


 All Posts (Aardwolf)
Re: DERALE Transmission Oil Pan for A4 700R and 4L60E - Photos and impressions |
||
|---|---|---|
|
Senior Guru
 
Joined:
2008/4/30 15:21 From Fremont, WI
Posts:
209
 |
To me it looks like the design went backwards. The design of the drain was perfect. Now it sticks down to far. There was no real reason to move it or change it. Look at the design on my pan. It's farther back but with the front of the car up all the fluid will run back there anyways. The nut is cut way down but there's still plenty to get a tool on.
The bung isn't really needed since you can go in the case for the sender. If that pan were mine I would close off the bottom drain. I'd probably weld a plate over it inside. Then use the bung for a drain and put the sender in the trans case. Due to heat I change the fluid once a year. Don't forget because of the plate/lip around the drain hole that not all sediment will drain out. Might want to drop the pan and clean it better once in awhile. For HPDE if you plan to go regularly I recommend synthetic trans fluid. I know Pete isn't a fan of the stuff but I've found it a big help road racing. With normal ATF I would get quite a bit of venting plus delayed shifting. Synthetic keeps the trans working good as temp climbs. I was over 280° at my last event. 
Posted on: 2011/5/6 14:58
|
|
 Transfer Transfer
|
 
|
|
Re: DERALE Transmission Oil Pan for A4 700R and 4L60E - Photos and impressions |
||
|---|---|---|
|
Senior Guru
Joined:
2008/4/30 15:21 From Fremont, WI
Posts:
209
|
Are you going to be road racing the car? Mine ran really cool on the street but it needs all the help it can get on the track. I bought a used pan from Pete and I don't like the look of that bottom drain setup on the new pan. It will really stick down! That plus the cost I would think putting that money into a big radiator would provide more gain. Unless you already have a big radiator with a good trans cooler in it. That's the next step for me. 150° for temp cruising around but 250° road racing.
Ground clearance pix: [IMG]http://i119.photobucket.com/albums/o130/Aardwolfki/Transmission/transpan3.jpg[/IMG] [IMG]http://i119.photobucket.com/albums/o130/Aardwolfki/Transmission/transpan1.jpg[/IMG] It becomes the lowest part of the vehicle.
Posted on: 2011/5/6 13:56
|
|
|
Transfer
|
|
|
Re: 4L60E Transmission Fluid & Cooler Line Routings (Sanity Check) |
||
|---|---|---|
|
Senior Guru
Joined:
2008/4/30 15:21 From Fremont, WI
Posts:
209
|
Quote:
Welcome! If the hard lines are still there using those into the top of the cooler is fine. I ran all new line to keep it away from the headers. My stock lines were getting pretty rusty and I didn't like the routing to well.
Posted on: 2011/5/6 12:20
|
|
|
Transfer
|
|
|
Re: 4L60E Transmission Fluid & Cooler Line Routings (Sanity Check) |
||
|---|---|---|
|
Senior Guru
Joined:
2008/4/30 15:21 From Fremont, WI
Posts:
209
|
Quote:
Not long after I got the car I installed one in the pan. I changed the fluid and filter then used the typical drain plug kit. Pic for location reference: [IMG]http://i119.photobucket.com/albums/o130/Aardwolfki/Transmission/transsensor.jpg[/IMG] After I had the trans rebuilt I used a port in the drivers side of the case. The sender is the same size as the plug so that was easy. I don't have a pic, I think it was by the governor.
Posted on: 2011/5/5 13:18
|
|
|
Transfer
|
|
|
Re: 4L60E Transmission Fluid & Cooler Line Routings (Sanity Check) |
||
|---|---|---|
|
Senior Guru
Joined:
2008/4/30 15:21 From Fremont, WI
Posts:
209
|
Quote:
Yes stock is routed that way. When I redid the system on mine I followed the tips at B&M. http://bmracing.com/bmracing/images/bm_cooler_techdoc.pdf Mount the B&M SuperCooler with the fittings on top or on the sides. It is not recommended to mount the cooler with the fittings pointing down as this may create an air pocket in the cooler resulting in reduced cooling efficiency. *** When mounting the cooler with the fittings on the right or left side, the lower fitting must be the inlet with the top fitting routing the fluid back to the transmission. ***
Posted on: 2011/5/5 13:11
|
|
|
Transfer
|
|
|
Re: 4L60E Transmission Fluid & Cooler Line Routings (Sanity Check) |
||
|---|---|---|
|
Senior Guru
Joined:
2008/4/30 15:21 From Fremont, WI
Posts:
209
|
Welcome! I saved the pic. I did some testing as I've gone through several trans configs. I had it not going through the radiator for awhile. It only ran slightly cooler and would get extremely hot in traffic. I didn't have a fan on the cooler though.
Posted on: 2011/5/4 20:25
|
|
|
Transfer
|
|
|
Re: 4L60E Transmission Fluid & Cooler Line Routings (Sanity Check) |
||
|---|---|---|
|
Senior Guru
Joined:
2008/4/30 15:21 From Fremont, WI
Posts:
209
|
Hey just saw this. It looks like you have the flow reversed on the trans but good elsewhere.
Bottom trans fitting is output flow to the bottom of the radiator cooler, top of radiator cooler to the bottom of the aux cooler. Top of the aux cooler to the top of the trans.
Posted on: 2011/5/4 13:58
|
|
|
Transfer
|
|
|
Re: Break Away Torque D44 Posi |
||
|---|---|---|
|
Senior Guru
Joined:
2008/4/30 15:21 From Fremont, WI
Posts:
209
|
I check that on mine once in awhile. I found it to hold 110 ft/lbs using the center 36 mm nut and torque wrench. Like you I also wondered about this, about what others found, and what the spec should be. I haven't found others to be checking the torque. I did talk to Brian about it, (bjankuski, not sure he is here) he works on differentials, he said at 110 it is good. He thought when it got down in the 40 range it would be bad. (jives with 40 min, I guess)
Posted on: 2011/4/21 17:38
|
|
|
Transfer
|
|
|
Re: Re-Installing Knock Sensors on an LT1 |
||
|---|---|---|
|
Senior Guru
Joined:
2008/4/30 15:21 From Fremont, WI
Posts:
209
|
Quote:
[IMG]http://i119.photobucket.com/albums/o130/Aardwolfki/Electrical/KS.jpg[/IMG]
Posted on: 2011/4/14 22:41
|
|
|
Transfer
|
|
|
Re: Re-Installing Knock Sensors on an LT1 |
||
|---|---|---|
|
Senior Guru
Joined:
2008/4/30 15:21 From Fremont, WI
Posts:
209
|
The knock sensor is one of several that do not get sealant. If needed use a little toward the very base of the sensor so the beginning threads are uncoated and can make a good ground.
Posted on: 2011/4/13 14:28
|
|
|
Transfer
|
|
|
Re: C4 frame flex |
||
|---|---|---|
|
Senior Guru
Joined:
2008/4/30 15:21 From Fremont, WI
Posts:
209
|
Quote:
Last I knew they were not winning.
Posted on: 2011/2/16 22:58
|
|
|
Transfer
|
|
|
Re: Another my C4 is a piece of $4!# car becuase it has a miss that comes on suddenly...... |
||
|---|---|---|
|
Senior Guru
Joined:
2008/4/30 15:21 From Fremont, WI
Posts:
209
|
Wow, go back and read the Seafoam can.
FYI: Sea Foam Motor Treatment is blended oil http://www.seafoamsales.com/tech-info-gas-engines/ USING in Crankcase Oil Sea Foam Motor Treatment may be used in an oil crankcase 2 separate ways, depending on your needs and expectations. Sea Foam Motor Treatment is most commonly used as a pre-service, old oil residue re-liquefier / cleaner and moisture drier. It can also be used as an after-service oil additive. In either application, Sea Foam Motor Treatment will safely and slowly re-liquefy old oil residue. Each method is described below: 1. As a pre service cleaner for old oil residue, sticky rings or valve train noise, pour 1 ½ ounces of Sea Foam Motor Treatment into the engine oil crankcase for EACH quart of oil capacity, including filter. Drive a MINIMUM of 30 minutes/miles, MAXIMUM 100 miles, and then do your oil change service Lube, Oil & Filter (LOF). This begins the process of safely/slowly re liquefying the old oil residue so contaminants may flow and be filtered. This also makes your old oil dirtier, quickly, so a LOF service is necessary when the oil gets dirty. Great for Turbocharged & Supercharged applications where oils deteriorate so quickly due to heat, and leave those residues that NEED CLEANING. 2. As an after service additive into fresh oil, nearly fresh oil, or oil (used condition) that is NOT ready to be changed (based on mileage since last oil change), put the same amount of Sea Foam Motor Treatment into the crankcase as described above, and then regularly monitor your oil for color and clarity. Set a predetermined schedule for checking the oil condition on a mileage, timed, or event basis (like every time you add fuel, etc.) to determine when an oil service is necessary. Monitoring of the oil for color and clarity will tell you when it is time to do an oil change service. NOTE: Do not exceed 3,000 miles without changing the oil. Sea Foam is safe to use with all synthetic oils. 100% synthetic oils, and blends of synthetic and petroleum-based oils, were engineered and are manufactured to be 100% compatible with petroleum based oils, all brands, and vice/versa. Without this compatibility, oil manufacturers and engineers would be liable for the results of mixing non-compatible lubricants. Since Sea Foam ONLY contains petroleum oils, it is entirely compatible with synthetic oils. Remember! When Using Sea Foam in Your Crankcase: * Check your oil and monitor its color & clarity to determine need for LOF service! * Change your oil when it gets dirty! http://www.seafoamsales.com/using-in-crankcase-oil.html
Posted on: 2011/2/14 22:49
|
|
|
Transfer
|
|
|
Re: Bad News |
||
|---|---|---|
|
Senior Guru
Joined:
2008/4/30 15:21 From Fremont, WI
Posts:
209
|
Quote:
I don't have an axe to grind about that but I believe temp data can go way way back further than that. Ice cores etc.
Posted on: 2010/10/21 19:30
|
|
|
Transfer
|
|
|
Re: Bad News |
||
|---|---|---|
|
Senior Guru
Joined:
2008/4/30 15:21 From Fremont, WI
Posts:
209
|
It's been warm and dry here. I saw this the other day:
2010 is warmest year-to-date on record http://www.fishnewseu.com/latest-news ... ar-to-date-on-record.html
Posted on: 2010/10/21 18:33
|
|
|
Transfer
|
|
|
Re: Bilstein Shocks |
||
|---|---|---|
|
Senior Guru
Joined:
2008/4/30 15:21 From Fremont, WI
Posts:
209
|
Quote:
Welcome! There are more on Vimeo: http://vimeo.com/user757222/videos Track events are a lot of fun. Maybe you can make it out to one. It's fun just to visit too. The events around here are free to spectate. Check out what people have done with the cars and visit.
Posted on: 2010/9/10 18:08
|
|
|
Transfer
|
|
|
Re: Bilstein Shocks |
||
|---|---|---|
|
Senior Guru
Joined:
2008/4/30 15:21 From Fremont, WI
Posts:
209
|
I've been thinking of going to the sport valve as well. Koni sports are another option. If you want to track the car just get out there and do it. If you want to go often start thinking about cooling, the auto will need a large cooler. I started out adding a shift kit to my auto. So it would hold the selected gear. At Road America I can if I choose to, do the whole track in third.
I built a push button shifter for fun, here's a video testing it out: http://www.youtube.com/watch?v=DqwoCvpTHXQ
Posted on: 2010/9/9 19:56
|
|
|
Transfer
|
|
|
Re: LT1 Mini ram from TPIS, interesting |
||
|---|---|---|
|
Senior Guru
Joined:
2008/4/30 15:21 From Fremont, WI
Posts:
209
|
Quote:
Some thoughts.. Is the only difference that there isn't a thermostat housing in the front? If so you could save a lot buying a normal used model and removing the housing or using block off plates for the openings (dizzy/'stat).
Posted on: 2010/9/7 19:09
|
|
|
Transfer
|
|
|
Re: Edged Weapon Experts? |
||
|---|---|---|
|
Senior Guru
Joined:
2008/4/30 15:21 From Fremont, WI
Posts:
209
|
A local smith passed away recently. He forged the Conan blades IIRC. There are some sales on his works here:
http://jodysamson.com/index.html There are some awesome works there!
Posted on: 2010/6/23 0:44
|
|
|
Transfer
|
|
|
Re: How to buy engine components? |
||
|---|---|---|
|
Senior Guru
Joined:
2008/4/30 15:21 From Fremont, WI
Posts:
209
|
He works at comp, the site listed above. I'm sure he gets a nice discount on parts, but doesn't pass it along. So he's making some there! He said comp has been selling a LOT of rotating assemblies. His co-worker hasn't had time for any other work. 5-8 per day!
I normally do as much work myself as I can but I had him build the rotating assembly. Once it was in the block I started putting it together. I'm pretty far, here's a pic: [IMG]http://i119.photobucket.com/albums/o130/Aardwolfki/engine1.jpg[/IMG]
Posted on: 2010/5/7 20:49
|
|
|
Transfer
|
|
|
Re: How to buy engine components? |
||
|---|---|---|
|
Senior Guru
Joined:
2008/4/30 15:21 From Fremont, WI
Posts:
209
|
I had a local race builder work on mine. This is a 355 with a 6" rod and a hot cam. I reused the stock crank. You could save money and reuse the rods. Also I used a forged piston, you can save cost there too. I thought of going 383 but that up classes me for racing. And I'm not sure about how the inexpensive ($280ish) Scat cranks hold up for road racing. I traded my door panels for the cam so that's not in the bill either. Here is the bill:
[IMG]http://i119.photobucket.com/albums/o130/Aardwolfki/bill.jpg[/IMG] He said he would charge $75 for 383 clearance work. It looks like a 355 can be built around $1000 and about $1500 for a 383 short block, assembled. Pete, it looks like he charges similar to you just in different ways. More for balancing but less for assembly.
Posted on: 2010/5/7 19:55
|
|
|
Transfer
|
|
|
Re: I-Pod "Ripper" |
||
|---|---|---|
|
Senior Guru
Joined:
2008/4/30 15:21 From Fremont, WI
Posts:
209
|
No prob! It's just Itunes for the PC. You plug the Ipod into the computers USB then start Itunes on the computer and the two sync. Here is the download site:
http://www.apple.com/itunes/download/
Posted on: 2010/5/4 19:54
|
|
|
Transfer
|
|
|
Re: I-Pod "Ripper" |
||
|---|---|---|
|
Senior Guru
Joined:
2008/4/30 15:21 From Fremont, WI
Posts:
209
|
My partner has one and I set up the Itunes program on here. Just have it set to sync and as soon as you plug the Ipod into the computer it will make the library on each, equal. She downloads songs on the Ipod than sometimes wants to play them on this computer, the sync feature works well. Sync is probably enabled in Itunes by default but you can check in options, on the computer you wish to transfer the music to.
Posted on: 2010/5/4 13:05
|
|
|
Transfer
|
|
|
Re: A Quick Product Review - Dewitts Radiator |
||
|---|---|---|
|
Senior Guru
Joined:
2008/4/30 15:21 From Fremont, WI
Posts:
209
|
Was the A/C on? My old stock radiator keeps the car at 185° at the same cruise.
Posted on: 2010/5/2 14:26
|
|
|
Transfer
|
|
|
Re: Almost Virgin Drag Racer -- Help |
||
|---|---|---|
|
Senior Guru
Joined:
2008/4/30 15:21 From Fremont, WI
Posts:
209
|
Your tires will grip better if they get warm. A small burn out will also clean them off. At the light bring the idle up slightly till the car wants to move. This will help keep wheel spin down. Roll into the throttle rather then mash it. You don't want TO much wheel spin.
Posted on: 2010/4/28 15:52
|
|
|
Transfer
|
|
|
Re: ok 84 c4 z51 - Rack Problem |
||
|---|---|---|
|
Senior Guru
Joined:
2008/4/30 15:21 From Fremont, WI
Posts:
209
|
Measuring Toe
Toe is measure by measuring the difference in track between the front of your tires, and the rear of the same tires. You can use toe-plates, but I fine a straight edge and a tape measure works just fine. My method is great for the solo mechanic. 1. I measure my difference where the rim and tire meet. It is far enough away from the tire bulge but not so far out that you are on the face of the tire. See location of ruler in picture below. Slide tape under car, and ensure it is in this position on both sides of car. 2. Once tape is under vehicle, hold straight edge firmly against the tire and pull tape firmly against it. The tape should sit firmly on the ground, and should hold its position when you remove the straight edge. 2. Go to the other side of the vehicle. Hold straight edge in exactly the same position (where tire and rim meet), and slide the straight edge down against the tape measure. Read where the two touch, on the shorter side of the tape. In this example, it is 67 ¾ www.davidfarmerstuff.com please support my site via paypal link on homepage 4. Repeat steps 1-3 on the back of the same 2 wheels. Measure that distance and simply calculate the difference. For instance, if the front of the tire measure 67 ¾ and the rear measure 68 ¼, then your tires would be toed-in ½ TOTAL.
Posted on: 2010/4/16 0:02
|
|
|
Transfer
|
|
|
Re: ok 84 c4 z51 - Rack Problem |
||
|---|---|---|
|
Senior Guru
Joined:
2008/4/30 15:21 From Fremont, WI
Posts:
209
|
I am replacing the rack on mine as well and I've also wondered about aligning it. I plan to set the new rack as close to the old one as possible then check the alignment myself. You need only worry about the toe settings which are pretty easy. It's not like you'll be doing a full four wheel alignment. A quick toe and go at a shop would likely be fairly cheap though, $60?
Here follow the directions at this link: http://www.davidfarmerstuff.com/align.pdf
Posted on: 2010/4/15 17:45
|
|
|
Transfer
|
|
|
Re: Can't pull any codes |
||
|---|---|---|
|
Senior Guru
Joined:
2008/4/30 15:21 From Fremont, WI
Posts:
209
|
The fan doesn't normally run at turn on. It should run continuous when A and B are jumped and the ignition is on but the car not running. Does the SES light ever go on? If not check the bulb. Here is the pin out:
[IMG]http://i119.photobucket.com/albums/o130/Aardwolfki/ALDL.jpg[/IMG]
Posted on: 2010/4/14 18:36
|
|
|
Transfer
|
|
|
Re: Got my rearend serviced |
||
|---|---|---|
|
Senior Guru
Joined:
2008/4/30 15:21 From Fremont, WI
Posts:
209
|
Quote:
That's right, the black isn't dirt it's moly. If it wasn't black you should be concerned!
Posted on: 2010/4/9 18:00
|
|
|
Transfer
|
|
|
Re: Van Steel Coilovers for my 85 |
||
|---|---|---|
|
Senior Guru
Joined:
2008/4/30 15:21 From Fremont, WI
Posts:
209
|
I totally agree with the above. I'd look at sway bars, good shocks, sway bar heim links, heim links for the rear suspension, corner weigh/chassis setup. Put zerks in so you can lube the suspension bushings. I've found it doesn't take long before the sway bars become dampeners. Before anything budget for seat time.
Posted on: 2010/3/2 23:34
|
|
|
Transfer
|
|
|
Re: Post Your Favorite Picture Of Your Corvette |
||
|---|---|---|
|
Senior Guru
Joined:
2008/4/30 15:21 From Fremont, WI
Posts:
209
|
[IMG]http://i119.photobucket.com/albums/o130/Aardwolfki/IMG9447.jpg[/IMG]
Posted on: 2010/2/26 1:36
|
|
|
Transfer
|
|
|
Re: Corvette Fever Tests Corvettes In AeroDyn's Wind Tunnel |
||
|---|---|---|
|
Senior Guru
Joined:
2008/4/30 15:21 From Fremont, WI
Posts:
209
|
This help any?
[IMG]http://i119.photobucket.com/albums/o130/Aardwolfki/aerobook.jpg[/IMG]
Posted on: 2010/2/25 17:20
|
|
|
Transfer
|
|
|
Re: Van Steel Coilovers for my 85 |
||
|---|---|---|
|
Senior Guru
Joined:
2008/4/30 15:21 From Fremont, WI
Posts:
209
|
From what I have seen, stock versus coil overs on track cars. The ones with coil overs do not win more often. For the money I have have a shop tweak the suspension, corner weigh, etc.
Posted on: 2010/2/25 17:18
|
|
|
Transfer
|
|
|
Re: 113 head chamber question |
||
|---|---|---|
|
Senior Guru
Joined:
2008/4/30 15:21 From Fremont, WI
Posts:
209
|
I took them along with me when I dropped off the short block. My builder thought they should be done again, a .005 shave he was thinking.
Not a heat sink, an actual block to prevent fuel from going onto the plug. I don't know for sure if it's there because of a wet flow issue or not. I'll ask my builder what his thoughts are.
Posted on: 2010/2/20 16:56
|
|
|
Transfer
|
|
|
Re: 113 head chamber question |
||
|---|---|---|
|
Senior Guru
Joined:
2008/4/30 15:21 From Fremont, WI
Posts:
209
|
Quote:
The heads I got from you? I took pictures. They didn't do much in the combustion chamber. I have them off and was thinking of touching that area up. [IMG]http://i119.photobucket.com/albums/o130/Aardwolfki/Porting/head4.jpg[/IMG] It could be there to have something to do with keeping the plug at an even temp. Not having it fouled or cooled by gas.
Posted on: 2010/2/20 15:51
|
|
|
Transfer
|
|
|
Re: Olympics thread |
||
|---|---|---|
|
Senior Guru
Joined:
2008/4/30 15:21 From Fremont, WI
Posts:
209
|
Quote:
Uhh my first thought on that mod is gross. There would be a vent hole left..
Posted on: 2010/2/17 17:03
|
|
|
Transfer
|
|
|
Re: New Wheels for Track Days |
||
|---|---|---|
|
Senior Guru
Joined:
2008/4/30 15:21 From Fremont, WI
Posts:
209
|
They were chrome? I don't believe they were stock, did the person have them chromed? They could be the heavy aftermarket repo's too.
Posted on: 2010/2/8 18:28
|
|
|
Transfer
|
|
|
Re: mod. to the l98 A.I.R. pulley |
||
|---|---|---|
|
Senior Guru
Joined:
2008/4/30 15:21 From Fremont, WI
Posts:
209
|
I'm surprised you didn't make a bracket to move the alternator up instead, thus doing away with all air pump mess. That is really well made, good work!
Posted on: 2010/2/8 18:26
|
|
|
Transfer
|
|
|
Re: Favorite Brake Pads, Rotors and Fluid for AX and HPDE and why? |
||
|---|---|---|
|
Senior Guru
Joined:
2008/4/30 15:21 From Fremont, WI
Posts:
209
|
Quote:
I had the same experience. I would not ever use HPS or stock Z06 pads for track use. My first track event at Road America I had HPS on for so I always recommend track pads. Use the HPS for autox and get some track pads for VIR.
Posted on: 2010/2/4 17:18
|
|
|
Transfer
|
|
|
Re: wait for it to be above freezing before washing DD? |
||
|---|---|---|
|
Senior Guru
Joined:
2008/4/30 15:21 From Fremont, WI
Posts:
209
|
I used to spritz some WD40 in the locks before winter but I've been to busy to take care of all the cars here now. There have been zero problems with frozen locks.
Posted on: 2010/1/12 20:00
|
|
|
Transfer
|
|
|
Re: wait for it to be above freezing before washing DD? |
||
|---|---|---|
|
Senior Guru
Joined:
2008/4/30 15:21 From Fremont, WI
Posts:
209
|
It's fine to wash a vehicle in the cold. It's freezing around here for months and it's very common to wash the salt off in car washes.
Posted on: 2010/1/12 18:36
|
|
|
Transfer
|
|
|
Re: Help removing SuperRam |
||
|---|---|---|
|
Senior Guru
Joined:
2008/4/30 15:21 From Fremont, WI
Posts:
209
|
The casting on the SR isn't very good. When I take the lid off mine I use scraper between the lid and TB flange.
Posted on: 2010/1/6 0:38
|
|
|
Transfer
|
|
|
Re: Help removing SuperRam |
||
|---|---|---|
|
Senior Guru
Joined:
2008/4/30 15:21 From Fremont, WI
Posts:
209
|
Well if it was normal RTV I'd say pry harder. With the right stuff though I'm not sure it wouldn't hold and the metal crack. I've never used it. You could try soaking it with some solvent, thinner/brake cleaner or whatever.
Posted on: 2010/1/5 23:46
|
|
|
Transfer
|
|
|
Re: Dana 36 Guru's step inside |
||
|---|---|---|
|
Senior Guru
Joined:
2008/4/30 15:21 From Fremont, WI
Posts:
209
|
Well, last time I worked on that I left the brake off and torqued the rear axle nut just to see what torque it would move at. 110 ft/lbs made the axle turn, I then applied the brake to get to full torque. I'd be curious what others have found for when it slips.
Posted on: 2010/1/2 20:10
|
|
|
Transfer
|
|
|
Re: 30 dollar 12HP+ air foil? |
||
|---|---|---|
|
Senior Guru
Joined:
2008/4/30 15:21 From Fremont, WI
Posts:
209
|
Sure, I'll take a pic. I can take a picture of about anything on the car, it's all in pieces right now.
Clearly not every air foil is the same. I've seen several designs. Remember the plastic one? That was common for awhile. The foil in my photo came to me on a LTR setup I bought several years ago. Before I reinstall it I think I will grind out the back of it for more fresh air. In the picture of the back of the TB, the drivers side circle is for the gas evap system. The TB cover has a boss that sticks down and seals that from the PCV system, pictured at the top. The drivers side circle, I'm not sure what that's for. I drilled and tapped that hole with a bolt in it some years back, I can remember what I had attached there. Could work for NOS or water injection? [IMG]http://i119.photobucket.com/albums/o130/Aardwolfki/tbair4.jpg[/IMG]
Posted on: 2009/12/18 0:27
|
|
|
Transfer
|
|
|
Re: 30 dollar 12HP+ air foil? |
||
|---|---|---|
|
Senior Guru
Joined:
2008/4/30 15:21 From Fremont, WI
Posts:
209
|
The cut in the back of the air foil is tiny. The air hole in the top of the throttle body must be 1000x the size. I don't believe that small cut could be helping the system work. I'll take a picture.
[IMG]http://i119.photobucket.com/albums/o130/Aardwolfki/tbair3.jpg[/IMG] The fresh air looks to be 3/8" and that cut around 1/16". It looks like it could be enlarged quite a bit though.
Posted on: 2009/12/17 20:28
|
|
|
Transfer
|
|
|
Re: 30 dollar 12HP+ air foil? |
||
|---|---|---|
|
Senior Guru
Joined:
2008/4/30 15:21 From Fremont, WI
Posts:
209
|
Interesting discussion!
Fact, new throttle bodies have the air foil made right in. Fact, new throttle bodies have a hole for the fresh air PCV system. Picture: 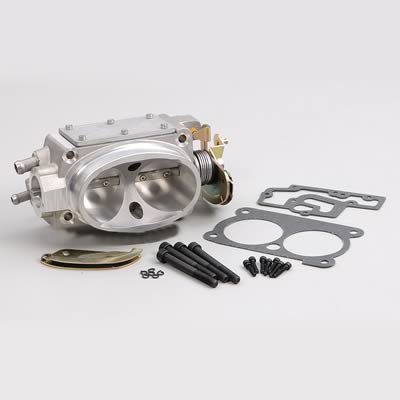 Fact, the air foil of that type totally blocks the fresh air PCV. But could be modified to work well. The mounting piece of metal is made to only take up half the diameter of the fresh air opening. A hole could be drilled in the air foil to let the system function normally. Picture: [IMG]http://i119.photobucket.com/albums/o130/Aardwolfki/tbair1.jpg[/IMG] In regards to a breather for the fresh air, some say that is unmetered air on a MAF system and should be tuned for. Others disagree.
Posted on: 2009/12/17 19:13
|
|
|
Transfer
|
|
|
Re: Engine Hoist Chain |
||
|---|---|---|
|
Senior Guru
Joined:
2008/4/30 15:21 From Fremont, WI
Posts:
209
|
I thought of getting one too but decided not to, since the rebuild bill is high. I had zero trouble without one.
Posted on: 2009/11/21 23:40
|
|
|
Transfer
|
|
|
Re: Engine rebuild/upgrade project |
||
|---|---|---|
|
Senior Guru
Joined:
2008/4/30 15:21 From Fremont, WI
Posts:
209
|
Might want to use a 6" or 6.125" rod if new rods are in the budget.
Posted on: 2009/11/21 16:01
|
|
|
Transfer
|
|
|
Re: Engine Hoist Chain |
||
|---|---|---|
|
Senior Guru
Joined:
2008/4/30 15:21 From Fremont, WI
Posts:
209
|
I pulled my engine last week and got some chain at Harbor Freight. It was $2 per foot (three needed) and heavier chain.
Posted on: 2009/11/21 15:59
|
|
|
Transfer
|
|
|
Re: Cyber attack |
||
|---|---|---|
|
Senior Guru
Joined:
2008/4/30 15:21 From Fremont, WI
Posts:
209
|
Thirdgen was down too.
Posted on: 2009/11/15 21:41
|
|
|
Transfer
|
|
|
