|
|
|
|
|
Register To Post |
| Matatk | Pumpkin swap/u-joints/wheel bearings/suspension junk (PICS!) | ||
|
Webmaster
 
|
OK....here's my saga. I'm not done yet, so this thread will be a work in progress.
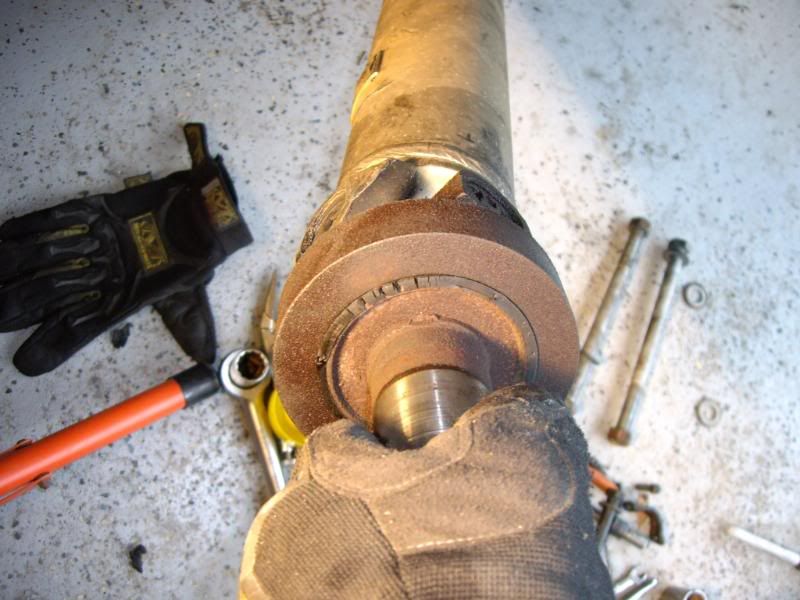
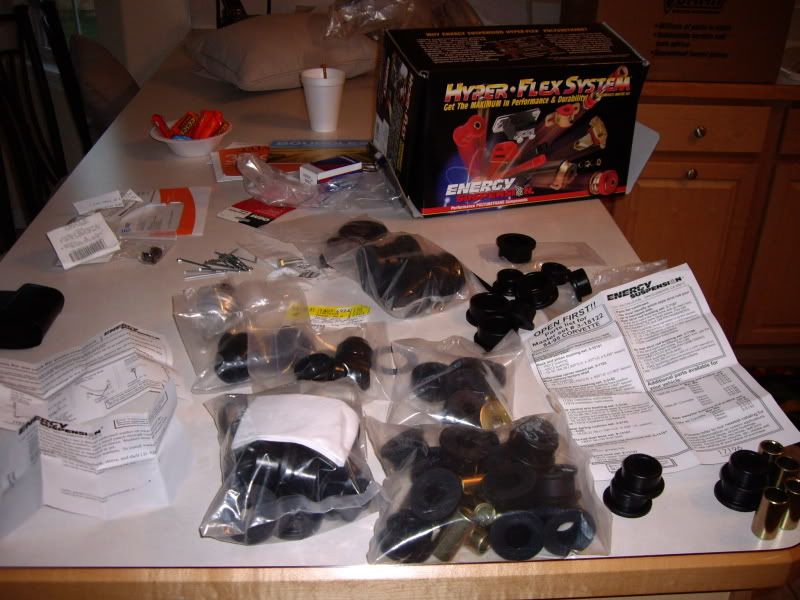
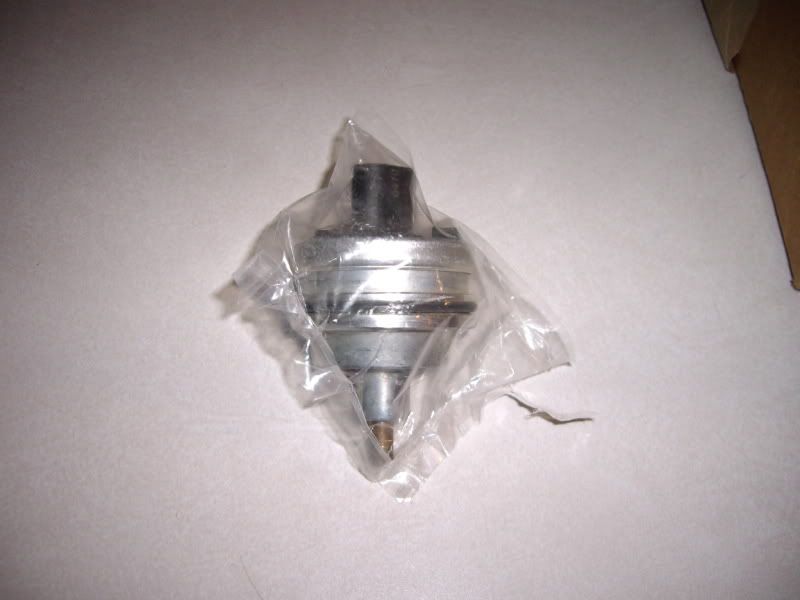
When I started this, I knew if would be a lot of work, I knew it would be time consuming, I knew it would be a PIA. And I was right. I started working this morning and got a solid day's work in. 20 years of corrosion and dirt did not make the job any easier. I'll give some commentary along the way. Some stuff to get started: 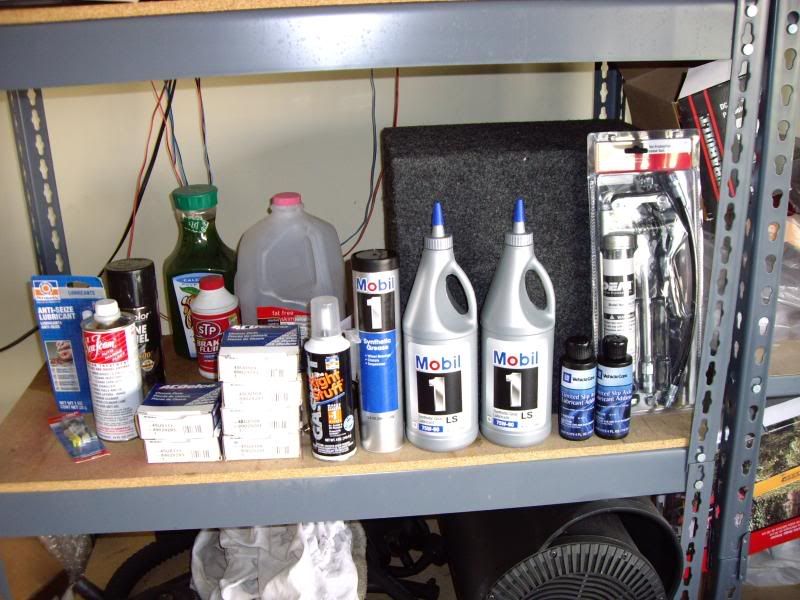 On jackstands, spare tire & carrier removed: 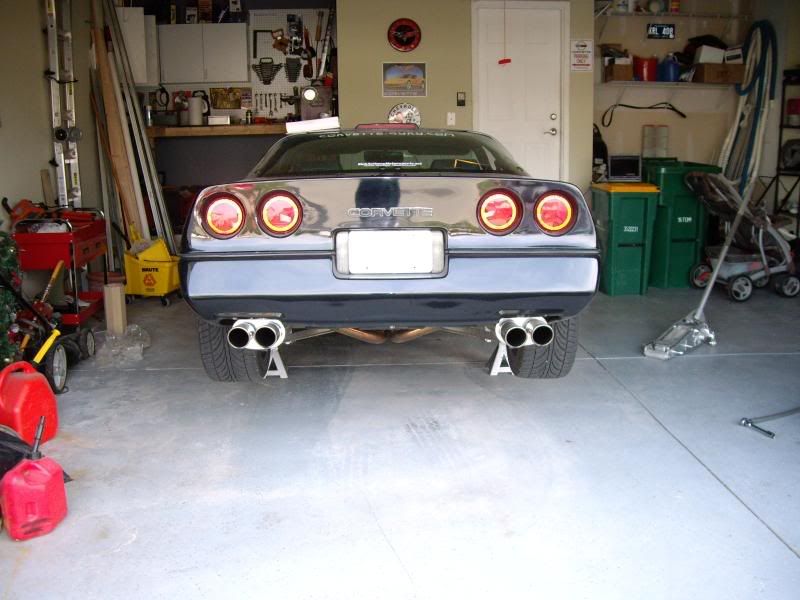 Underneath shot: 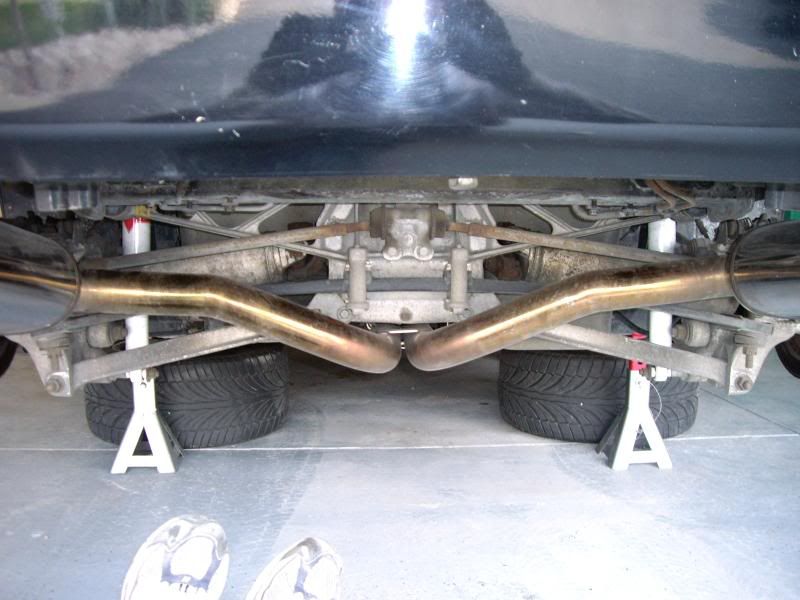 Exhaust removed: 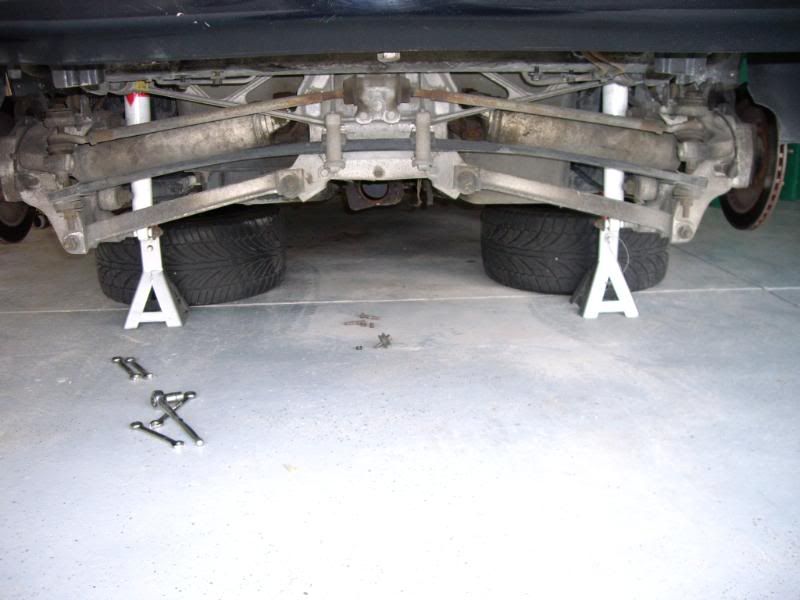 I then removed the 3 bolts attaching the tortion bar to the batwing but didn't take a photo. I photographed the spring shims just in case: 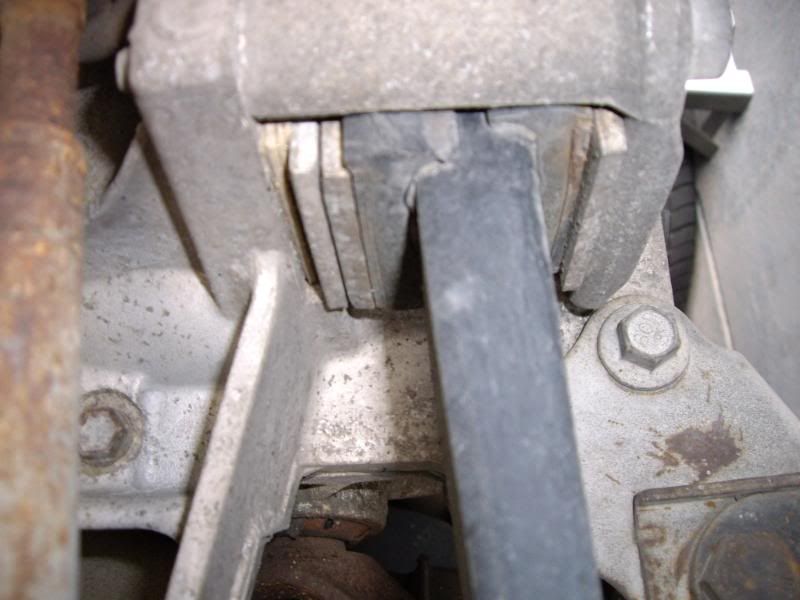 Supporting the spring with a jack to remove the bolts (probably not the safest!): 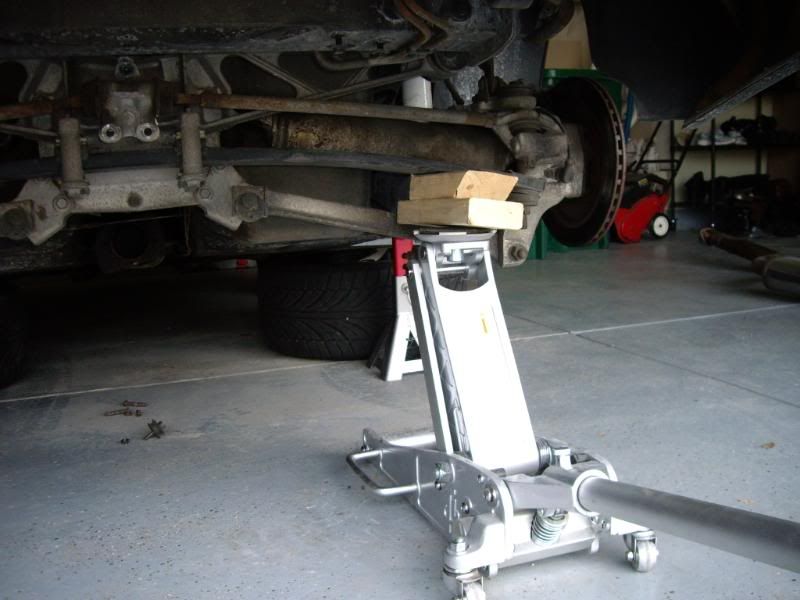 Spring is gone: 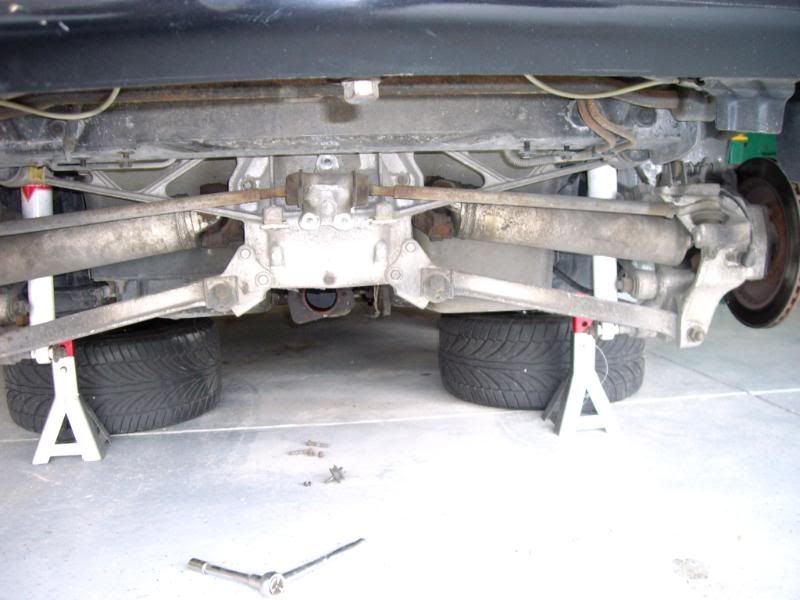 I followed Andy's (95vette) advice and removed the bolts attaching the camber rods and let them hang down as opposed to the camber bolts - this will help maintain alignment. 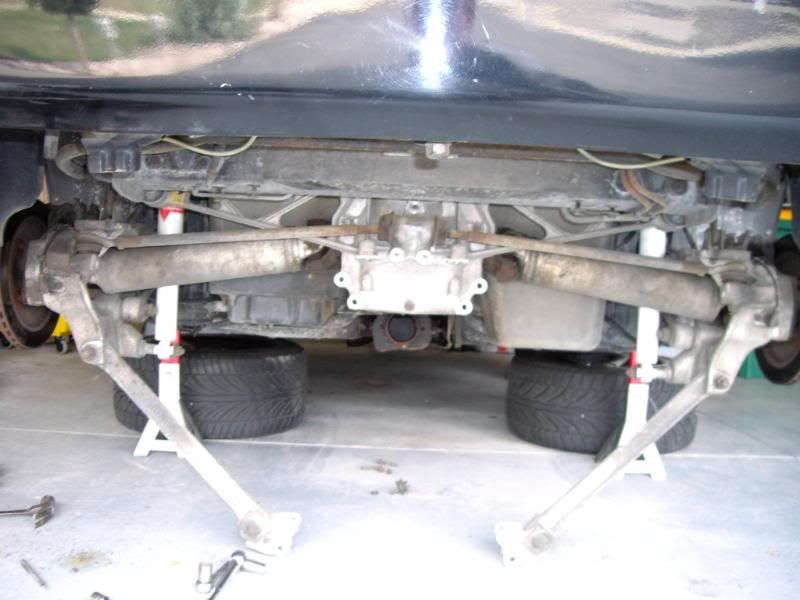 No pictures of me unbolting the u-joint straps but they are a B! 5/16th socket/wrench are required for this. Be prepared to fight years of corrosion. After you do one side, rotate the halfshaft/driveshaft by putting the car in neutral, turning them by hand, then putting the car back in park. After undoing all the bolts, push out at the wheels (rotors) to give enough room to wiggle the shafts free: 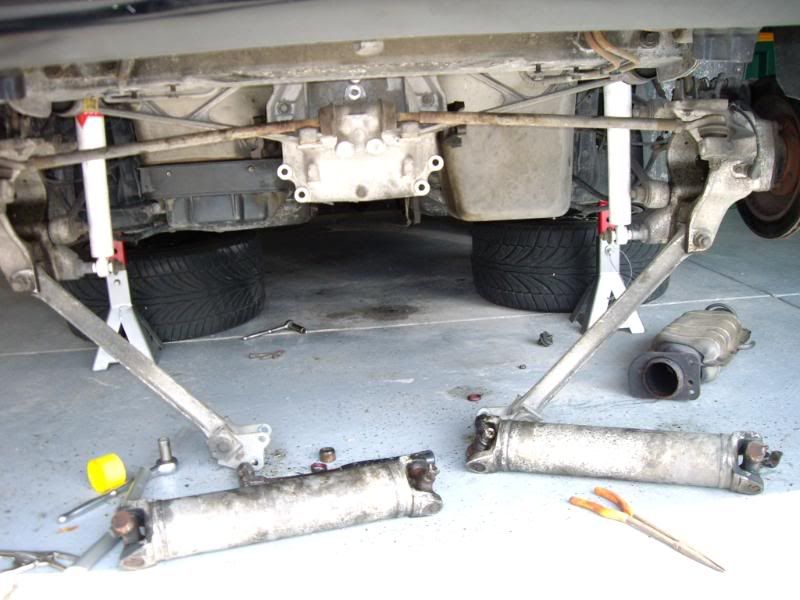 My nasty u-joints: 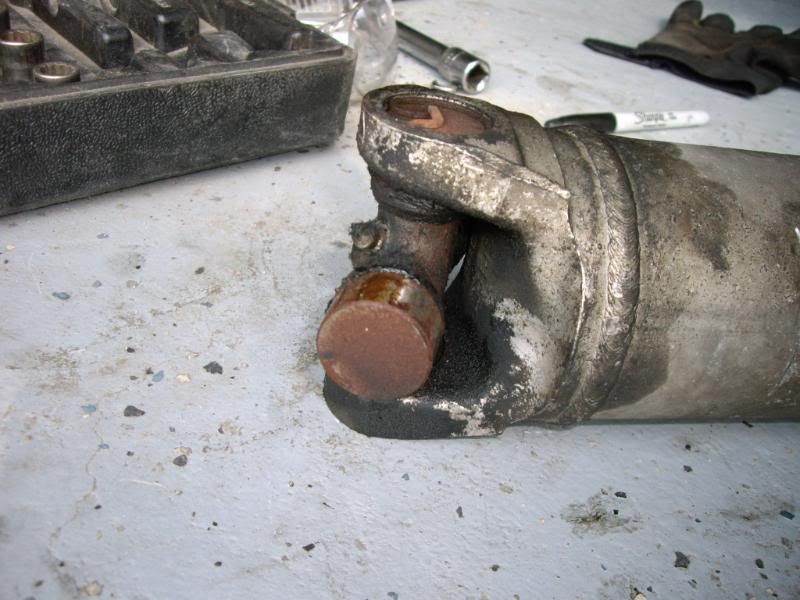 Unbolt the two long bolts attaching the d36 to the c-beam. They are a PIA. Then remove the two large bolts holding the batwing in. Make sure the batwing is supported underneath with a jack (and use the correct one and chain it, unlike my picture!) Also, I supported the trans with a jack and a large board underneath the pan. 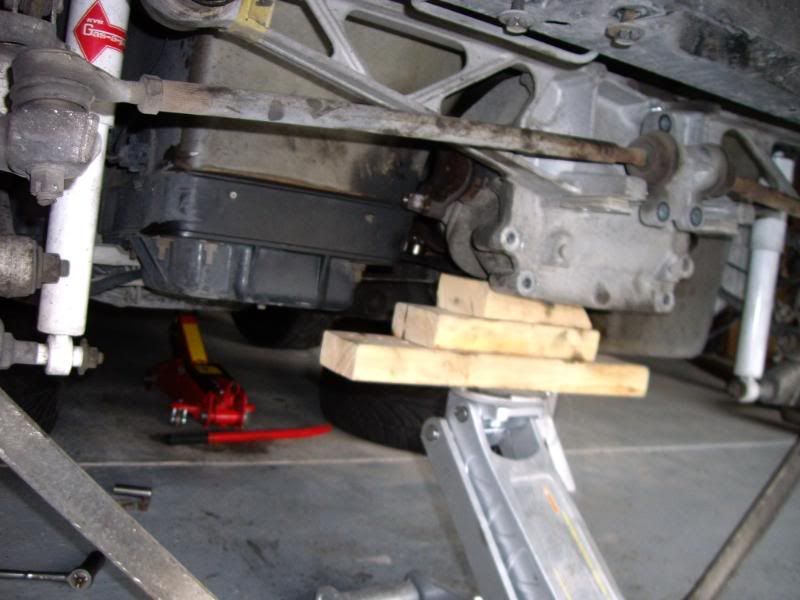 Old one out: 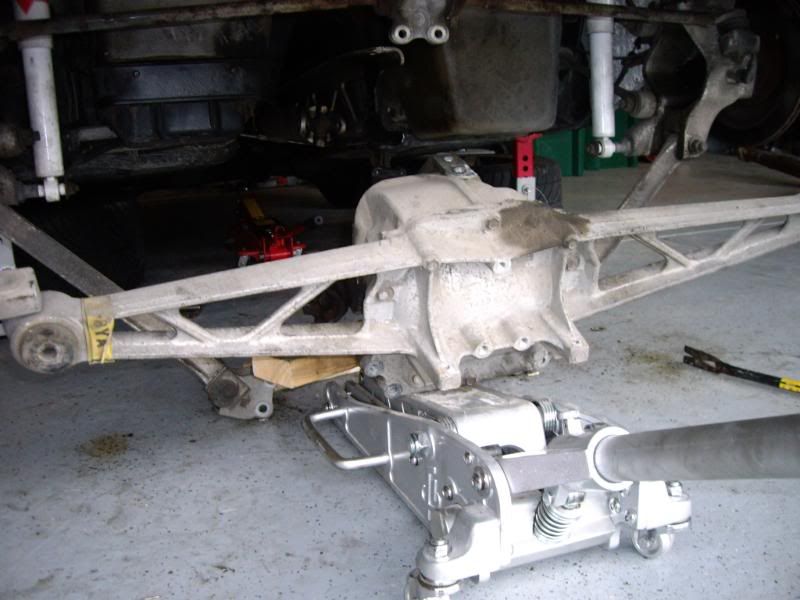 Driveshaft can be wiggled out once the d36 is out: 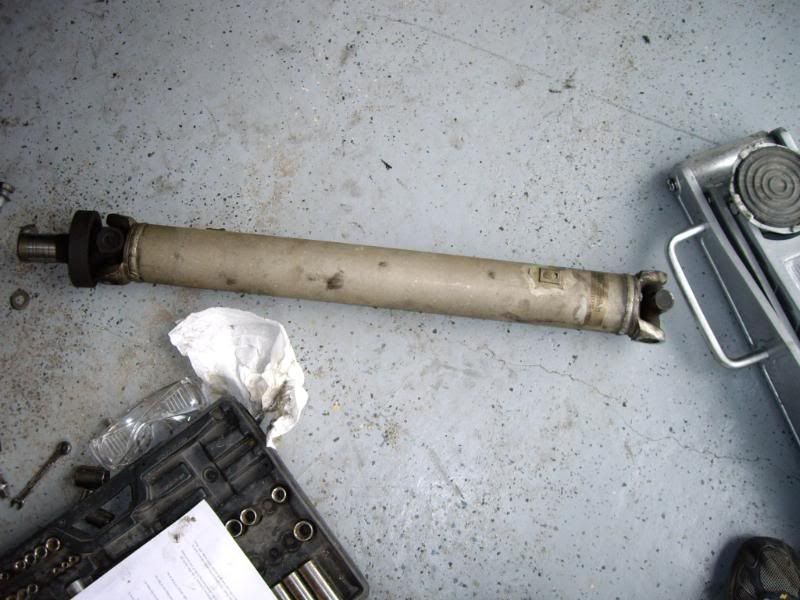 How's it look? Doesnt look worn to me, seal looks ok: 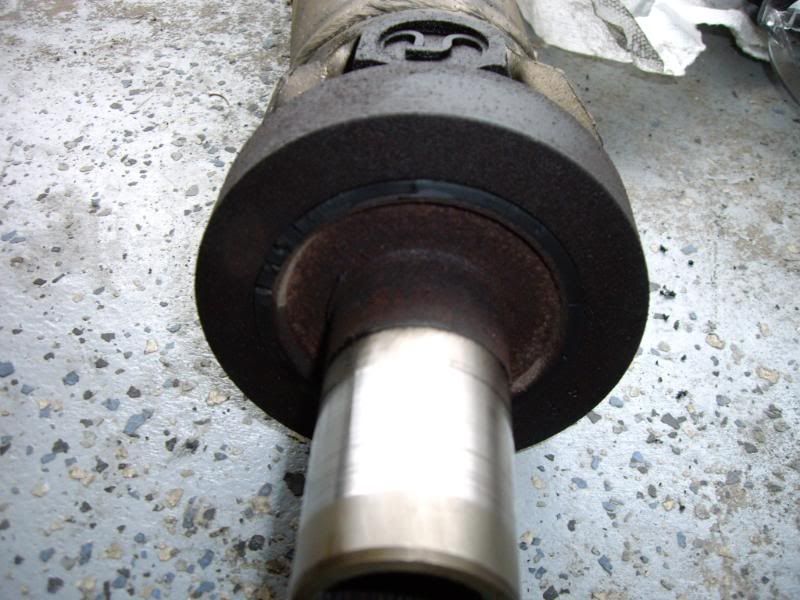 Shot of the rear of the trans, c-beam still attached: 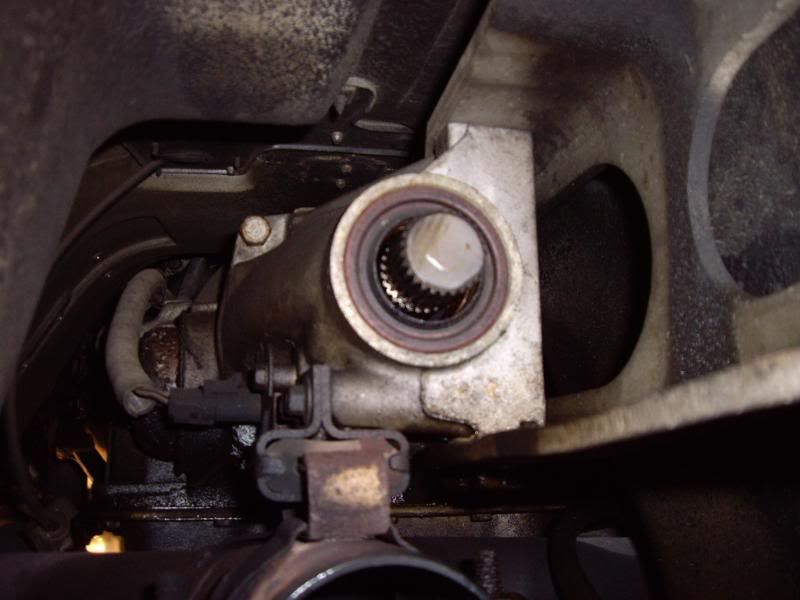 New gear I was *supposed* to install: 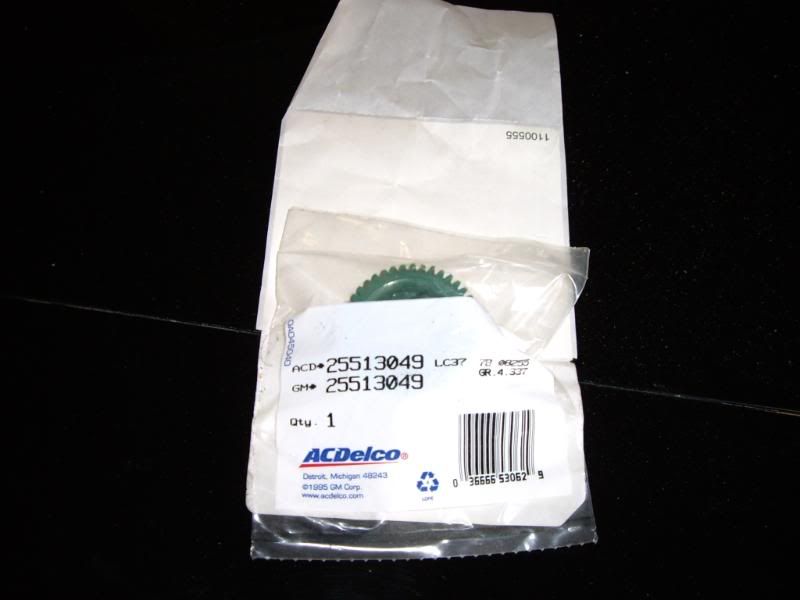 Vehicle speed sensor: 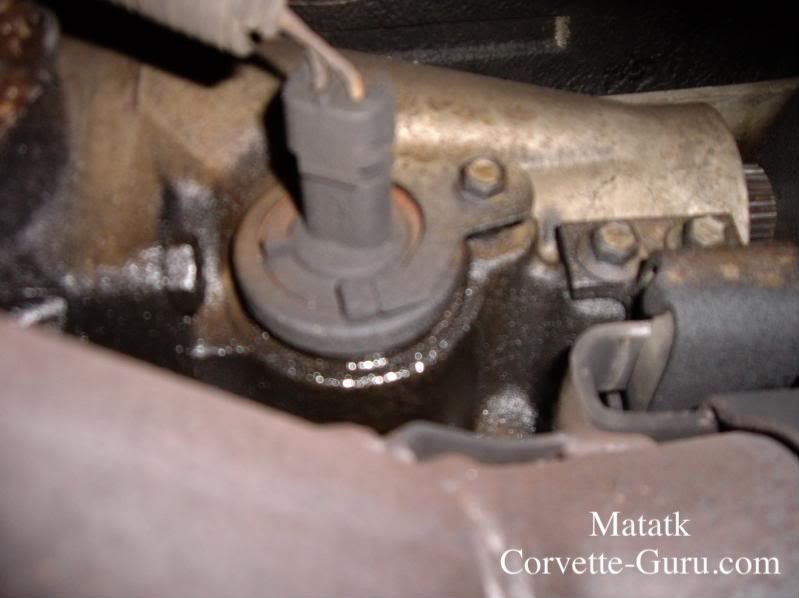 Broken VSS: 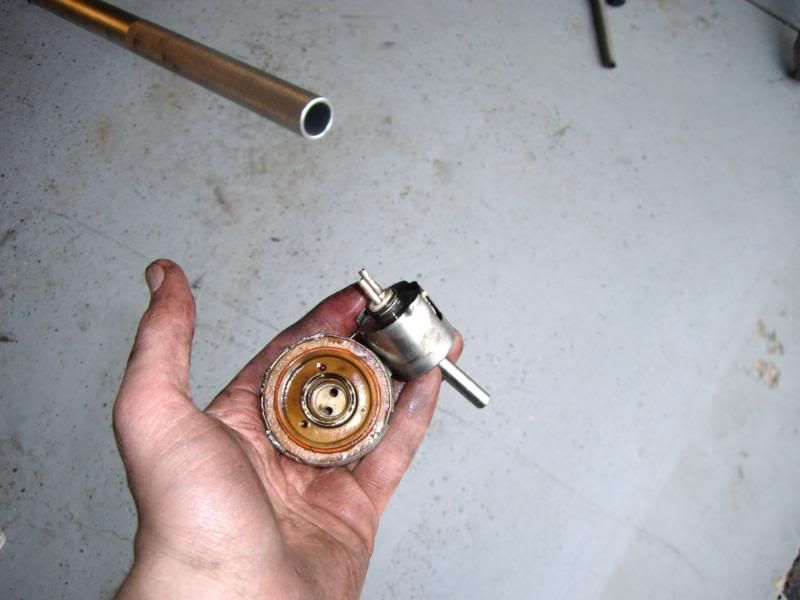 What it should look like: 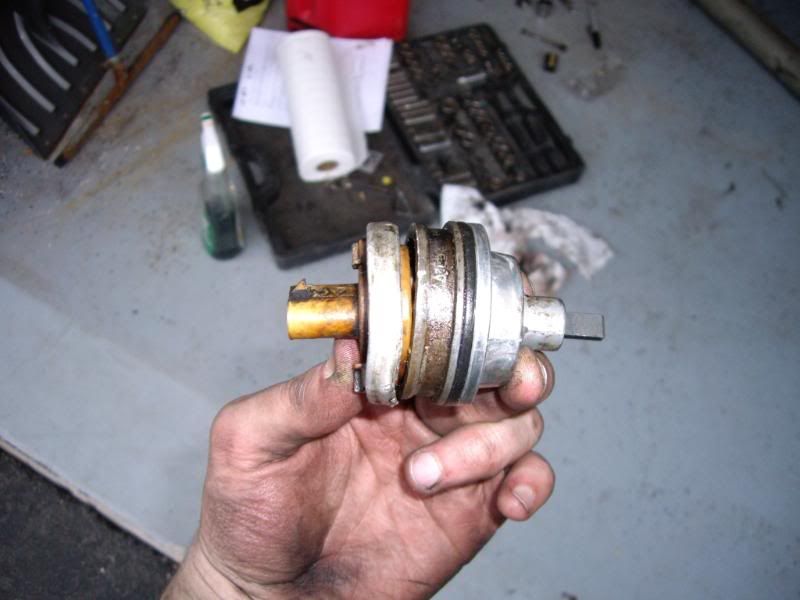 C-beam removed. Still a PIA to get those two bolts out: 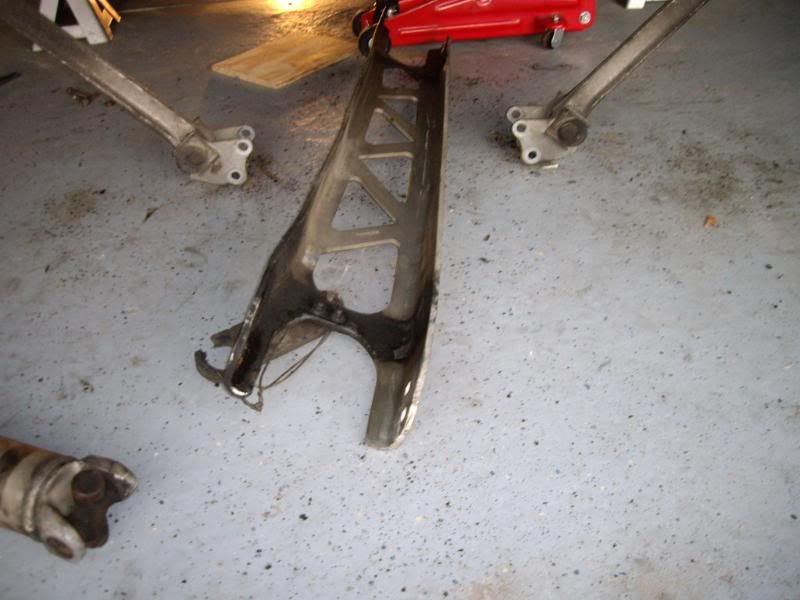 Evil bolts: 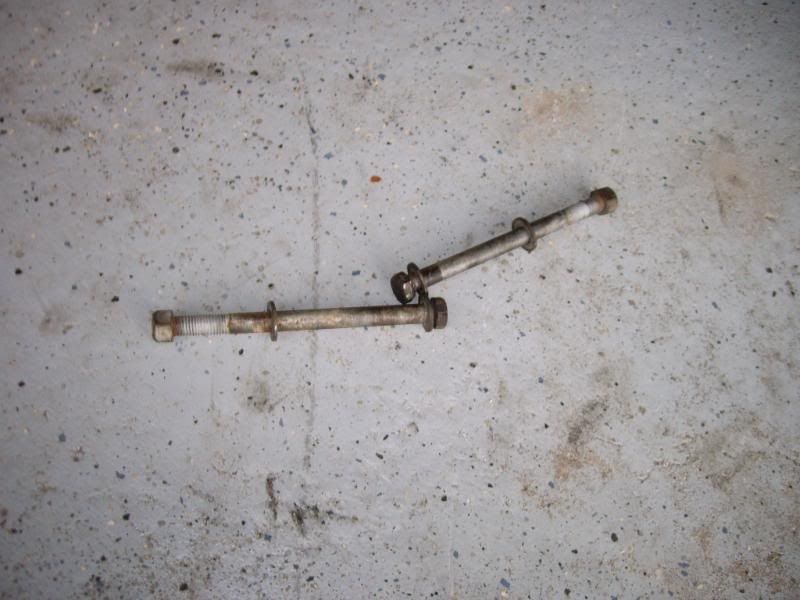 Transmission tailshaft housing removed: 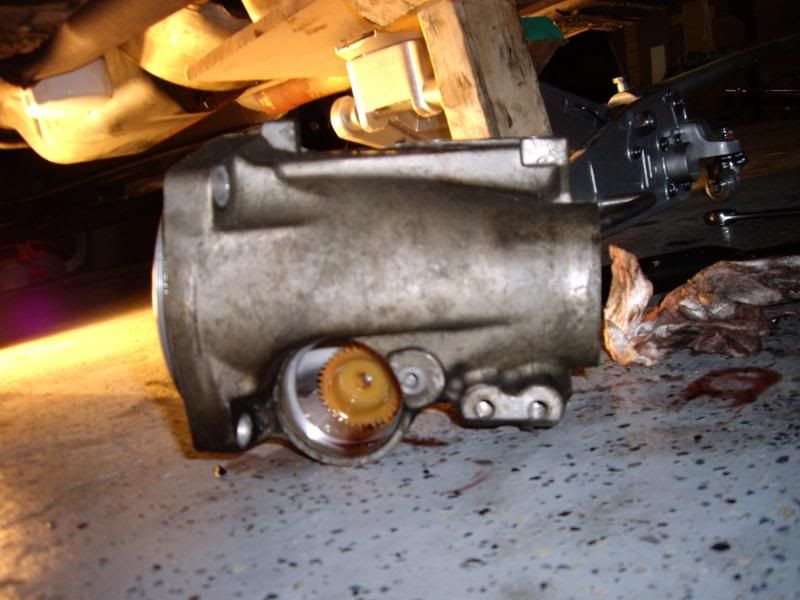 Tailshaft: 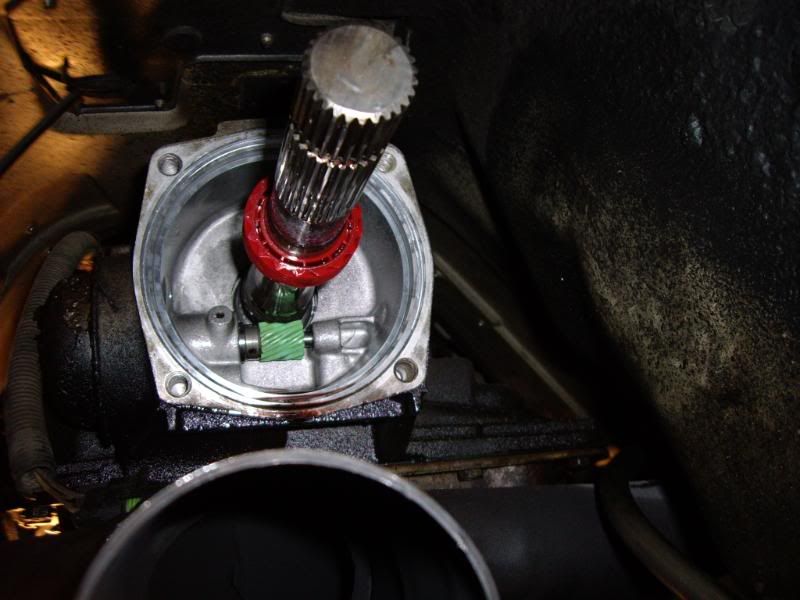 Overall not a bad day. Kinda PO'd I broke the sensor, but oh well. It's 20 years old. Now the problem is I'm doing the "well, since I'm in here" and considering polyurethane, etc, etc. Dangerous thoughts. I'll post more as I go along. Slowly but surely wins the race! Matthew |
||
Posted on: 2009/4/19 3:16
|
|||
|
_________________
2002 EBM convertible, Magnusson supercharger, cam, headers, etc. 1989 Corvette...RIP |
|||
 Transfer Transfer
|
|||
| bogus | Re: Pumpkin swap/u-joints/wheel bearings/suspension junk (PICS!) | ||
|
Grand Imperial Pooh-Bah
 |
looking GREAT!
Lotsa work. Wanna make the c-beam bolts easier to deal with? Get Beam Plates. http://www.zfdoc.com/c4beamplate.htm I have them and are really happy with them. Get the new VSS... you will be a happy camper. I would consider doing poly for the batwing... I think you will like it. If you can, I would clean everything thoroughly. It will just look nicer. I would also do a drain for the diff now that it is apart. Another thought... coat the underside of the car with truck bed liner. I have been using it on my inner fenders and plan on coating the under floor. My thinking is that it will act as a sound deadener. |
||
Posted on: 2009/4/19 5:56
|
|||
|
_________________
The single biggest problem with communication is the illusion that it has taken place. - George Bernard Shaw Education is the best tool to overcome irrational fear. - me |
|||
 Transfer Transfer
|
|||
| 1Fast04Vert | Re: Pumpkin swap/u-joints/wheel bearings/suspension junk (PICS!) | ||
|
Elite Guru
 |
That is very good progress for one man working on the floor. I had a lift and a friend helping and it took about 4-5 hours, plus I did not have to change the speedo gear. If you want to clean up the parts just use some fine steel wool and they will clean up and shine up very quickly.
Looking good! If you are thinking about changing the bushings in the rear suspension now is the time. ps-- the ujoint strap bolts are actually 8mm heads, but the 5/16" socket works fine. |
||
Posted on: 2009/4/19 12:15
|
|||
|
_________________
2004 Vert. 475hp. Built by Vengeance Racing |
|||
 Transfer Transfer
|
|||
| PeteK | Re: Pumpkin swap/u-joints/wheel bearings/suspension junk (PICS!) | ||
|
Moderator
 
|
The pic may be deceiving, but the governor gear looks shot. I would suggest changing it now anyway, as it is the old green, problematic gear. I would also suggest a new teflon rear tail housing bushing and seal.
I just read your pm, and will try to give you a call later. Today is the only day I am home, and wife has some plans. |
||
Posted on: 2009/4/19 13:56
|
|||
|
_________________
"It was really on a pass until it came apart." "Yeah. They always are." |
|||
 Transfer Transfer
|
|||
| pianoguy | Re: Pumpkin swap/u-joints/wheel bearings/suspension junk (PICS!) | ||
|
Guru Emeritus
 
|
Great work, Matt! Yep, the old "while I'm in there" bug will indeed bite, but then again, you probably won't be in there too often ;-)
I'll second the recommendation for the beam plates - everybody who has them swears by 'em, and they also include some shims to help align the c-beam. |
||
Posted on: 2009/4/19 14:31
|
|||
|
_________________
1996 LT4 �Before you criticize someone, you should walk a mile in their shoes. That way when you criticize them, you are a mile away from them and you have their shoes.�- Jack Handey |
|||
 Transfer Transfer
|
|||
| Matatk | Re: Pumpkin swap/u-joints/wheel bearings/suspension junk (PICS!) | ||
|
Webmaster
 
|
Quote:
Thanks, Pete, is the governor gear the horizontal green one? I'm a dummy except when I'm actually working with my hands then I'm ok. Where can I get a new teflon rear tail housing bushing set? Can I replace the governor gear w/o replacing the governor assembly? Looks like they sell both? On a semi positive note, I found a replacement VSS that is actually the correct 3.07 one (no flipping it 180*) for $45. Looks aftermarket (standard products), but if it works I could care less. As far as the c-beam plates I've read good things about them. However, I am not willing to pay $200 for them. That's just crazy for what they actually are. Oh well. I'll be doing a little more work today. Thanks for the encouragement. Is this the governor gear?  I found this governor gear on ebay: http://cgi.ebay.com/ebaymotors/700R4- ... uckQ5fPartsQ5fAccessories This is the VSS I found: http://cgi.ebay.com/ebaymotors/ws/eBa ... e=VIP:Watchlink:middle:us As far as the teflon seals, I found these: http://cgi.ebay.com/ebaymotors/Tail-h ... uckQ5fPartsQ5fAccessories http://cgi.ebay.com/ebaymotors/700-R4 ... uckQ5fPartsQ5fAccessories Comments? Matthew |
||
Posted on: 2009/4/19 14:51
|
|||
|
_________________
2002 EBM convertible, Magnusson supercharger, cam, headers, etc. 1989 Corvette...RIP |
|||
 Transfer Transfer
|
|||
| PeteK | Re: Pumpkin swap/u-joints/wheel bearings/suspension junk (PICS!) | ||
|
Moderator
 
|
Buy the gear, and seal/teflon kit from Blznhot.
It is everything you need. You are correct that the governor gear is the horizontal green one. To remove the governor, tap off the metal cap with a long screwdriver and hammer. Knock the roll pin out of the governor, install the new gear, and carefully drill the plastic using the holes in the governor body as a guide. Replace the roll pin, install the governor, rtv the flange of the cap, and tap it back in carefully on the flanged end only. After cap is seated, you can dimple the senter of the cap to reduce the end play of the governor to about .150. That is a good number to let the gear live a long time. Replacing the bushing is easy. With the seal removed, and tailshaft on the bench (with the bushing side up). set the new bushing on top of the old, and tap the new one in with a bushing driver. As the new bushing goes in, the old will push out towards the bottom until it falls out. If a bushing driver is unavailable, stack large washers over the bushing, place a socket on the washers, and tap away. It's only difficult the first time. Easy job overall. Another "while you are there tip": Look closely at the drain hole beneath the gov gear. Be sure it is not sludged up, and partially blocked. If so, blast it clean with carb cleaner, and drain the fluid from the pan when done, as that is where the crap will go. |
||
Posted on: 2009/4/19 15:00
|
|||
|
_________________
"It was really on a pass until it came apart." "Yeah. They always are." |
|||
 Transfer Transfer
|
|||
| Matatk | Re: Pumpkin swap/u-joints/wheel bearings/suspension junk (PICS!) | ||
|
Webmaster
 
|
|||
Posted on: 2009/4/19 15:12
|
|||
|
_________________
2002 EBM convertible, Magnusson supercharger, cam, headers, etc. 1989 Corvette...RIP |
|||
 Transfer Transfer
|
|||
| PeteK | Re: Pumpkin swap/u-joints/wheel bearings/suspension junk (PICS!) | ||
|
Moderator
 
|
The seal is normally replaced any time it is apart, but in this case, you must destroy the old seal to access the bushing. Kit also gives you a new square cut seal to bo between the trans and tailshaft. Be sure to torque the c=beam bolts. Overtightening will snap the tailhousing or rear housing.
Front - 40 ft lbs Rear - 65 ft lbs EDIT: If you are referring to the rubber ring on the driveshaft yoke, no. The only way to replace that is by changing the complete yoke. |
||
Posted on: 2009/4/19 15:25
|
|||
|
_________________
"It was really on a pass until it came apart." "Yeah. They always are." |
|||
 Transfer Transfer
|
|||
| Matatk | Re: Pumpkin swap/u-joints/wheel bearings/suspension junk (PICS!) | ||
|
Webmaster
 
|
Thanks again, Pete. Yes, in the above post I was referring to the ring on the yoke. I didn't know if it needed to be replaced.
So those torque specs are for the long bolts that go through the c-beam? Do you by chance know the torque specs for the 4 bolts that hold the tailshaft housing to the trans case? I have my fsm, but sometimes finding stuff in there is difficult. Matthew Edit - I found it on page 700-r4-59 "case extension to case m10 1.50x30 26 ft lbs" |
||
Posted on: 2009/4/19 16:35
|
|||
|
_________________
2002 EBM convertible, Magnusson supercharger, cam, headers, etc. 1989 Corvette...RIP |
|||
 Transfer Transfer
|
|||
| PeteK | Re: Pumpkin swap/u-joints/wheel bearings/suspension junk (PICS!) | ||
|
Moderator
 
|
Sadly, I do know the torque specs. 24 ft lbs are the requirements for the tail housing bolts.
One last tip: When you change the drive gear on the output shaft, the clip will likely fall. Be careful when putting it back. It has a locating tit that fits in a small hole in the output shaft. However, there are 2 holes close together. You want to stick the tit in the rearmost hole. c4 vette's use this hole, all other cars use the front hole. |
||
Posted on: 2009/4/19 16:42
|
|||
|
_________________
"It was really on a pass until it came apart." "Yeah. They always are." |
|||
 Transfer Transfer
|
|||
| Matatk | Re: Pumpkin swap/u-joints/wheel bearings/suspension junk (PICS!) | ||
|
Webmaster
 
|
Thanks Pete, but I don't believe I need to change the gear on the output itself. It's the red gear, which was the same for 2.59 and 3.07 gears according to what I've read. I am changing only the gear that slips into the side of the tailshaft housing that that VSS goes over.
Matthew Edit: mine should match this when I'm done: MD8 with P255/50ZR16 or P275/40ZR17 Tires 3.07 8640517 Red 17 25513049 Green 42 25007308 http://www.corvetteforum.net/c4/vette ... SpeedometerGearshtm.shtml |
||
Posted on: 2009/4/19 16:48
|
|||
|
_________________
2002 EBM convertible, Magnusson supercharger, cam, headers, etc. 1989 Corvette...RIP |
|||
 Transfer Transfer
|
|||
| PeteK | Re: Pumpkin swap/u-joints/wheel bearings/suspension junk (PICS!) | ||
|
Moderator
 
|
You are correct.
42 tooth driven gear is all you need. |
||
Posted on: 2009/4/19 16:49
|
|||
|
_________________
"It was really on a pass until it came apart." "Yeah. They always are." |
|||
 Transfer Transfer
|
|||
| BrianCunningham | Re: Pumpkin swap/u-joints/wheel bearings/suspension junk (PICS!) | ||
|
Senior Guru
 
|
Nice writeup/pics
|
||
Posted on: 2009/4/19 18:11
|
|||
|
_________________
Polo Green 95 LT1 6-spd http://mysite.verizon.net/vzevcp74/ 383 LT1/Vortech Supercharger/AFR heads/Rod end suspension/Penske-Hardbar dual rate coilovers/Wilwood 6pot brakes NCCC Governor: http://BayStateCorvetteClub.com |
|||
 Transfer Transfer
|
|||
| Matatk | Re: Pumpkin swap/u-joints/wheel bearings/suspension junk (PICS!) | ||
|
Webmaster
 
|
Got to tinker for a couple of hours today. Didn't really accomplish much since I was beat from going out last night. Here's the progress:
First order of business was to remove the old u-joints. I found that a pair of needle nose vice grips were great for taking out the retainers: 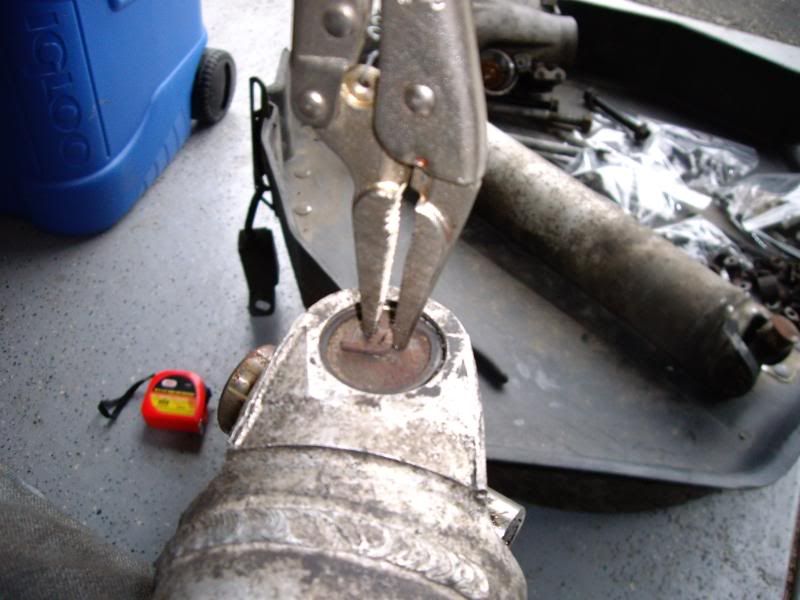 I borrowed this HF u-joint press from my buddy. He never used it, bought it just in case. I was happy to christen it for him: 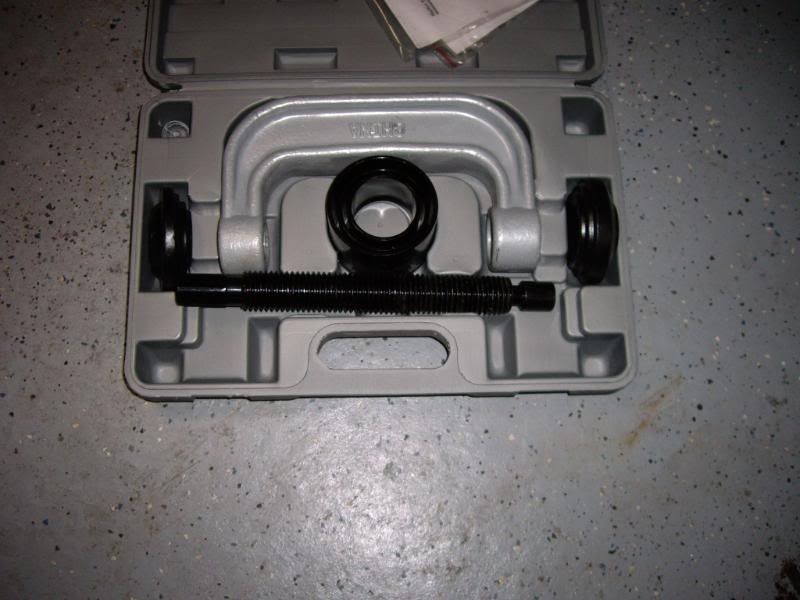 You just use it like a c-clamp to press them out. Takes a little practice to get it perfect, but for a cheap tool it's not bad. I'd rather have a bench style press that is easier to keep square, but you use what you have: 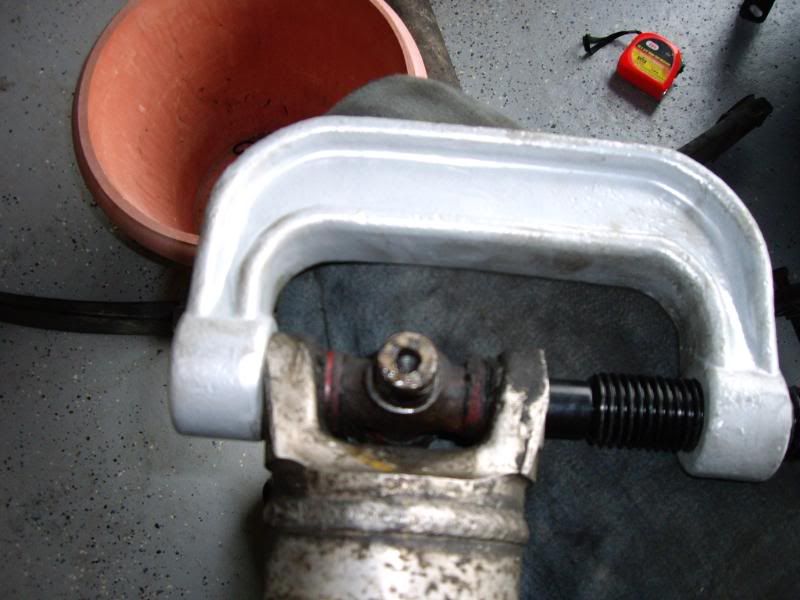 Pressed out: 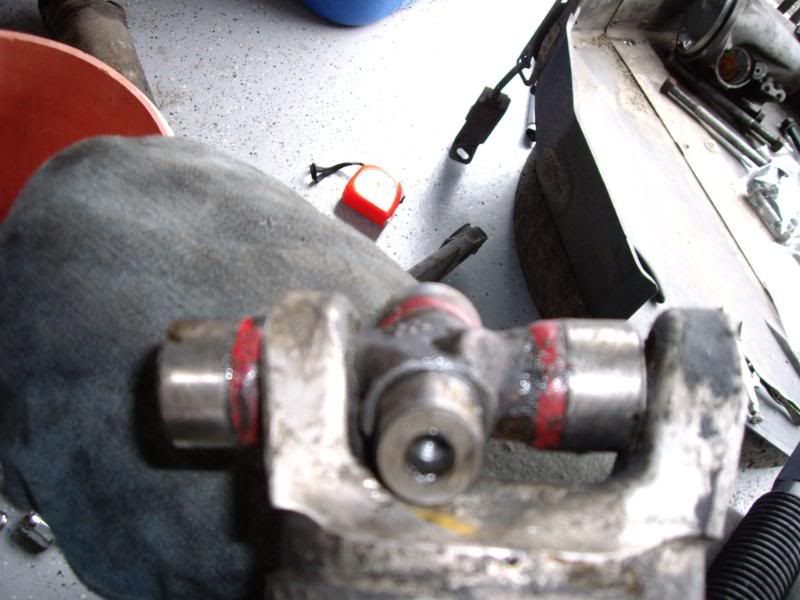 Once pressed out, remove the end cap and then wiggle the u-joint out: 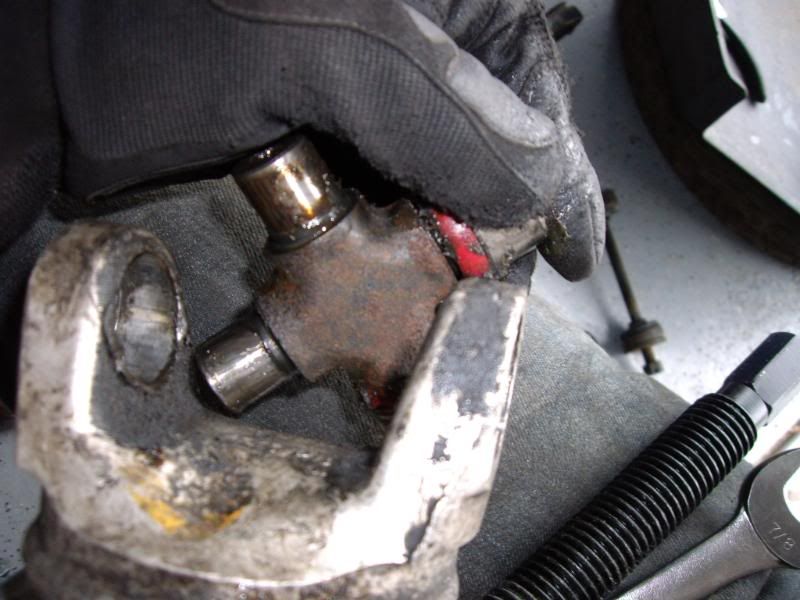 Driveshaft u-joints were harder to break free than the half shafts for some reason. They are also slightly smaller. Here I had to use a pair of vice grips to pull the cap off: 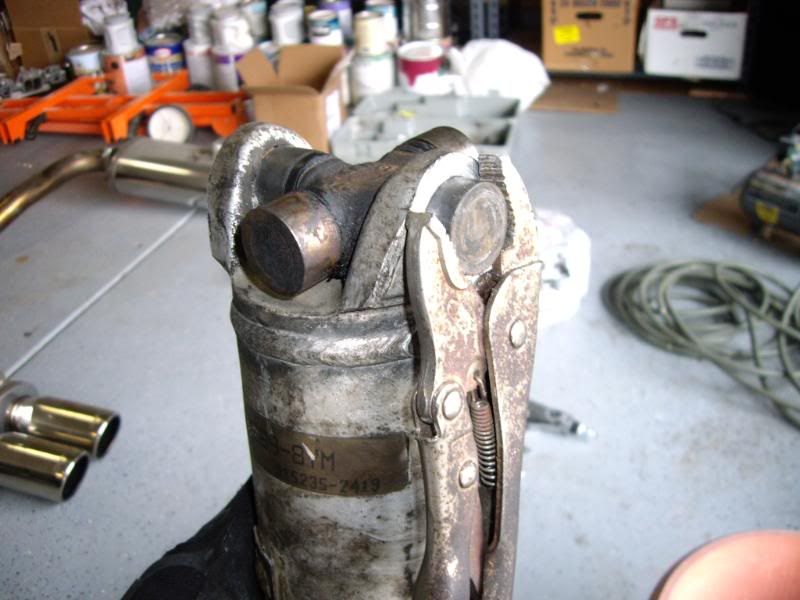 Decided to clean up the shafts a bit before I put in the new u-joints. I used this stuff from NAPA. For $10 a bottle it better be good: 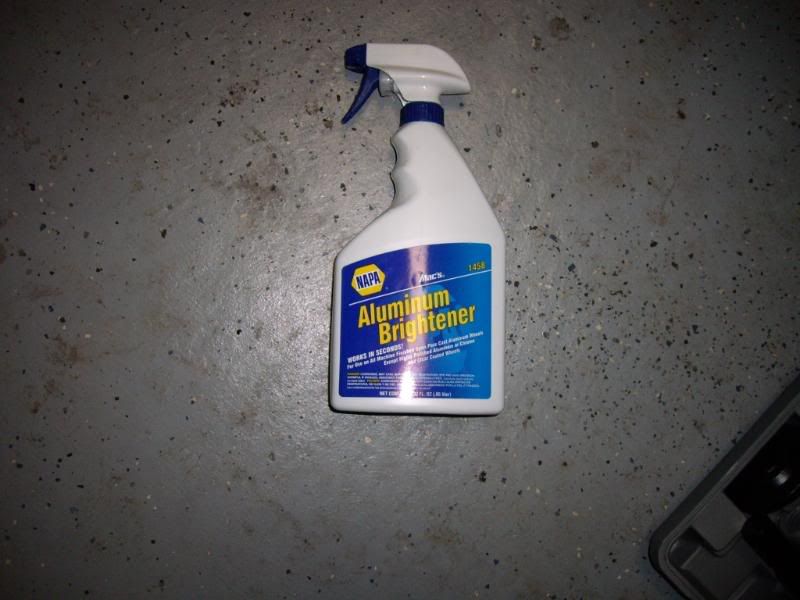 Before shot: 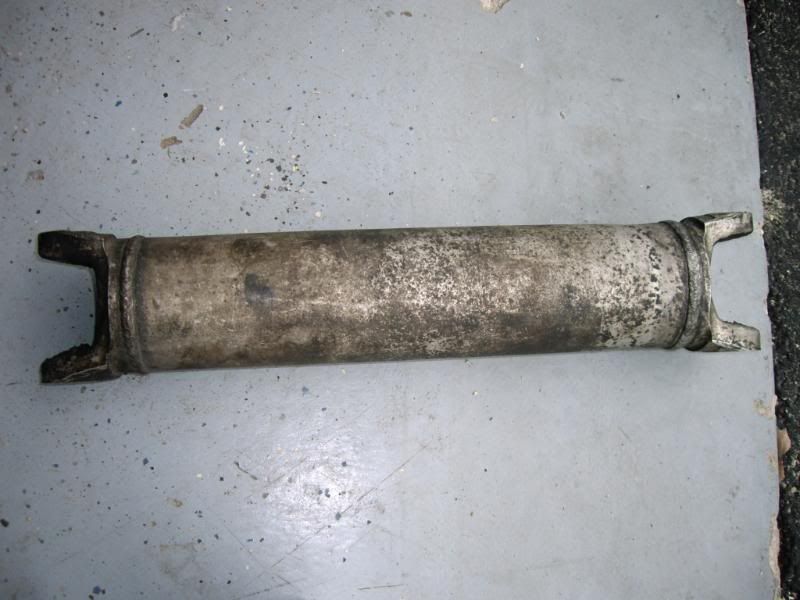 I sprayed it on and it started working right away. I used a rag to wipe away the excess dirt and grime then I sprayed it again and rinsed it down. I'm not concerned with it being a show car, but I'm impressed by how well it worked with about zero effort from me. 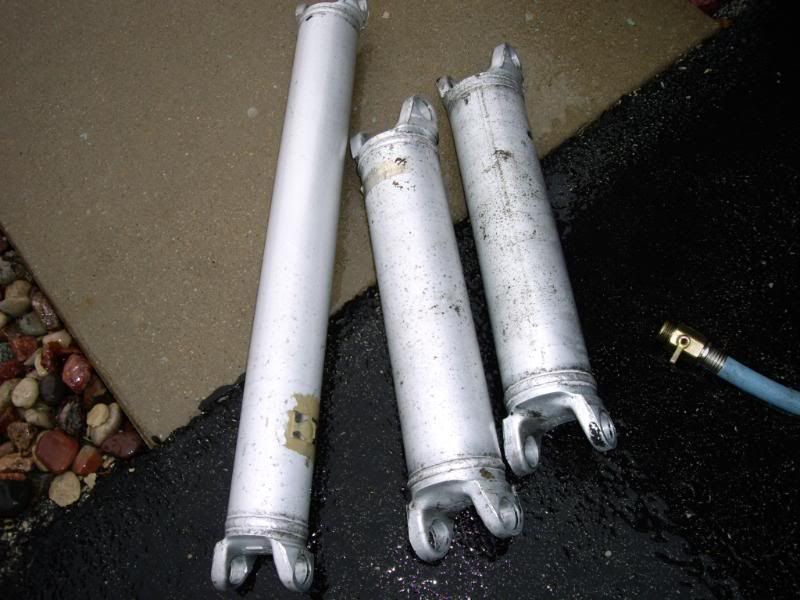 New u-joints ready to go in: 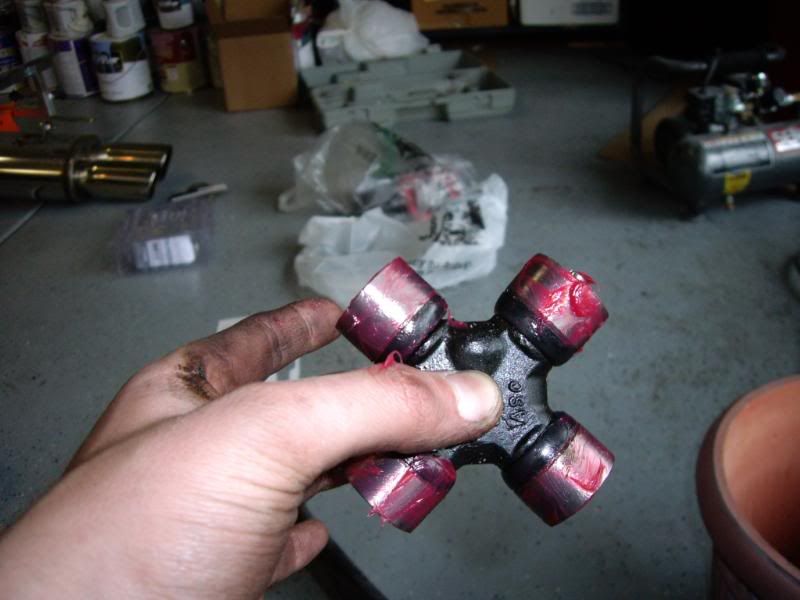 Installation is the opposite of removal. Take off one end cap (with the rubber boot still on it so you don't loose all the bearings) and slip it in the shaft. Then put the cap back on. In the above picture I lubed the u-joints, but found it easier on the next ones to lube the inside of the shafts instead. I don't honestly know if it helps or not but I figured it couldn't hurt. Make sure the u-joint is lined up square when you press it in or else it will 1) not go in or 2) break something. All jointed up! Put some tape on as a precaution so the caps don't fall off. These ends will be held in by the u-joint straps. 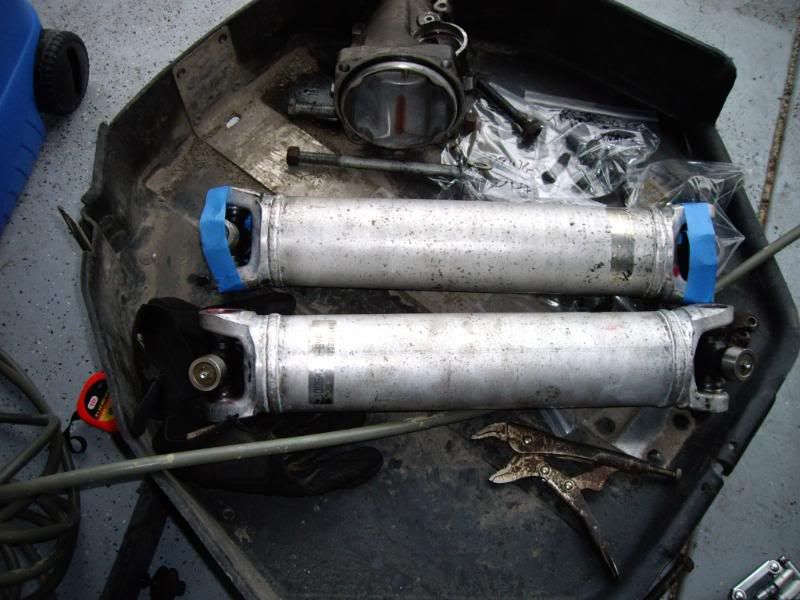 I also separated the old pumpkin from the batwing and cleaned up the new one a bit. Old fluid: 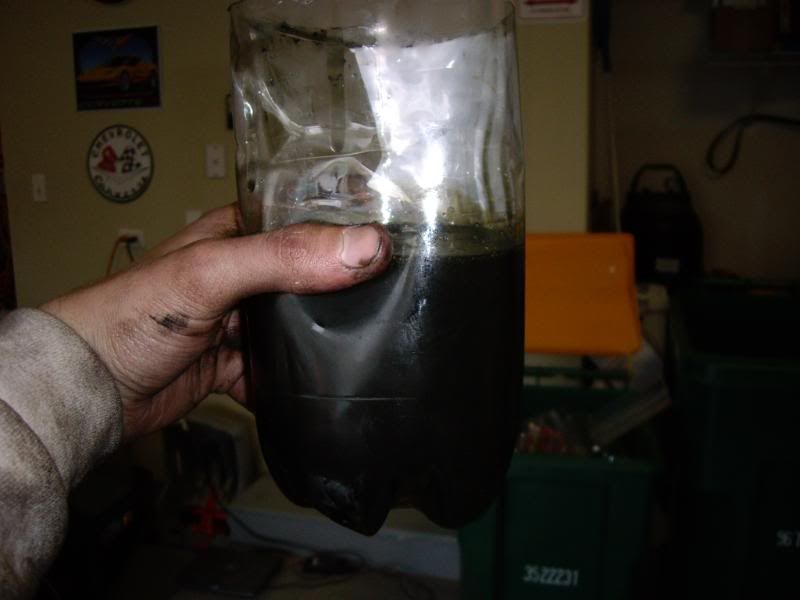 "New" 3.07 pumpkin: 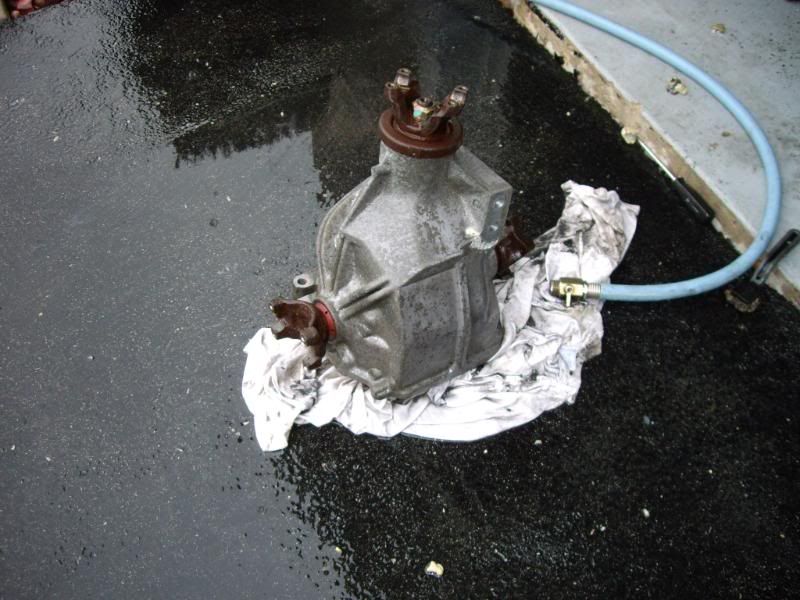 That's it for today. I ordered the seals to put the trans back together and the new VSS. Once I get those I can start piecing things back together. Matthew |
||
Posted on: 2009/4/20 1:39
|
|||
|
_________________
2002 EBM convertible, Magnusson supercharger, cam, headers, etc. 1989 Corvette...RIP |
|||
 Transfer Transfer
|
|||
| pianoguy | Re: Pumpkin swap/u-joints/wheel bearings/suspension junk (PICS!) | ||
|
Guru Emeritus
 
|
Great pics! This might be an opportune time to install a drain plug in the diff.
|
||
Posted on: 2009/4/20 1:59
|
|||
|
_________________
1996 LT4 �Before you criticize someone, you should walk a mile in their shoes. That way when you criticize them, you are a mile away from them and you have their shoes.�- Jack Handey |
|||
 Transfer Transfer
|
|||
| Matatk | Re: Pumpkin swap/u-joints/wheel bearings/suspension junk (PICS!) | ||
|
Webmaster
 
|
I'm debating that. I've heard pros and cons. Pros - easier to swap fluid. Cons - making sure you drill in the right spot, possible leaks.
Comments? Matthew |
||
Posted on: 2009/4/20 2:04
|
|||
|
_________________
2002 EBM convertible, Magnusson supercharger, cam, headers, etc. 1989 Corvette...RIP |
|||
 Transfer Transfer
|
|||
| Epimax | Re: Pumpkin swap/u-joints/wheel bearings/suspension junk (PICS!) | ||
|
Elite Guru
 
|
Quote:
  Wanna do mine next?  |
||
Posted on: 2009/4/20 16:35
|
|||
 Transfer Transfer
|
|||
| Matatk | Re: Pumpkin swap/u-joints/wheel bearings/suspension junk (PICS!) | ||
|
Webmaster
 
|
Quote:
Sure, just drive it over and we'll knock it out in a weekend  |
||
Posted on: 2009/4/20 22:43
|
|||
|
_________________
2002 EBM convertible, Magnusson supercharger, cam, headers, etc. 1989 Corvette...RIP |
|||
 Transfer Transfer
|
|||
| flyboy | Re: Pumpkin swap/u-joints/wheel bearings/suspension junk (PICS!) | ||
|
Elite Guru
 |
Nice work!
|
||
Posted on: 2009/4/21 2:27
|
|||
 Transfer Transfer
|
|||
| jhammons01 | Re: Pumpkin swap/u-joints/wheel bearings/suspension junk (PICS!) | ||
|
Senior Guru
 
|
I've added drain plugs...not on Pumpkins but yet it is a simple job.
I'd look up my thread about the Pumpkin short shaft bearings being out.....$30 bux worth of security......"while you are in there" |
||
Posted on: 2009/4/21 2:58
|
|||
 Transfer Transfer
|
|||
| Epimax | Re: Pumpkin swap/u-joints/wheel bearings/suspension junk (PICS!) | ||
|
Elite Guru
 
|
Quote:
 I'll bring the I'll bring the  |
||
Posted on: 2009/4/21 11:34
|
|||
 Transfer Transfer
|
|||
| Matatk | Re: Pumpkin swap/u-joints/wheel bearings/suspension junk (PICS!) | ||
|
Webmaster
 
|
Thanks, John, I remember following that thread pretty closely when you posted it. I'm just trying to avoid rebuilding every part on my car for a "simple" rear end swap. I'll keep it in mind, though.
I've decided to nix the drain plug. Only change the fluid every 50,000 miles or so, and I'm not too concerned about it. Matthew |
||
Posted on: 2009/4/21 11:49
|
|||
|
_________________
2002 EBM convertible, Magnusson supercharger, cam, headers, etc. 1989 Corvette...RIP |
|||
 Transfer Transfer
|
|||
| jhammons01 | Re: Pumpkin swap/u-joints/wheel bearings/suspension junk (PICS!) | ||
|
Senior Guru
 
|
The guys that build lifted four wheel drive trucks are always the ones looking to add drain plugs in the rear ends. They fill em' with mud and then they want to flush it out all the time
|
||
Posted on: 2009/4/21 14:29
|
|||
 Transfer Transfer
|
|||
| bogus | Re: Pumpkin swap/u-joints/wheel bearings/suspension junk (PICS!) | ||
|
Grand Imperial Pooh-Bah
 |
the drain plug is a nice idea, but not necessary.
You won't get leaks from it. I have never heard of that happening. Ever. It's drill, tap, bolt. Done. But you raise a good point... if you are only swapping the oil every 3 years, who cares? Overall, looking GREAT! That aluminum cleaner rocks. I am gonna get some of that stuff! |
||
Posted on: 2009/4/21 14:39
|
|||
|
_________________
The single biggest problem with communication is the illusion that it has taken place. - George Bernard Shaw Education is the best tool to overcome irrational fear. - me |
|||
 Transfer Transfer
|
|||
| Weavsvet | Re: Pumpkin swap/u-joints/wheel bearings/suspension junk (PICS!) | ||
|
Senior Guru
 
|
I know you're having a BIG time Matt. I did this same thing last Sept. Glad you tried the Aluminum Brightener! That is miracle stuff! The only thing I wish I had done that I didn't is get the beam plates. I'm still considering them......it's just hard to justify nearly 200.00 for two pieces of stainless steel. Good Luck finishing up!
Weav |
||
Posted on: 2009/4/22 10:29
|
|||
 Transfer Transfer
|
|||
| Matatk | Re: Pumpkin swap/u-joints/wheel bearings/suspension junk (PICS!) | ||
|
Webmaster
 
|
Quote:
I feel the same exact way about them, hence they are not in my garage. I've already dumped a bunch of other money without a second thought, but those seem to catch me up. I don't really see the huge benefit vs. cost ratio. Matthew |
||
Posted on: 2009/4/22 11:40
|
|||
|
_________________
2002 EBM convertible, Magnusson supercharger, cam, headers, etc. 1989 Corvette...RIP |
|||
 Transfer Transfer
|
|||
| Matatk | Re: Pumpkin swap/u-joints/wheel bearings/suspension junk (PICS!) | ||
|
Webmaster
 
|
|||
Posted on: 2009/4/23 1:22
|
|||
|
_________________
2002 EBM convertible, Magnusson supercharger, cam, headers, etc. 1989 Corvette...RIP |
|||
 Transfer Transfer
|
|||
| Matatk | Re: Pumpkin swap/u-joints/wheel bearings/suspension junk (PICS!) | ||
|
Webmaster
 
|
|||
Posted on: 2009/4/23 22:20
|
|||
|
_________________
2002 EBM convertible, Magnusson supercharger, cam, headers, etc. 1989 Corvette...RIP |
|||
 Transfer Transfer
|
|||
| Matatk | Re: Pumpkin swap/u-joints/wheel bearings/suspension junk (PICS!) | ||
|
Webmaster
 
|
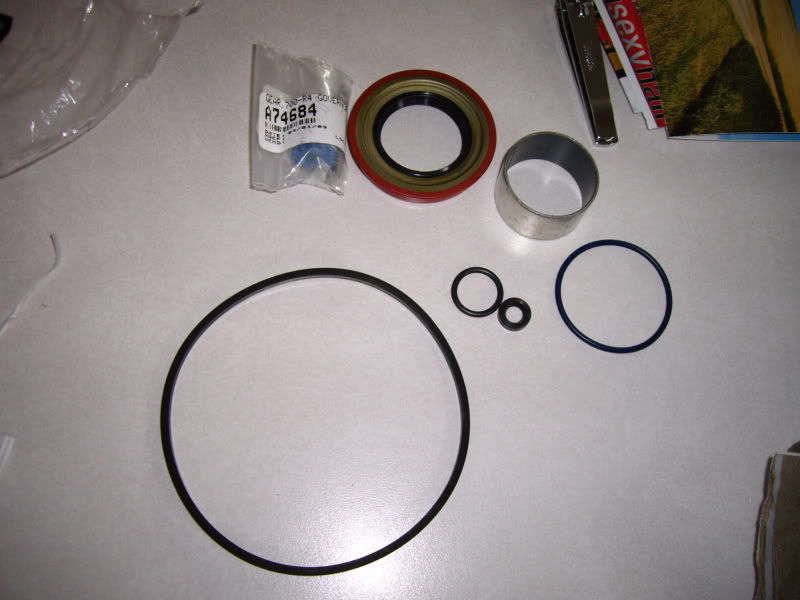
Bueller? Bueller? Bueller? Ferris Bueller?
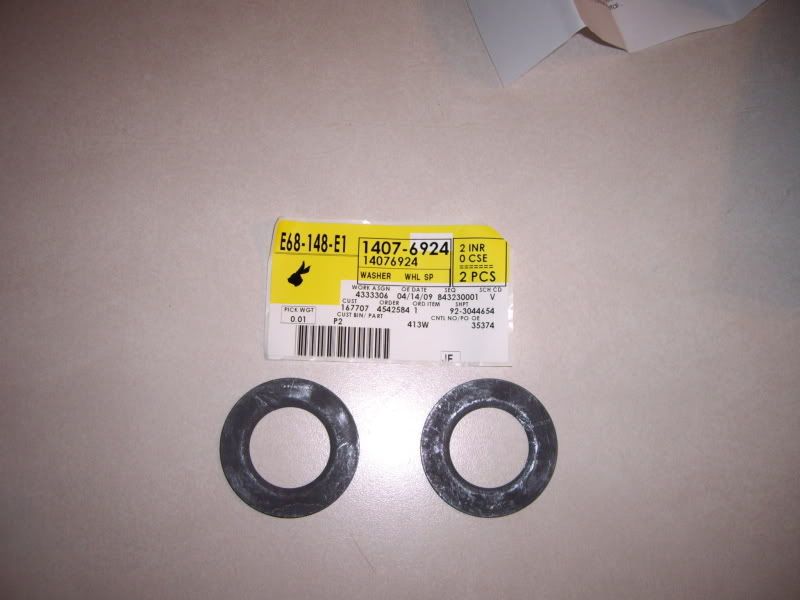
Quote: Now do those washers appear to be the correct ones for the wheel bearing swap? Quote: Pete - what are the two smaller rubber gaskets for? I know the big one is for the housing, the medium one is (I'm assuming VSS) but I don't know the other two. |
||
Posted on: 2009/4/24 11:43
|
|||
|
_________________
2002 EBM convertible, Magnusson supercharger, cam, headers, etc. 1989 Corvette...RIP |
|||
 Transfer Transfer
|
|||
| PeteK | Re: Pumpkin swap/u-joints/wheel bearings/suspension junk (PICS!) | ||
|
Moderator
 
|
Sorry about that. I am in Tampa on business, and have not logged on in a while.
The 2 small o-rings are for the speedo adapter, if it were the old cable driven tupe. The kit you bought is a 1 size fits all deal. No worries. Toss what you do not need, and use the rest. Keep up the good work, and keep the pics coming. |
||
Posted on: 2009/4/24 15:38
|
|||
|
_________________
"It was really on a pass until it came apart." "Yeah. They always are." |
|||
 Transfer Transfer
|
|||
| jhammons01 | Re: Pumpkin swap/u-joints/wheel bearings/suspension junk (PICS!) | ||
|
Senior Guru
 
|
Quote:
They go on the shaft prior to the bearing covering them up. |
||
Posted on: 2009/4/24 20:54
|
|||
 Transfer Transfer
|
|||
| Matatk | Re: Pumpkin swap/u-joints/wheel bearings/suspension junk (PICS!) | ||
|
Webmaster
 
|
Thanks for the replies, guys. Pete, sorry to be such a bother - you are a huge help and want you to know that.
I've got some free time tonight so I'm gonna clean up the ujoint straps and do a few odds and ends. Nothing major. Matthew |
||
Posted on: 2009/4/24 22:04
|
|||
|
_________________
2002 EBM convertible, Magnusson supercharger, cam, headers, etc. 1989 Corvette...RIP |
|||
 Transfer Transfer
|
|||
| Matatk | Re: Pumpkin swap/u-joints/wheel bearings/suspension junk (PICS!) | ||
|
Webmaster
 
|
I just tinkered a bit tonight. Cleaned up the gasket surfaces (see above posts), chased the threads in the pumpkin for the strap bolts. Tried cleaning the u-joint straps, they came out ok. Not as well as I would have hoped.
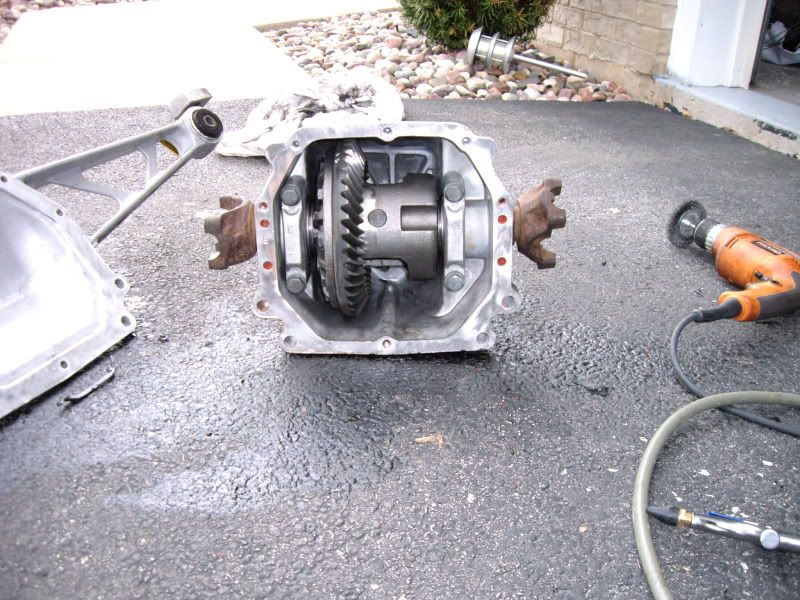 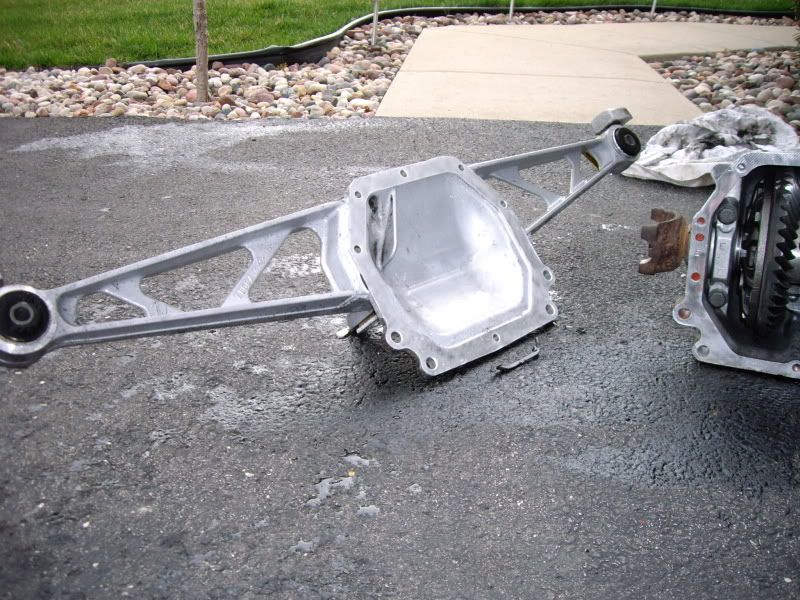 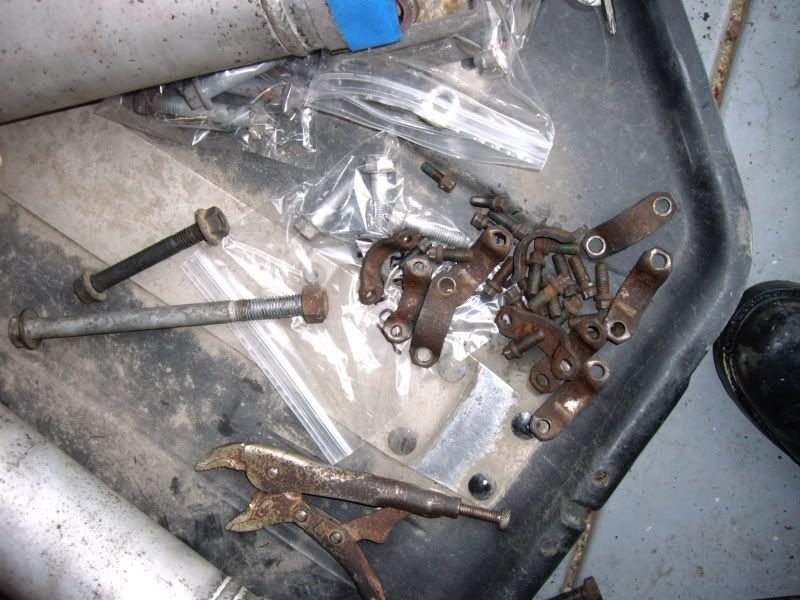 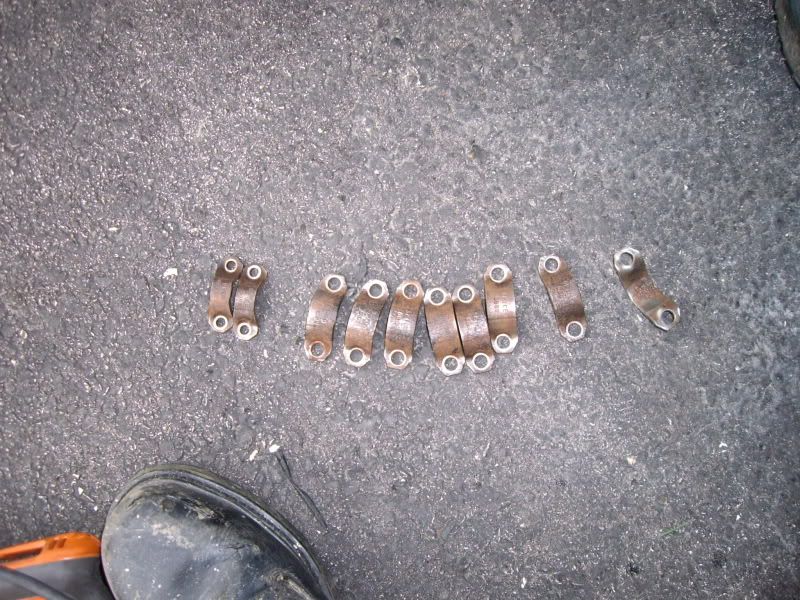 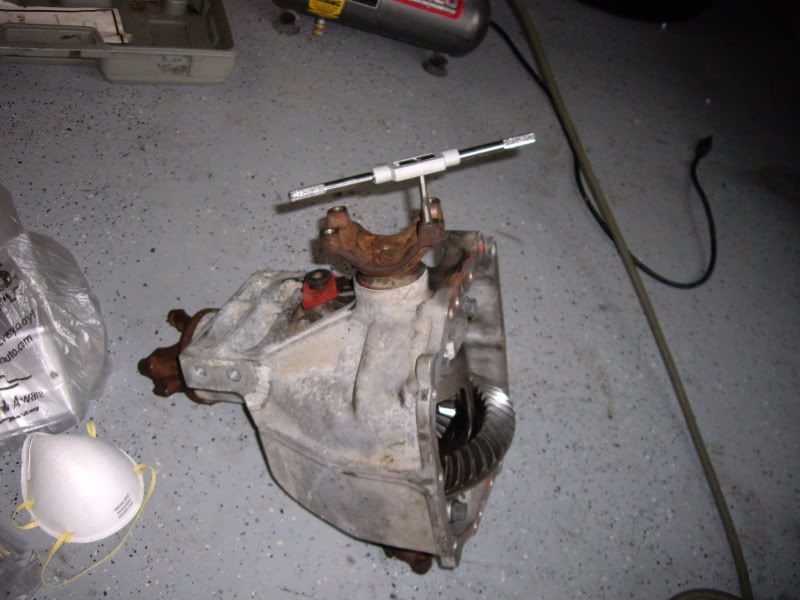 BTW - the tap/die set from HF are crap. I don't recommend buying them. The taps themselves are decent, but the dies are garbage. Couldn't get them to line up and spin to clean up the strap bolts. I also broke the tap handle (inside clamps). Luckily I had a good starrett tap handle in the cabinet I used that I forgot I had. Matthew |
||
Posted on: 2009/4/25 2:11
|
|||
|
_________________
2002 EBM convertible, Magnusson supercharger, cam, headers, etc. 1989 Corvette...RIP |
|||
 Transfer Transfer
|
|||
| Matatk | Re: Pumpkin swap/u-joints/wheel bearings/suspension junk (PICS!) | ||
|
Webmaster
 
|
Well, I had a few hours after dinner to tinker so I decided to tackle the wheel bearings. I ordered a set of NOS bearings from corvette recycling and got the new washers from the dealer. I used the steps in the FSM, but to be honest with you I didn't think it was the best method, so I modified it a bit. This was due to trial and error. I will post my procedure below. Also note that since I already have my half shafts removed along with other suspension components, some things will not really apply to you if only doing wheel bearings and nothing else (ie, the wheel bearings will not rotate if the shaft is attached and in gear).
First step is to remove the wheel (obviously). Since I already have the car jacked up, wheels off, much of the suspension removed I was ahead of the game. FSM also said you have to unfasten the spring to do this job, which is probably correct, but mine was already off so I can't really comment with 100% accuracy. Here's a shot of what you should be looking at: 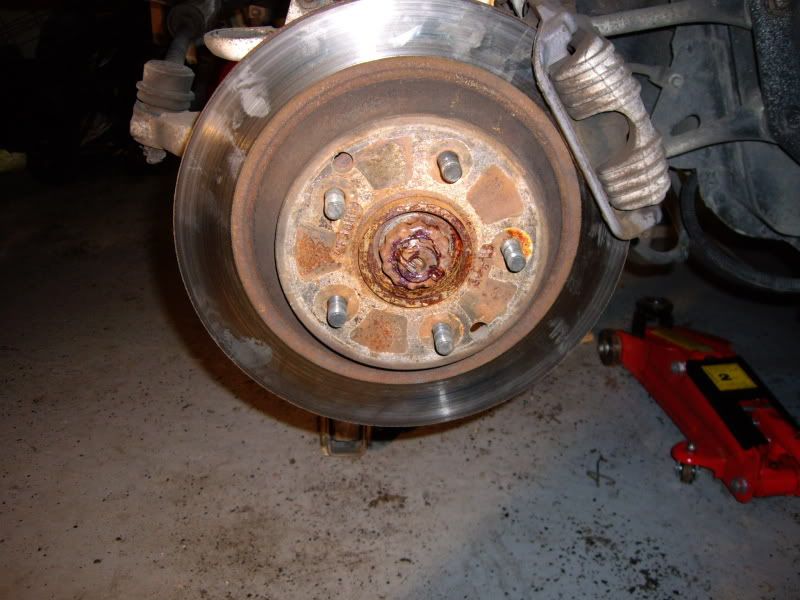 FSM says to remove the sensor on the rear of the brake first, which I did, but found it was easier to remove this after the brake caliper and rotor due to space constraints only. Once the caliper is removed, make sure to support it so it's not hanging from the brakeline. Two shots below: 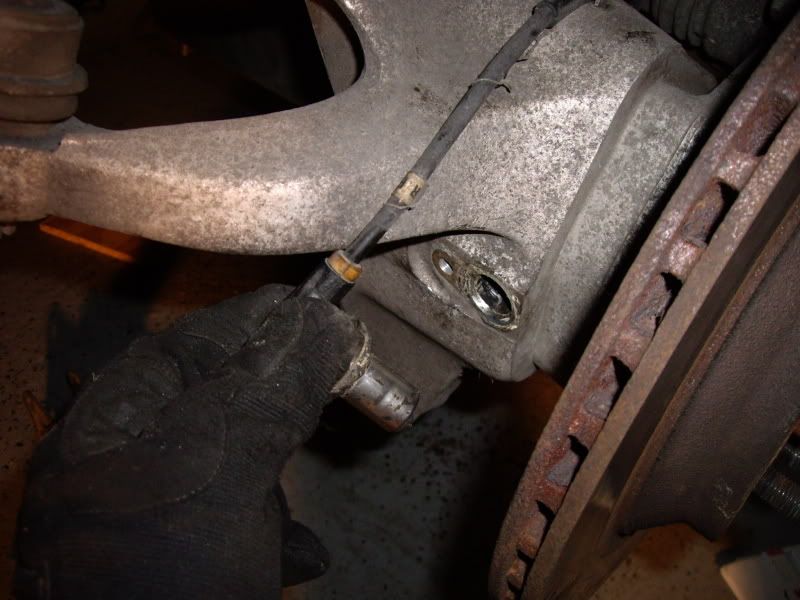 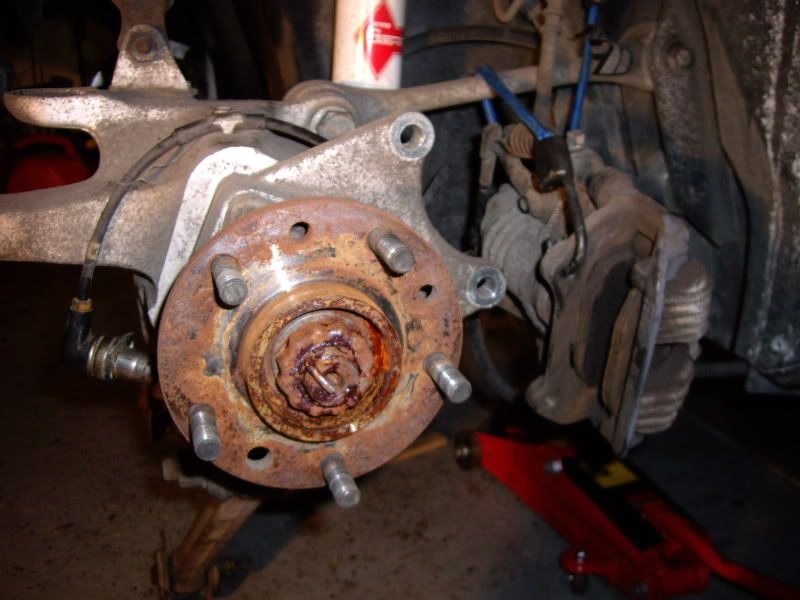 FSM then says to remove the three torx head bolts (T55) securing in the wheel bearing. Well, this is a bad idea because then when you try to remove the spindle nut later the whole thing just moves. Instead of doing this, loosen all three slightly (break the seal, mine were rusty on the exposed end) and completely remove the bottom one. This will allow you to put some sort of block in the wheel bearing to keep it from rotating. 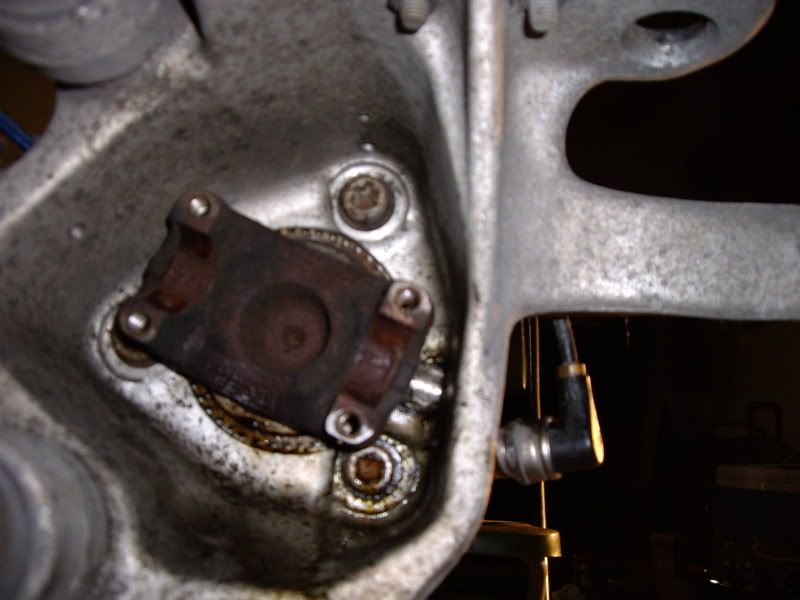 You can orientate the wheel bearing so the holes in the front line up with the mounting holes and use that to secure it. 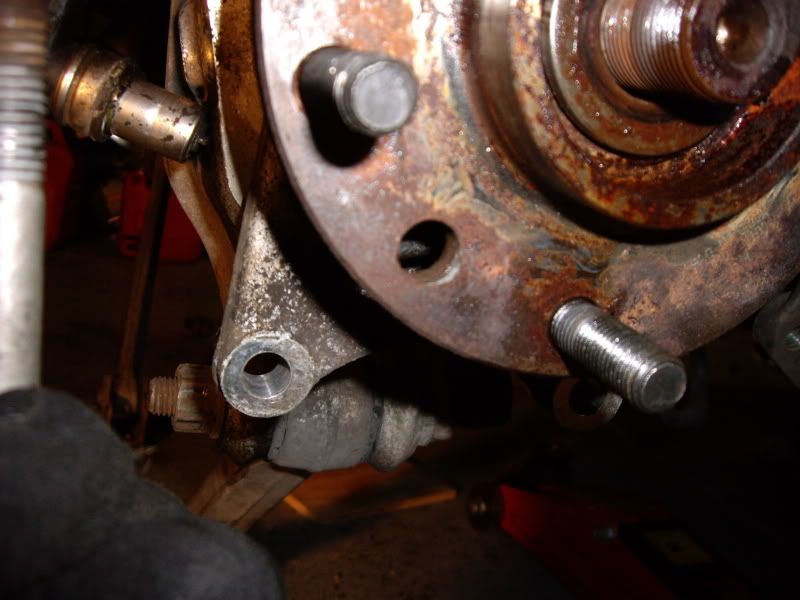 Whatever you do, do not use the torx head bolt in the hole to prevent the wheel bearing from turning. I tried this thinking it was a good idea. Bad move! 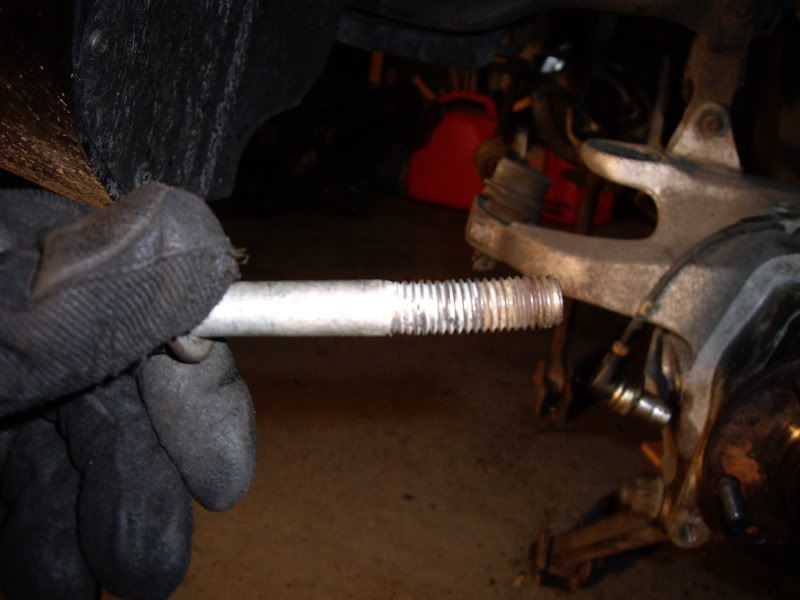 As you can see, the bolt began to bend when I was applying pressure to it. I was able to bend it back with a vice and a hammer (with a socket slipped over the bolt to protect the threads). Looking for something strong to use (wasn't sure if a screwdriver would be enough) I found an extra weight stack pin from my weightlifting equipment. Seems like a perfect fit! 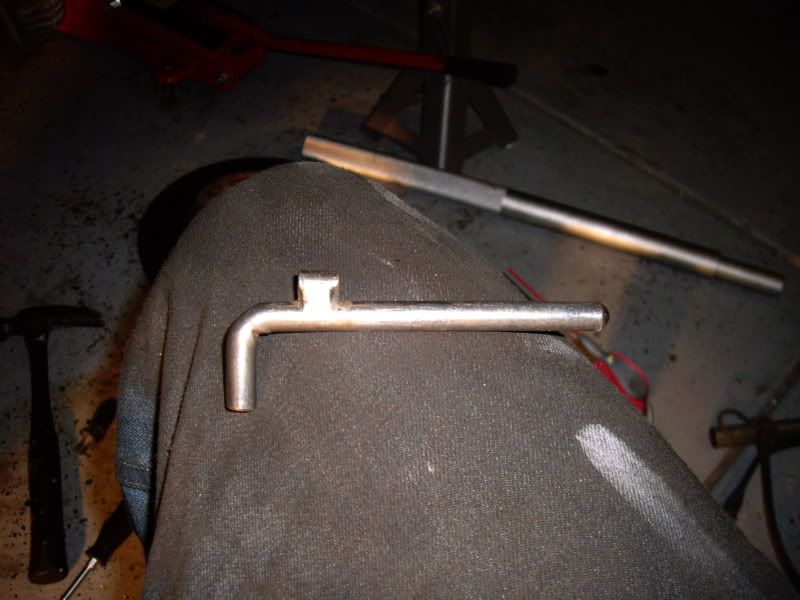 Next, remove the cotter pin, spindle nut retainer, and spindle nut. The spindle nut itself uses a 36 mm socket for removal. And it's a bear. I tried a combination of pb blaster and sheer strength along with a breaker bar. No go. I tried heating the nut and that was the magic ticket. You can then carefully pry/wiggle the bearing off. Here you can see the spindle along with the infamous "clicking" washer. 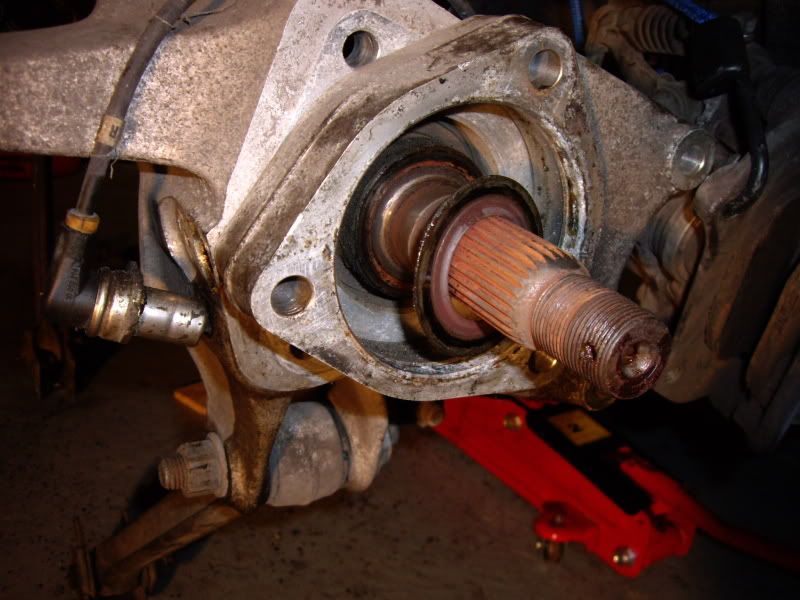 Old bearing I removed: 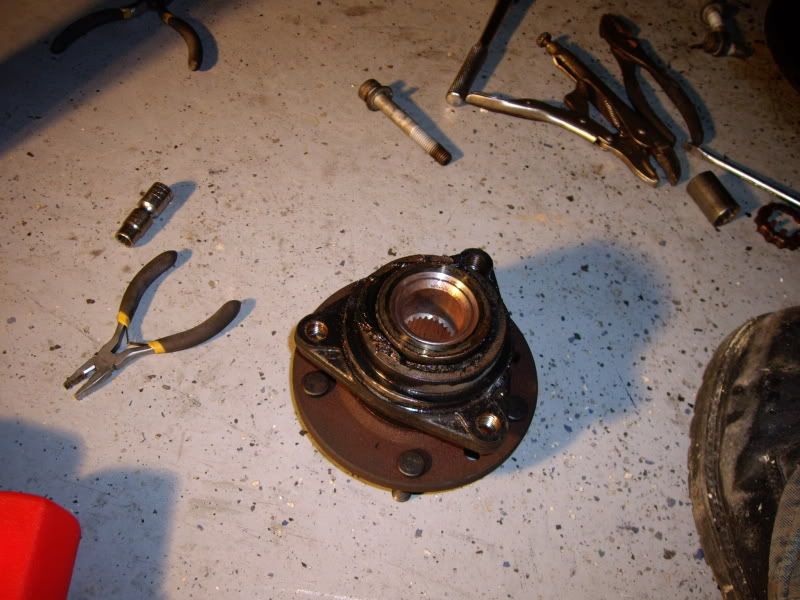 New bearing ready to go in: 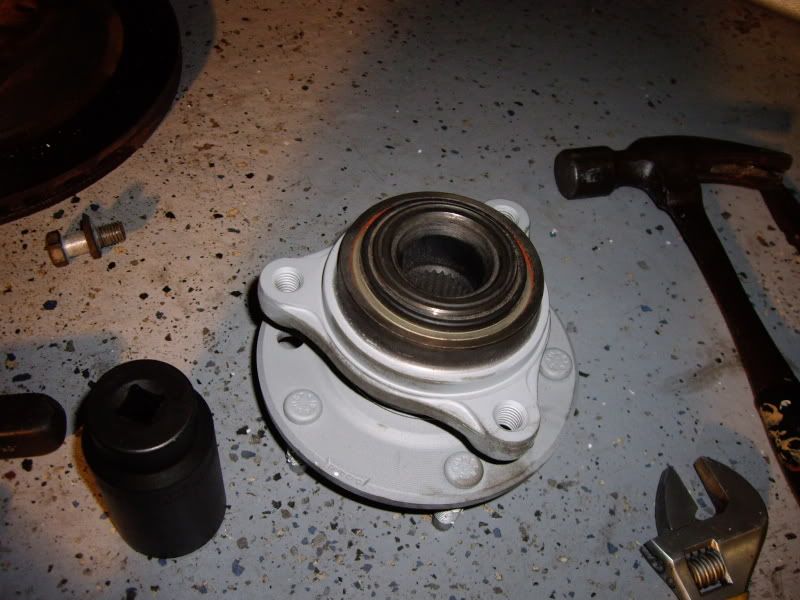 First, I put some anti-seize on the new washer (the lip should point towards you as you're placing it on) and on the spindle itself. I don't know if this is necessary or even a good idea, but I did it. FSM says nothing about anti-seize. Somebody please tell me if it's bad  (Edit - if you've only read this far, it's bad. Don't do it!) (Edit - if you've only read this far, it's bad. Don't do it!)I then slipped on the new bearing and began screwing in two of the T55 torx bolts. I reinserted the weightlifting pin and put that spindle nut on as hard as I could with the breaker bar. I don't have a 200 ft-lb torque wrench, so I don't know exactly how much I put on there, but it was a lot. Original FSM calls for slightly less than that, but more recent internet postings say 200. The torx bolts should be 66 ft-lbs. End result once all was tightened up and the spindle nut retainer replaced, cotter pin inserted. I also forgot to mention there is a washer behind the spindle nut, don't forget to replace that. Here you can see how much the weightlifting pin was bent out of shape, so it's a lot of force being put on that spindle nut (and it's actually worse from another angle): 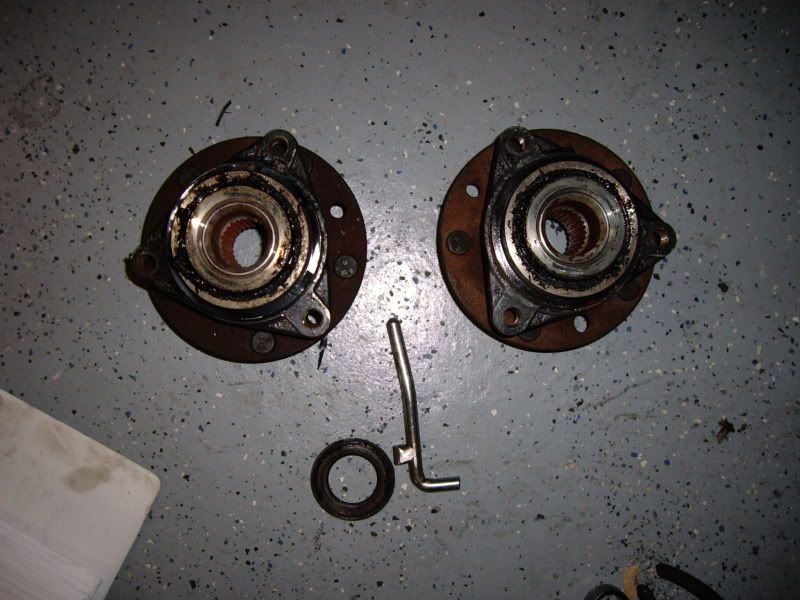 Altogether this took me about 2 1/2 hours. This is also a good time to inspect your read calipers, rotors, and pads. I decided I need new pads, so add that to the list! Thanks for checking out the pics, comments welcome. Matthew |
||
Posted on: 2009/4/26 3:25
|
|||
|
_________________
2002 EBM convertible, Magnusson supercharger, cam, headers, etc. 1989 Corvette...RIP |
|||
 Transfer Transfer
|
|||
| jhammons01 | Re: Pumpkin swap/u-joints/wheel bearings/suspension junk (PICS!) | ||
|
Senior Guru
 
|
Nice post....keep up the good work
|
||
Posted on: 2009/4/26 4:21
|
|||
 Transfer Transfer
|
|||
| PeteK | Re: Pumpkin swap/u-joints/wheel bearings/suspension junk (PICS!) | ||
|
Moderator
 
|
Antiseize on the washer is bad. It will attract dirt, wear the washer, and click and grind soon.
Ask me how I learned this. Pull it apart and clean it up. |
||
Posted on: 2009/4/26 11:56
|
|||
|
_________________
"It was really on a pass until it came apart." "Yeah. They always are." |
|||
 Transfer Transfer
|
|||
| Matatk | Re: Pumpkin swap/u-joints/wheel bearings/suspension junk (PICS!) | ||
|
Webmaster
 
|
Quote:
Pete, you are the man. I read your post (I'm an early bird) and already went out, removed both wheel bearings and cleaned off the anti-seize and reinstalled. Whole process went a ton quicker than the first time  Pete, since you're my online guidebook with my F ups, can you tell me if I need a special tool to press out/remove the tailshaft housing seal and that metal sleeve that goes in behind it??? I also decided to work on the pumpkin and batwing since I was out there. I figured it'd be a good time to swap over the poly bushings from the stock. 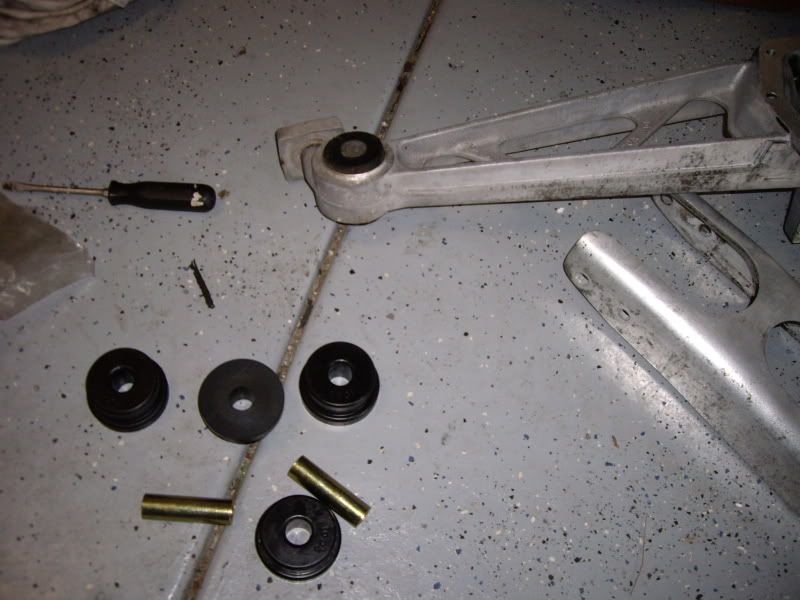 What a PIA. I mean, it really sucked the way I was trying to do it. I originally tried to use the c-clamp press I used for the u-joints. Not happening. I was wrenching on that thing like a mofo but those bushings are in there good. They must use an enormous press to get them in. I also tried to cut the part of the sleeve I did get pressed out. Good luck. Apparently GM found the last cache of Kryptonite left and used that to fabricate the sleeves. Ugh. 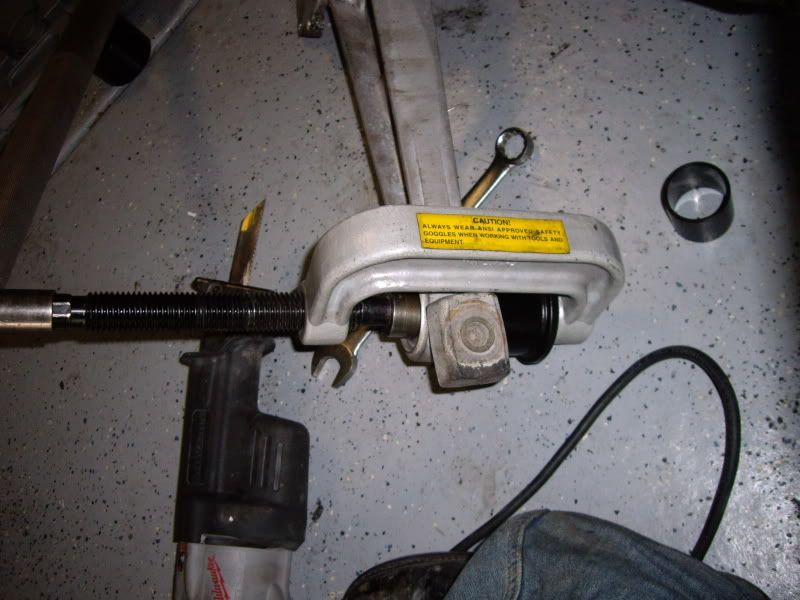 I do not recommend that method unless you've got a huge press of your own. What I did instead it a lot simpler, although it makes a huge mess. You aren't reusing the stock bushings, so it's ok to destroy them. Get out your drill index and select a small/medium bit to make about 8 pilot holes. Go around the bushing in a clock-like pattern. Once you have the pilots drilled, select the biggest bit you have and ream out the holes nice and good. It's messy and smelly, but you'll see the bushing begin to disintegrate. Then you can pop it out. And don't worry about nicking the inside sleeve on the batwing because you have to remove it anyway to put in the polys. That's the next step. 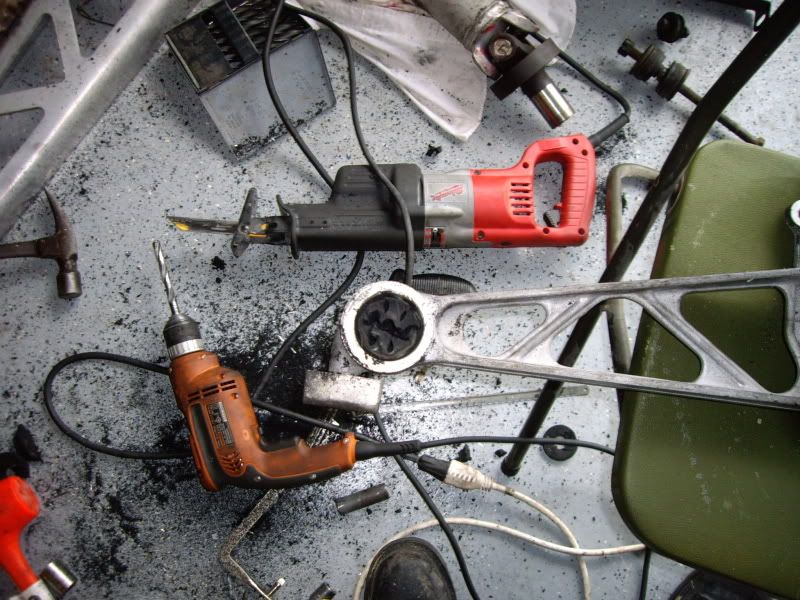 Once the bushing it out, carefully cut the inside of the sleeve with several relief cuts. Pry them with a screwdriver and pop it out. 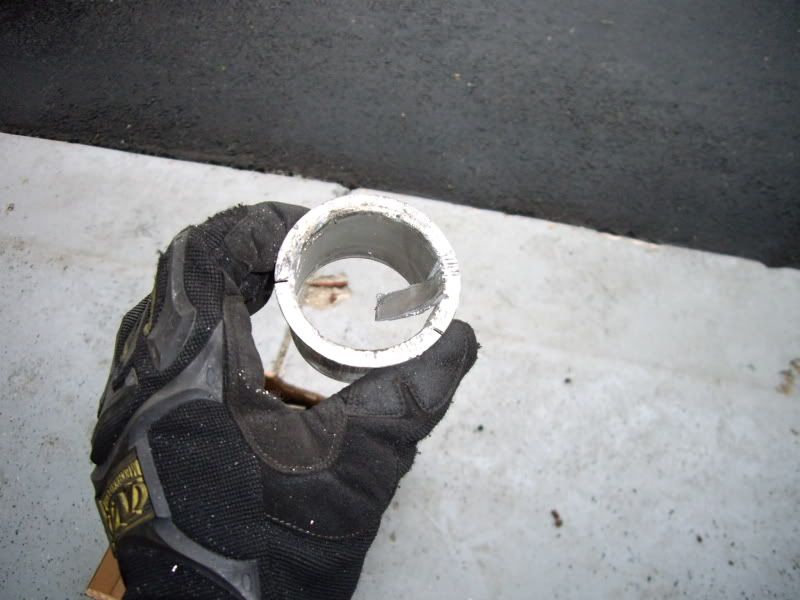 You should be left with this: 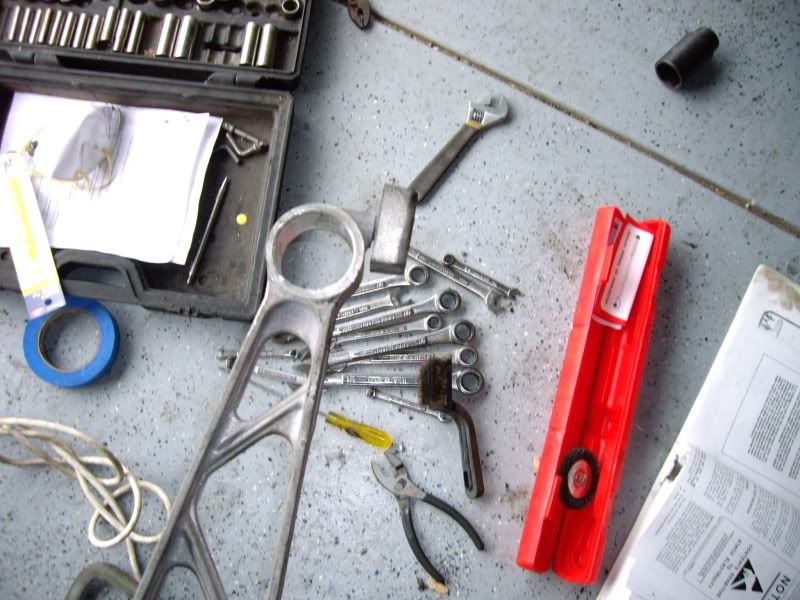 I made a couple boo boos while triming out the sleeve but nothing too deep, just cosmetic. But be careful not to get too saw happy. After the sleeve was out, I lightly coated the new polys ID and OD with the supplied grease along with the new bolt sleeve OD and the ID of the batwing bushing hole. 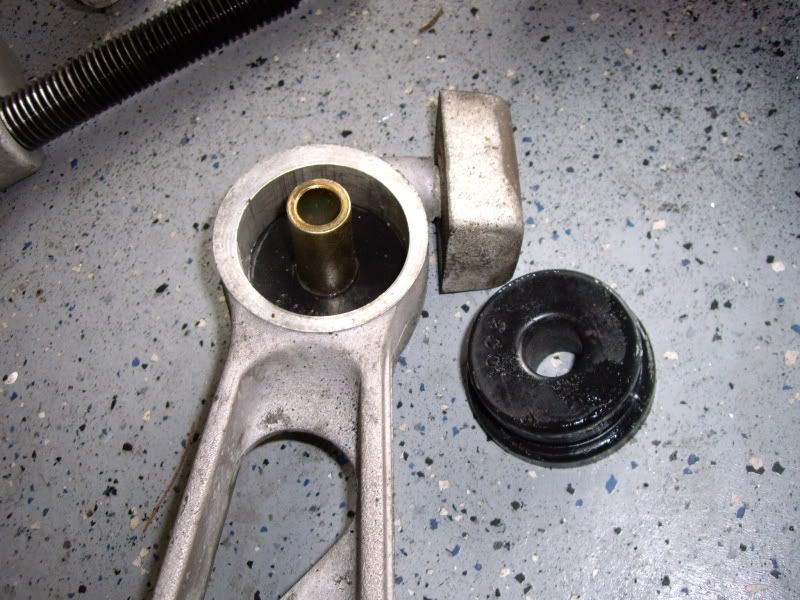 I then pressed them together by hand and used a soft dead blow hammer to nudge it the last bit. I noticed they pop out a little, but I think that it will snug up once bolted to the car. 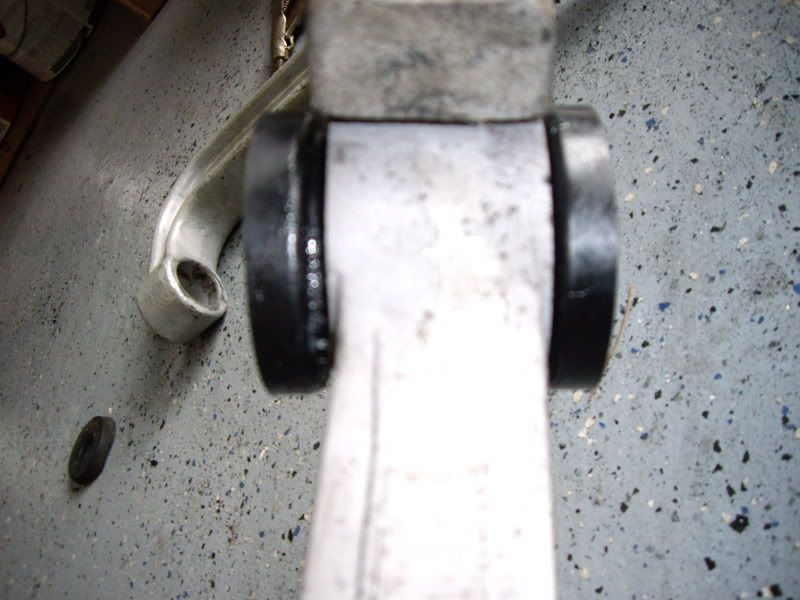 The grease is pretty sticky, I don't think it will come off easily. It didn't come off my hands easily when I washed up. Once the bushings were in I decided to assemble the whole package. I used an old bucket to hold the carrier up while I worked on it. That actually worked well. I then put the bead of the Right Stuff around the carrier and then set the batwing on it. 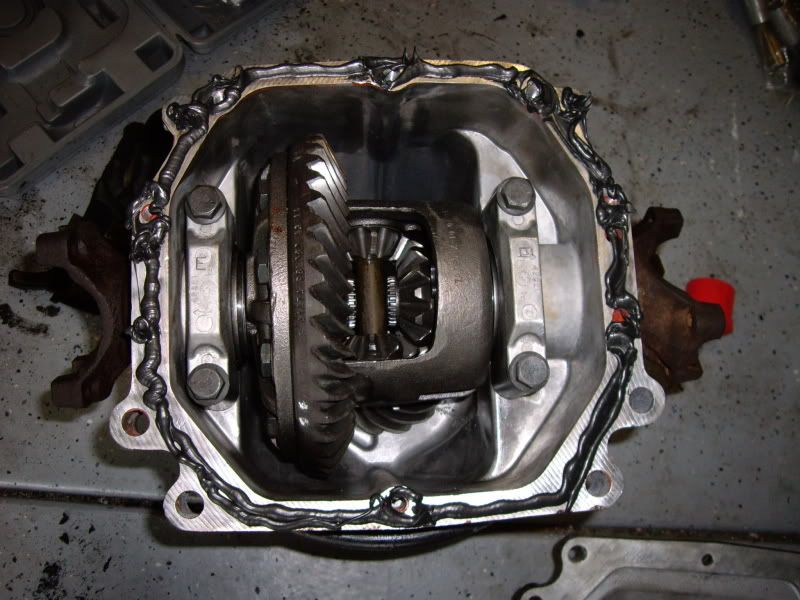 I might have used slightly too much gasket material, but I kept it towards the outside so it would ooze out more than in. I then placed the batwing on and torqued the bolts to 23 ft lbs. 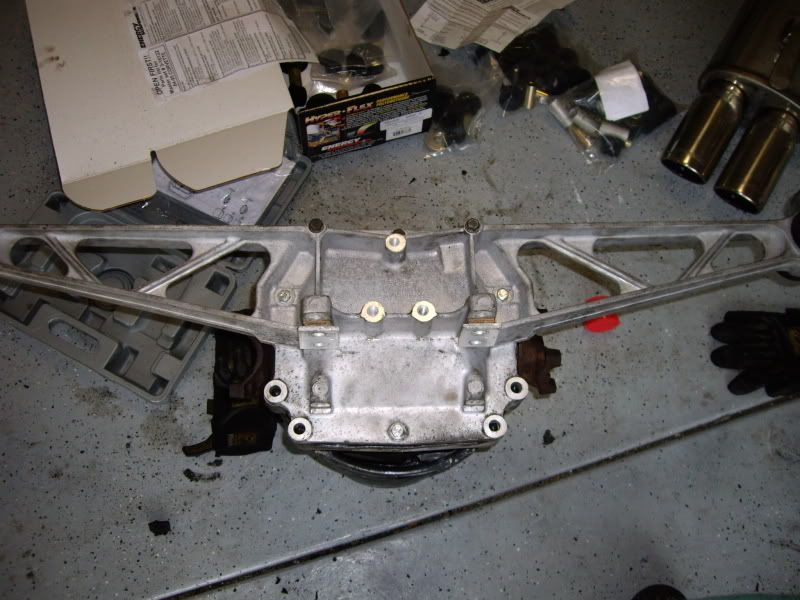 You might notice I replaced a few of the smaller bolts. This is because when I took the old diff off I snapped one of them so I figured it was a good idea to replace them. I'm not 100% certain but I think they are 8x1.25x30mm. I'll have to double check the bag. Ok, here's my second question of the day: I've read you should fill the diff while on the car to get the right level. I figure it's easier to do it on the ground. Comments? Thanks everyone for the help. Matthew |
||
Posted on: 2009/4/26 16:24
|
|||
|
_________________
2002 EBM convertible, Magnusson supercharger, cam, headers, etc. 1989 Corvette...RIP |
|||
 Transfer Transfer
|
|||
| Epimax | Re: Pumpkin swap/u-joints/wheel bearings/suspension junk (PICS!) | ||
|
Elite Guru
 
|
Amazing work!
Man, this is going into the files for future reference. The tip about removing the bushings will be a huge timesaver once the time comes! Thanks for the excellent documentation and photos!  |
||
Posted on: 2009/4/27 10:10
|
|||
 Transfer Transfer
|
|||
| Matatk | Re: Pumpkin swap/u-joints/wheel bearings/suspension junk (PICS!) | ||
|
Webmaster
 
|
Thanks, David. I hope someone can gain some knowledge from my work and trial and error. I'm not a genius, but I figure things out better when I'm actually working with my hands as opposed to just reading a diagram in a book.
Matthew |
||
Posted on: 2009/4/27 12:30
|
|||
|
_________________
2002 EBM convertible, Magnusson supercharger, cam, headers, etc. 1989 Corvette...RIP |
|||
 Transfer Transfer
|
|||
| BillH | Re: Pumpkin swap/u-joints/wheel bearings/suspension junk (PICS!) | ||
|
The Stig Moderator
 |
Big project Matthew, looks like you're doing everything right and taking your time. I'm sure you will be happy with the results.
Comment on the HF taps/dies, there's certain things that I wouldn't buy at HF: anything that requires high grade steel. And, Sears sells a thread restorer kit, about $50 that works much better for chasing threads on bolts and cleaning holes. They will also pull slightly damaged threads back into alignment rather than cut thru them like a tap will. Using slightly too much of the Right Stuff is way better than using too little. Any that oozes into the inside will just set up and stay there, no problem. Any that oozes out can be removed if you want. Looks like you'll be back to driving soon. |
||
Posted on: 2009/4/27 14:51
|
|||
|
_________________
Every man dies but not every man lives. |
|||
 Transfer Transfer
|
|||
| Matatk | Re: Pumpkin swap/u-joints/wheel bearings/suspension junk (PICS!) | ||
|
Webmaster
 
|
Thanks, Bill. Do you know if I should refill the diff on or off the car?
Matthew |
||
Posted on: 2009/4/27 15:40
|
|||
|
_________________
2002 EBM convertible, Magnusson supercharger, cam, headers, etc. 1989 Corvette...RIP |
|||
 Transfer Transfer
|
|||
| BillH | Re: Pumpkin swap/u-joints/wheel bearings/suspension junk (PICS!) | ||
|
The Stig Moderator
 |
Quote:
It dosen't matter. It's not like it's going to leak out anywhere. |
||
Posted on: 2009/4/27 16:01
|
|||
|
_________________
Every man dies but not every man lives. |
|||
 Transfer Transfer
|
|||
| Matatk | Re: Pumpkin swap/u-joints/wheel bearings/suspension junk (PICS!) | ||
|
Webmaster
 
|
Well, I got a chance to work on the car today. Of course, I woke up feeling pretty much like crap, so I should have figured that would be indicative of the day I would have. It was a frustrating workday, to say the least.
I decided to at least get the trans stuff put back together. I don't have a bearing puller or installer, so I looked around and found a few sites that said to use a screwdriver. I actually found this pic on an audi site, but the principle applies: 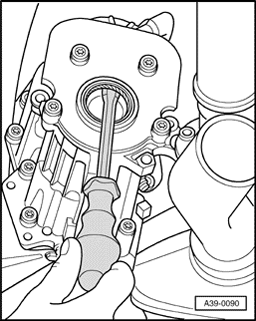 Well, I tried using a screwdriver. I was extremely careful not to nick the sides or any of the surface because this is one piece I don't want to replace. Unfortunately, I didn't have much luck with the screwdriver. It seemed to bend the seal a bit, but didn't pry it out. 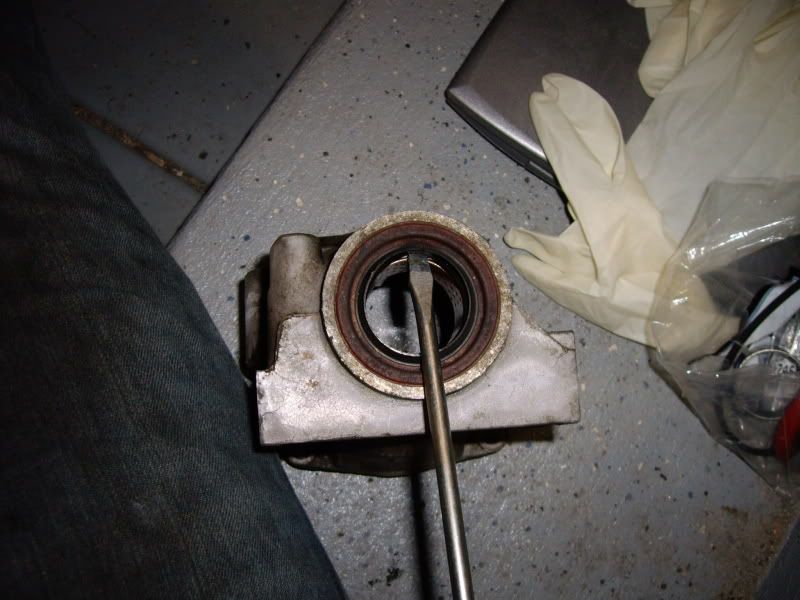 Instead, I grabbed a paid of vice grips, latched them on, and pried it back. The vice grips were perfect because they have a round edge and I could just gently roll it back. Came out instantly. 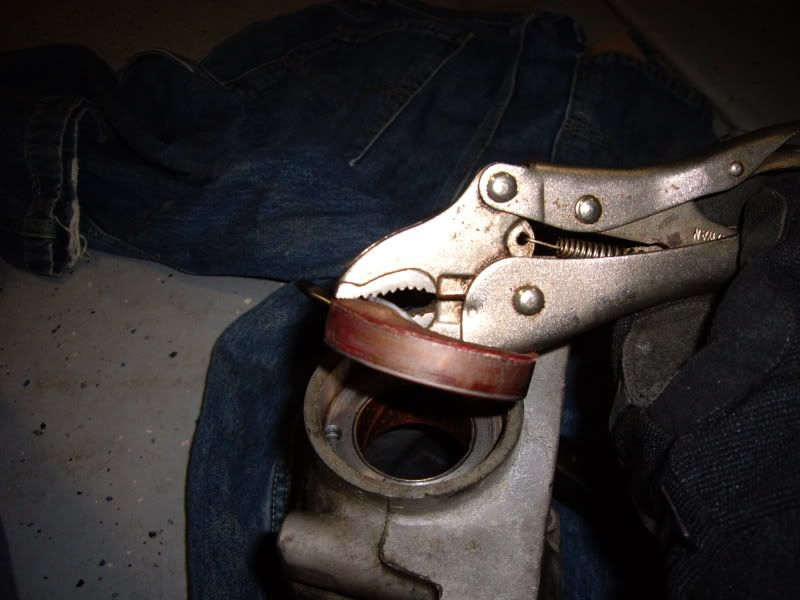 To replace the sleeve, I just pounded it out by putting the new one over it and hitting it with a dead blow hammer. 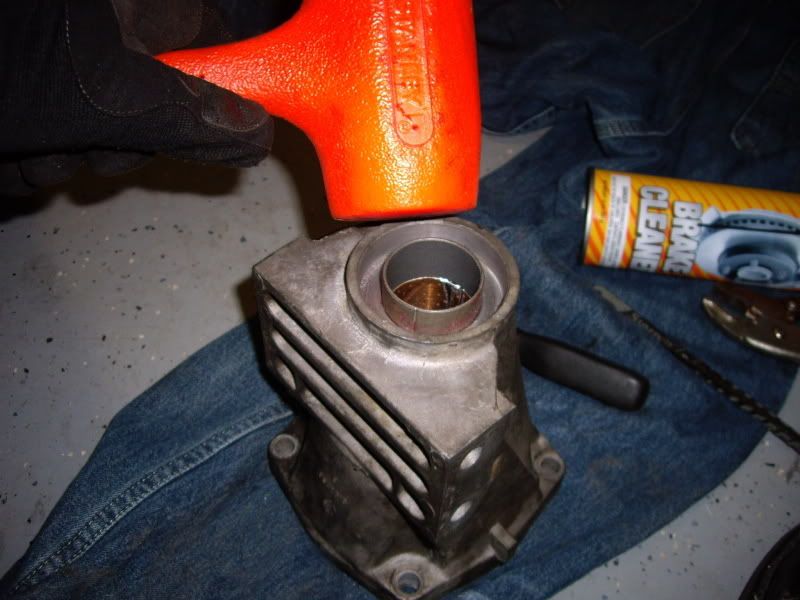 To install the new seal, I placed it square, made sure the tailshaft housing was firmly on the ground, and then placed a board over the top. I hit it dead on a few times with the dead blow and it was perfect. I also lubed it slightly with mobil 1 bearing grease. Not sure if I'm supposed to but I wiped off the excess that oozed out. 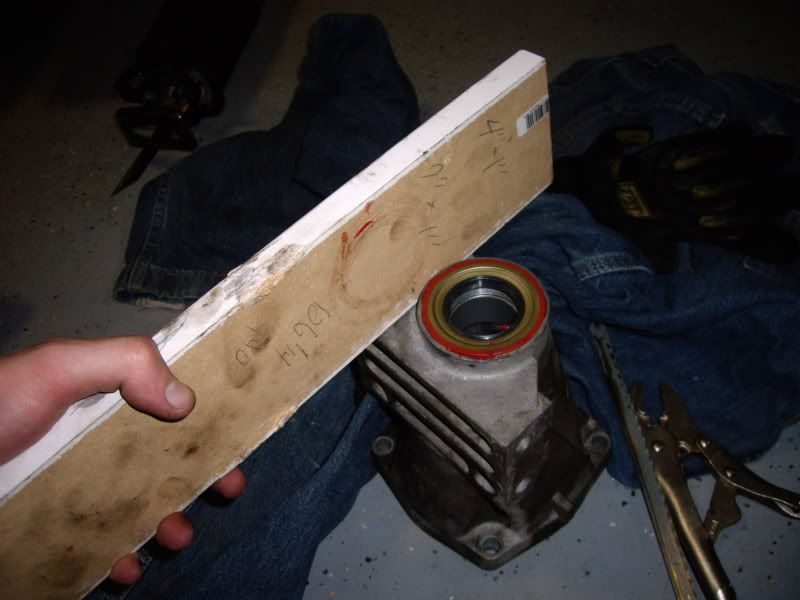 Next I went to put it on the trans. Got it bolted up without a hitch. The 4 bolts should be torqued to 26 ft lbs. Then I went to install the VSS. PIA trying to get enough leverage to push it in there. There was a gap that I just couldn't get to close no matter how hard I tried. Based on my past history with VSS's, I didn't want to damage this one. So I carefully pulled it out, took the tailshaft housing off and then installed the VSS first. Well, in doing so I noticed that the "gap" I was concerned about was just the way it sits and not incorrect. Went to reinstall the tailshaft housing and found out you can not insert the bottom d/s bolt with the VSS in way. WTF. So I had to take the VSS out again (very carefully) and then put the bolt in. I was then able to reassemble everything. Below is a picture of the "gap" that screwed me up. 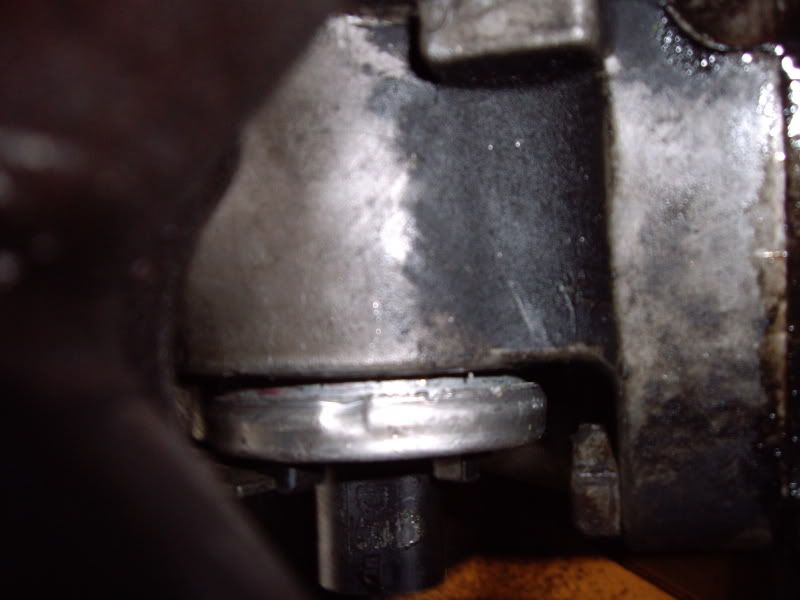 Well, after that I should have known it would be downhill from there and just taken the day off. Instead I took a break to go to the bank and came back to work on the poly bushings. Went ahead and removed the control arms (dog bones) and the camber arms (I don't know the correct name?) Here you can see the difference in length between the upper and lower control rods. 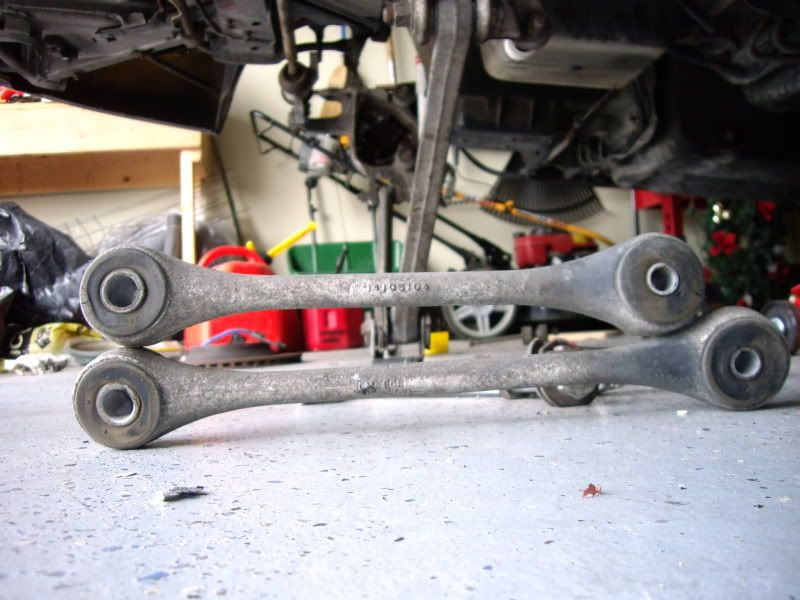 Here's a quick clean up with that awesome aluminum spray: 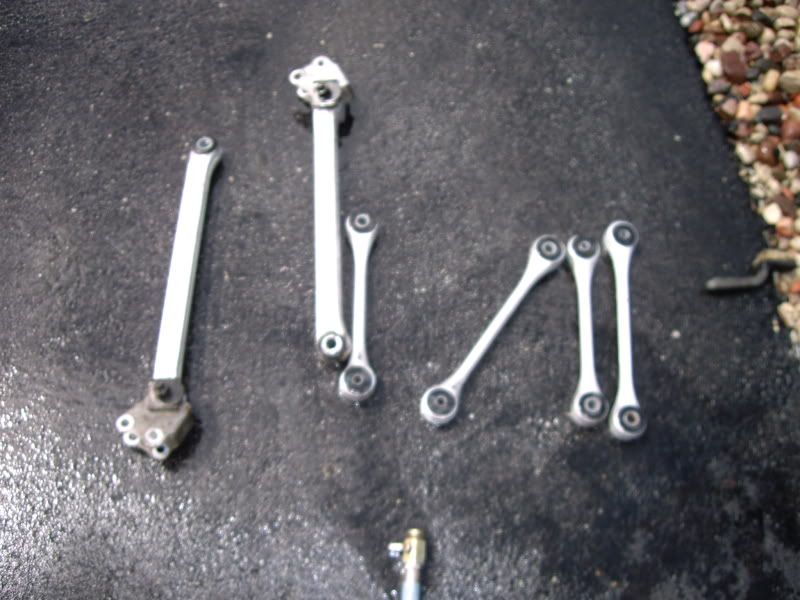 In order to remove the old bushings, I again turned to the trusty drill motor. In this case, use a smaller bit than last time because there is less bushing material (plus the lip on the bushing is misleading as to size) and there is not an internal aluminum sleeve that you need to cut out. 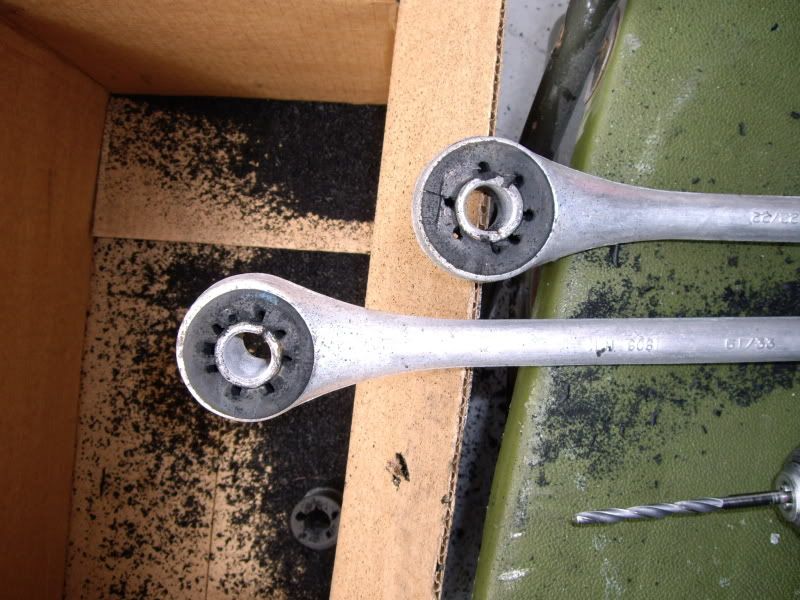 I used the c-clamp press to pushing the bolt sleeve out and then used a socket and hammer to remove the rubber. 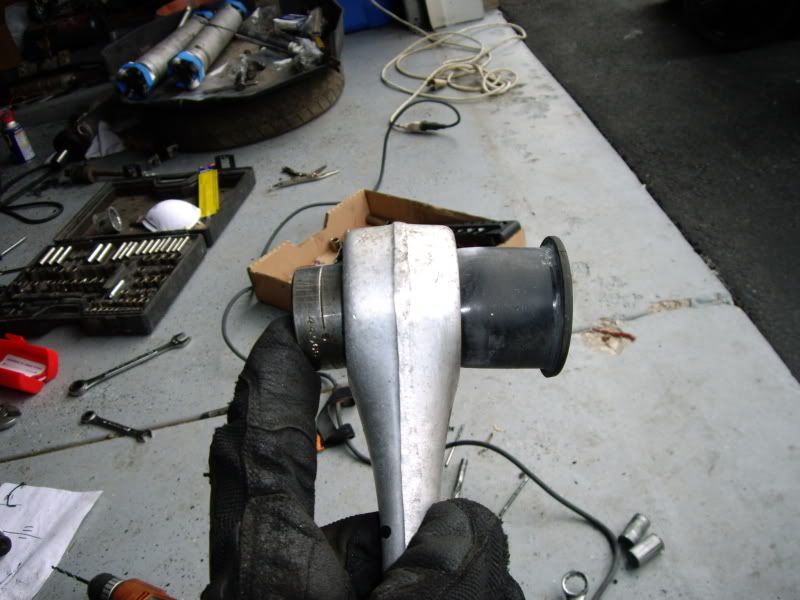 Once removed, you might need to clean them up a bit. Then it's a simple step of greasing the new poly 2 part bushings and pressing them in by hand and then inserting the sleeve. Here they are all done: 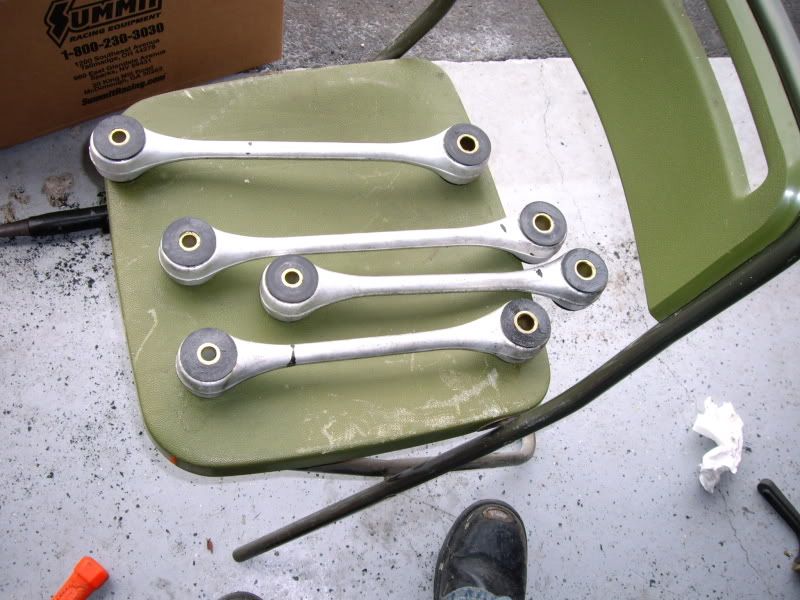 I also did the spring bolt bushings while I was at it. Just a comparison of old to new: 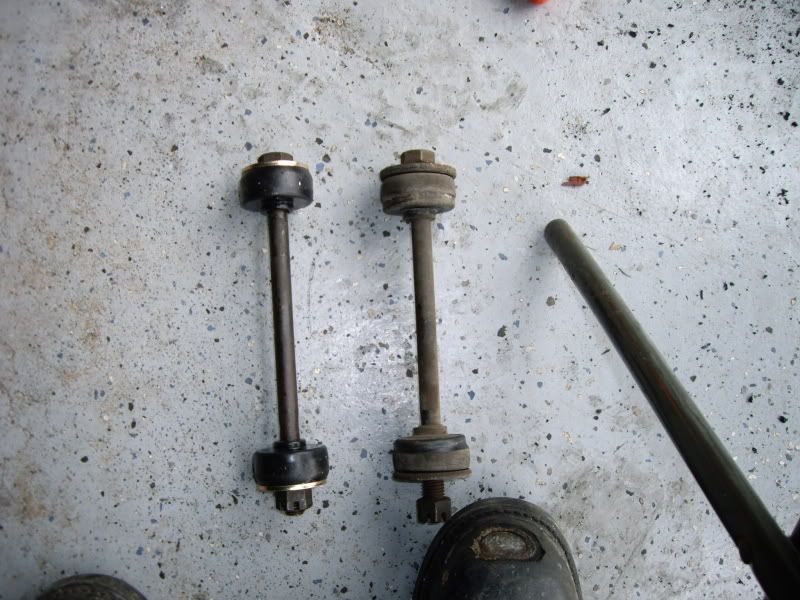 Here is a pic of the camber arm (name?) bushing that is all beat up. This was probably the worst of the group: 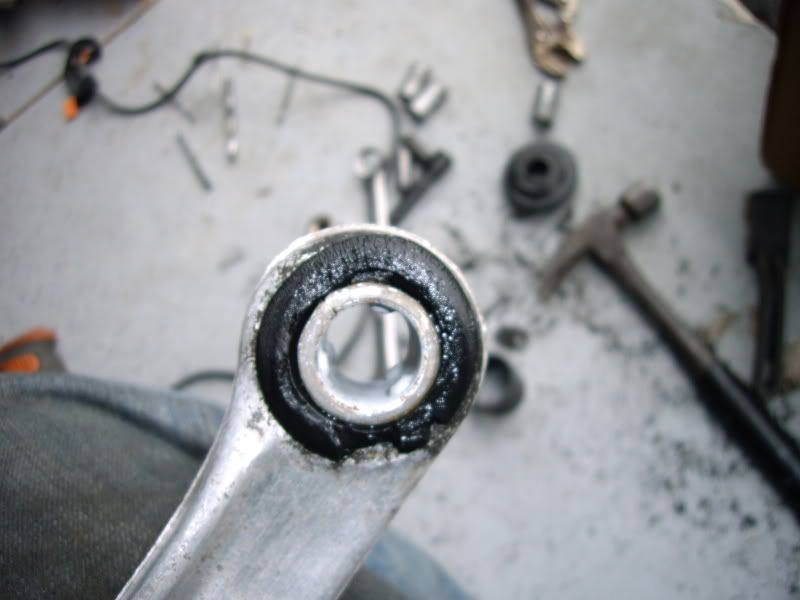 Pressing this bushing out was a serious PIA. There was not a lot of flex in the rubber and the sleeve just didn't want to budge. Got it done eventually: 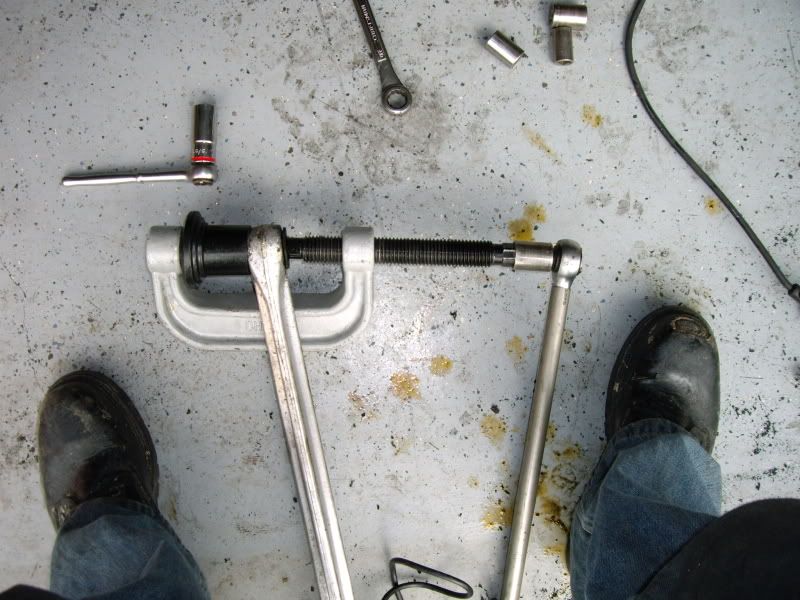 Once I got it pressed out, it was pretty corroded on the inside: 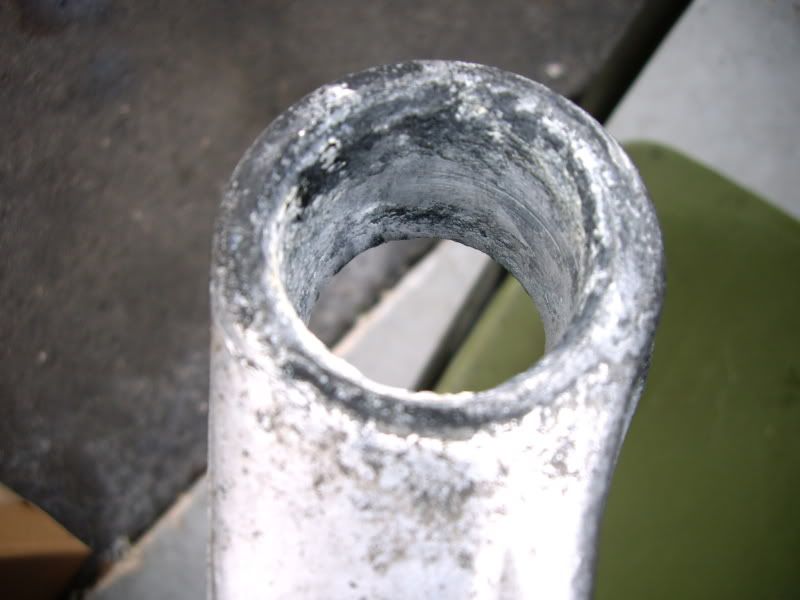 I used a dremel with a sanding drum to clean it up. Once that was done, I tried to unbolt the bolts where the camber adjustment was. Not happening. I tried hard and couldn't get them to budge. I'm gonna need air tools. Probably much easier to do when still attached to the batwing, but at this point I don't have that luxury and I can't get enough torque on them to break free. Since I couldn't finish those bushings I decided to install the dog bones. Got the P/S done without a hitch: 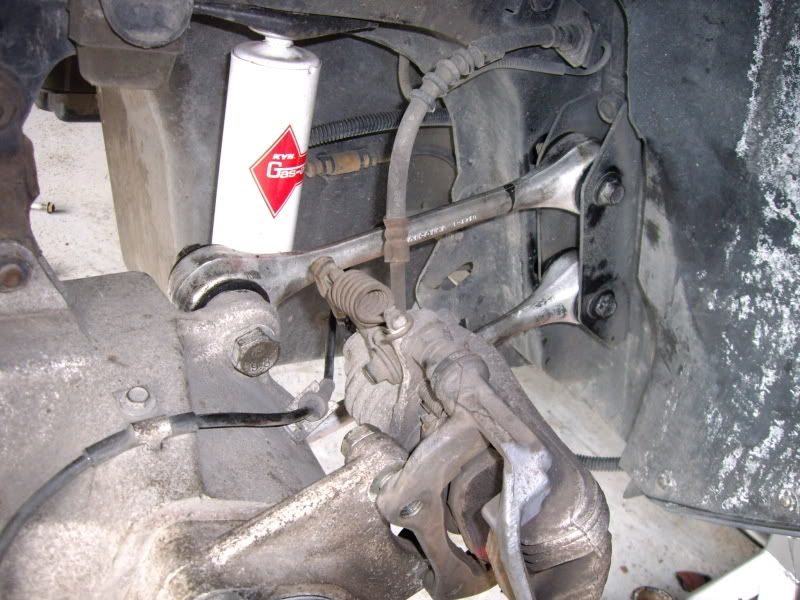 Went to do the D/S and the bolts weren't passing through the sleeves on the top or bottom with ease. It was weird. Maybe a hair off on machining? I also noticed a little machining grime (shavings) in one of the sleeves on the P/S so make sure to check them before install. After a few choice words and gentle massaging with a hammer, I got the bolt thread far enough in that I could draw it all together with the nut and bolt. Of course, when I tried to bolt the front bolt/nut on the bottom dogbone, I dropped it in the frame. Awesome. After that I decided I was done. Too much BS for one day. Tomorrow I'll stop by HD and pick up a new nut to replace the one I lost. I'll also see if my buddy can get those bolts loose. Pretty soon I'll be ready to put it all back together. Still got a couple poly bushings, poly boots, brake pads, bleed brakes, fill the diff, put the driveshaft and c-beam in, mount the diff and check my work. Thanks for following along with my follies. Matthew |
||
Posted on: 2009/4/28 22:37
|
|||
|
_________________
2002 EBM convertible, Magnusson supercharger, cam, headers, etc. 1989 Corvette...RIP |
|||
 Transfer Transfer
|
|||
| 1Fast04Vert | Re: Pumpkin swap/u-joints/wheel bearings/suspension junk (PICS!) | ||
|
Elite Guru
 |
What color are you going to paint the calibers?
You know while you are in there you should replace the brake lines with SS lines. Don't forget to wax the shock absorber tubes. Seriously, you are really doing well. Bet you have it back on the road this weekend. |
||
Posted on: 2009/4/28 23:27
|
|||
|
_________________
2004 Vert. 475hp. Built by Vengeance Racing |
|||
 Transfer Transfer
|
|||
| Matatk | Re: Pumpkin swap/u-joints/wheel bearings/suspension junk (PICS!) | ||
|
Webmaster
 
|
Quote:
I've got the zaino lined up  I do plan on painting the calipers black to match the front, but I'm not gonna pull them off to do so. I have some high temp gloss engine paint I might try. Otherwise I'll try the brush on caliper paint. I used the spray version before and I was not happy with the results after much prep time. I'd like to try to get it finished up this weekend, but if it doesn't happen I'm not gonna cry. I'd rather take my time and do everything correctly. I'm also debating when to start my header project. Because of course that also means I have to buy a new high flow cat (*of course*) and I'll have to get a front y-pipe bent up at the exhaust shop. Plus get an EGR blockoff and pull the plenum. All of that = more $$$ and more time. It never ends! Lol. Thanks for the encouragement, though. Matthew |
||
Posted on: 2009/4/29 0:58
|
|||
|
_________________
2002 EBM convertible, Magnusson supercharger, cam, headers, etc. 1989 Corvette...RIP |
|||
 Transfer Transfer
|
|||
| jhammons01 | Re: Pumpkin swap/u-joints/wheel bearings/suspension junk (PICS!) | ||
|
Senior Guru
 
|
Damn man, you are going to town on that rear section.
I'm taking notes for sure |
||
Posted on: 2009/4/29 17:45
|
|||
 Transfer Transfer
|
|||
| 1Fast04Vert | Re: Pumpkin swap/u-joints/wheel bearings/suspension junk (PICS!) | ||
|
Elite Guru
 |
I got the caliber paint kit (brush on) from Advanced Auto.
Brush the dirt off, spray on the degreaser that comes with the kit, wait a few minutes and paint. It didn't cost much, take long to do and looks great to me. |
||
Posted on: 2009/4/29 19:29
|
|||
|
_________________
2004 Vert. 475hp. Built by Vengeance Racing |
|||
 Transfer Transfer
|
|||
| SpectatorRacing | Re: Pumpkin swap/u-joints/wheel bearings/suspension junk (PICS!) | ||
|
Elite Guru
 |
This is a great write up, I'll have to bookmark it. I've often wondered how much work it is to get the batwing out. Thanks for answering that question. Anyone want to trade their 3:45's for a 4:10?
I'll try to remember to take photos while rebuilding the motor. This stuff is always so helpful, I should do my part. I am curious why you bent the hell out of those pins doing the bearing replacement. I've never had any trouble. I can only assume it's because you removed the halfshafts and had nothing to resist turning the hub bolt. |
||
Posted on: 2009/4/29 19:29
|
|||
|
_________________
aka Scaryfast |
|||
 Transfer Transfer
|
|||
| Matatk | Re: Pumpkin swap/u-joints/wheel bearings/suspension junk (PICS!) | ||
|
Webmaster
 
|
Quote:
That's exactly why. If you are doing only the wheel bearings the half shafts are still attached and keep the hub from moving. I think I mentioned that in the post? On another note, I did get the bolts loosened from the camber bars, so that's out of the way. This weekend I'll be able to put the new bushings in and start reassembling stuff. Thanks for the comments. Matthew |
||
Posted on: 2009/4/30 0:12
|
|||
|
_________________
2002 EBM convertible, Magnusson supercharger, cam, headers, etc. 1989 Corvette...RIP |
|||
 Transfer Transfer
|
|||
You can view topic.
You cannot start a new topic.
You cannot reply to posts.
You cannot edit your posts.
You cannot delete your posts.
You cannot add new polls.
You cannot vote in polls.
You cannot attach files to posts.
You cannot post without approval.
|
|


