


|
|
Register To Post |

| PeteK | 700R4 - 4L60 Build Up Inside | ||
|
Moderator
 
|
I am building up a replacement trans for my 1987 coupe. My intention is to build a duplicate of the trans in my car currently, to R&D the gear ratio swap. The new gears will give gears 1-3 the same approx ratio as a 2004R , and overdrive will remain .70
I will update the thread as I go. Today I tossed a 1990 vette core on the stand. The V on the bellhousing identifies it as a Vette core. 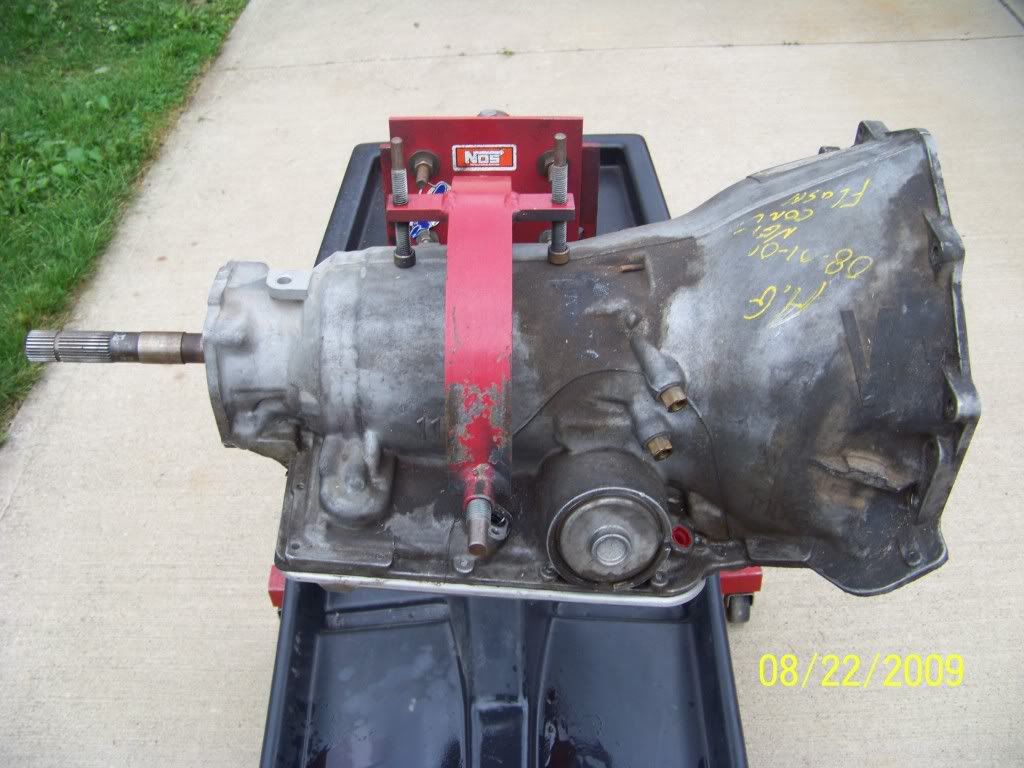 The pass side of the case, near the pan gasket is where the info is stamped 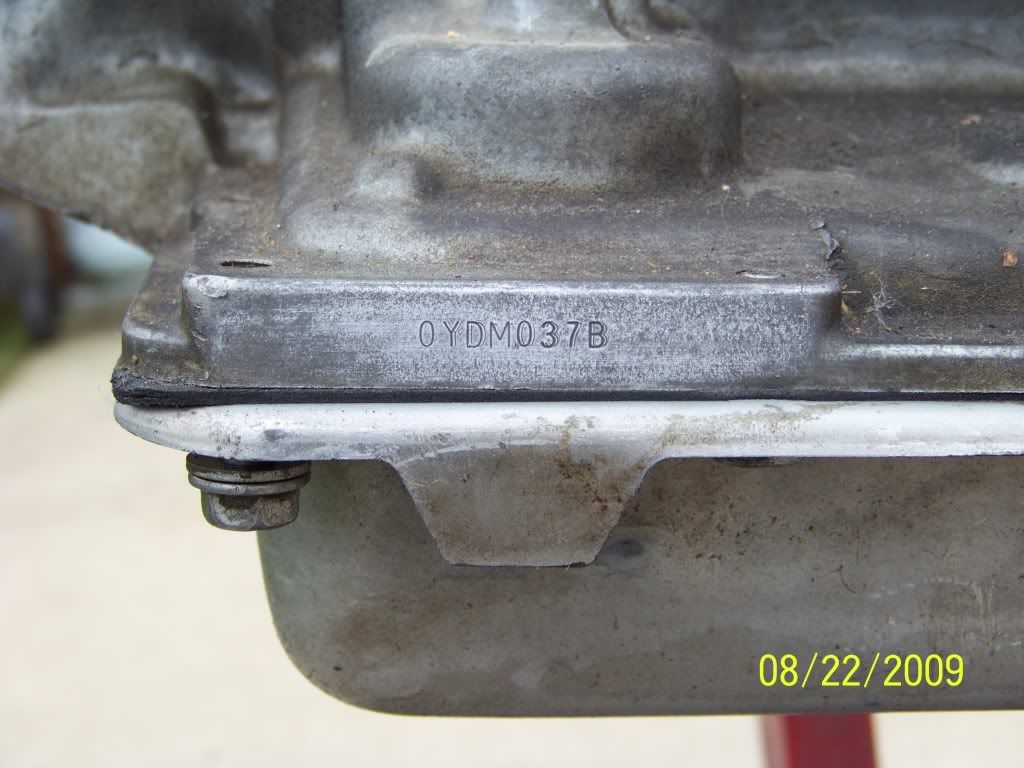 The 0 indicates 1990 model year. YDM is the code for Corvette 037 is the Julien date (February 6, 1990) B means second shift build at the factory. |
||
Posted on: 2009/8/22 23:26
Edited by Matatk on 2012/2/15 19:18:30 |
|||
|
_________________
"It was really on a pass until it came apart." "Yeah. They always are." |
|||
 Transfer Transfer
|
 
|
||

| PeteK | Re: 700R4 - 4L60 Build Up | ||
|
Moderator
|
C4 Vette's have a unique tailhousing. Because there is no provisions for a "standard" transmission mount, the tailhousing is used to attach the trans to the rear end via an aluminum "C" shaped support beam.
A couple pic's of the tailhousing. 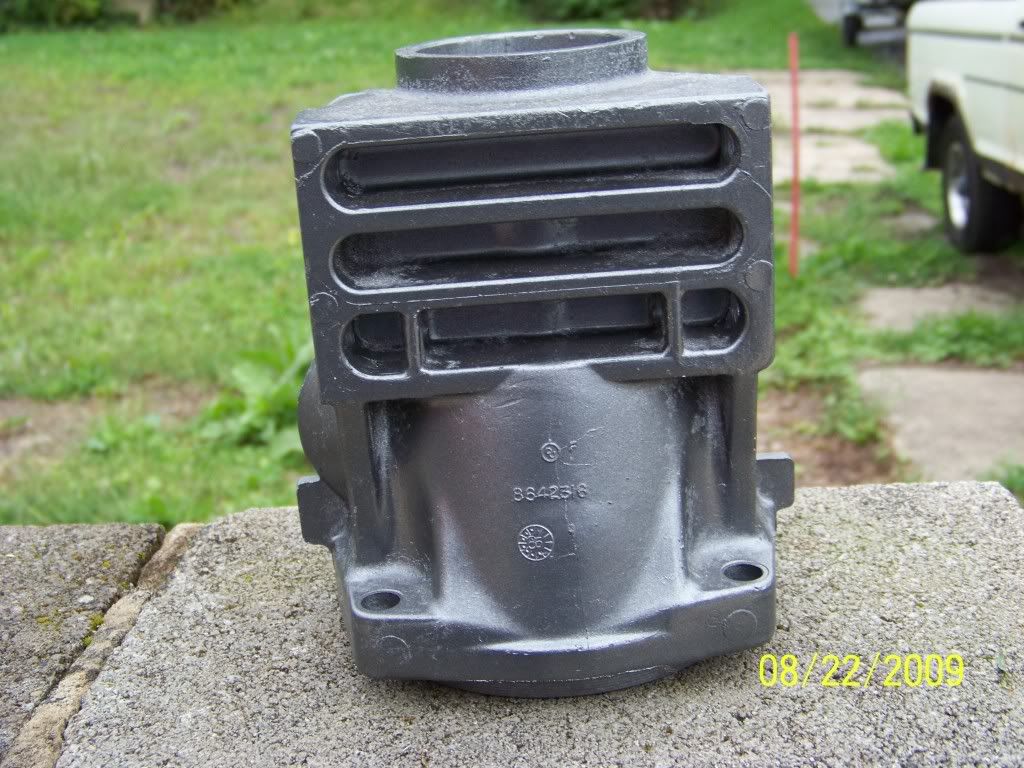 Passenger side view. 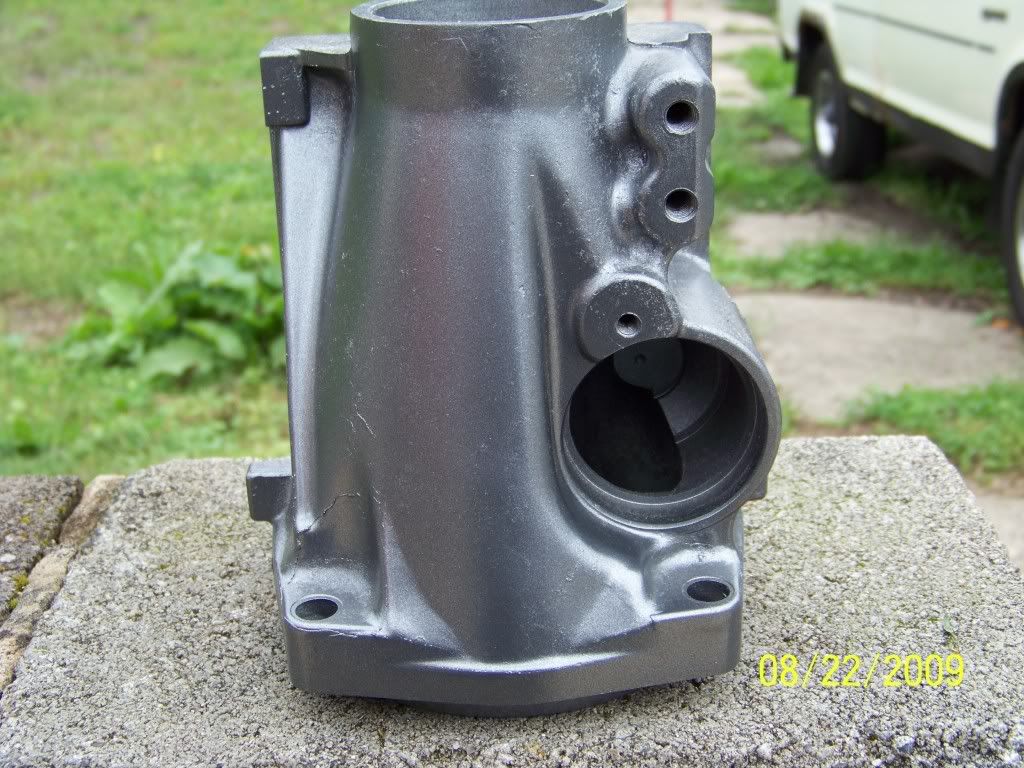 Drivers side view. Round hole is for speedo sensor. |
||
Posted on: 2009/8/23 0:47
Edited by PeteK on 2012/2/15 23:01:25 Edited by PeteK on 2012/2/15 23:02:40 |
|||
|
_________________
"It was really on a pass until it came apart." "Yeah. They always are." |
|||
|
Transfer
|
|
||
| iCorvette | Re: 700R4 - 4L60 Build Up Inside | ||
|
Senior Guru
 
|
cool
i like saying i have a zf6 but an auto would be a dream to drive.... |
||
Posted on: 2009/8/23 2:56
|
|||
|
_________________

|
|||
|
Transfer
|
|
||
| PeteK | Re: 700R4 - 4L60 Build Up Inside | ||
|
Moderator
|
Today's goal is to tear it down to sub-assemblies, and to clean and prepare the empty case. Painting it also.
The guy who built it last was a freakin butcher. He was too cheap, stupid or lazy to put the orifice screens back in it, so all the trash went through it, and scarred up alot of stuff, including some machined surfaces in the case. The bad news is it will require alot to fix. The good news is that it is all fixable, and will permit me to show some repair techniques not normally needed in a typical overhaul. What cannot be fixed will be replaced with new or quality used parts. Stay tuned, pics to follow. |
||
Posted on: 2009/8/23 21:02
|
|||
|
_________________
"It was really on a pass until it came apart." "Yeah. They always are." |
|||
|
Transfer
|
|
||
| iCorvette | Re: 700R4 - 4L60 Build Up Inside | ||
|
Senior Guru
|
Quote:
how much power are you building it for? |
||
Posted on: 2009/8/23 21:14
|
|||
|
_________________
|
|||
|
Transfer
|
|
||
| PeteK | Re: 700R4 - 4L60 Build Up Inside | ||
|
Moderator
|
500 hp and 600 ft lbs, but it will likely handle more.
7000 rpm |
||
Posted on: 2009/8/23 22:41
|
|||
|
_________________
"It was really on a pass until it came apart." "Yeah. They always are." |
|||
|
Transfer
|
|
||
| PeteK | Re: 700R4 - 4L60 Build Up Inside | ||
|
Moderator
|
Because the trans shown is a core, the tailhousing and speedo gears are already removed.
Next step is to carefully tap off the governor cover with a large screwdriver. These fit on like an old style wheel bearing cap. A few careful taps, and off it comes. 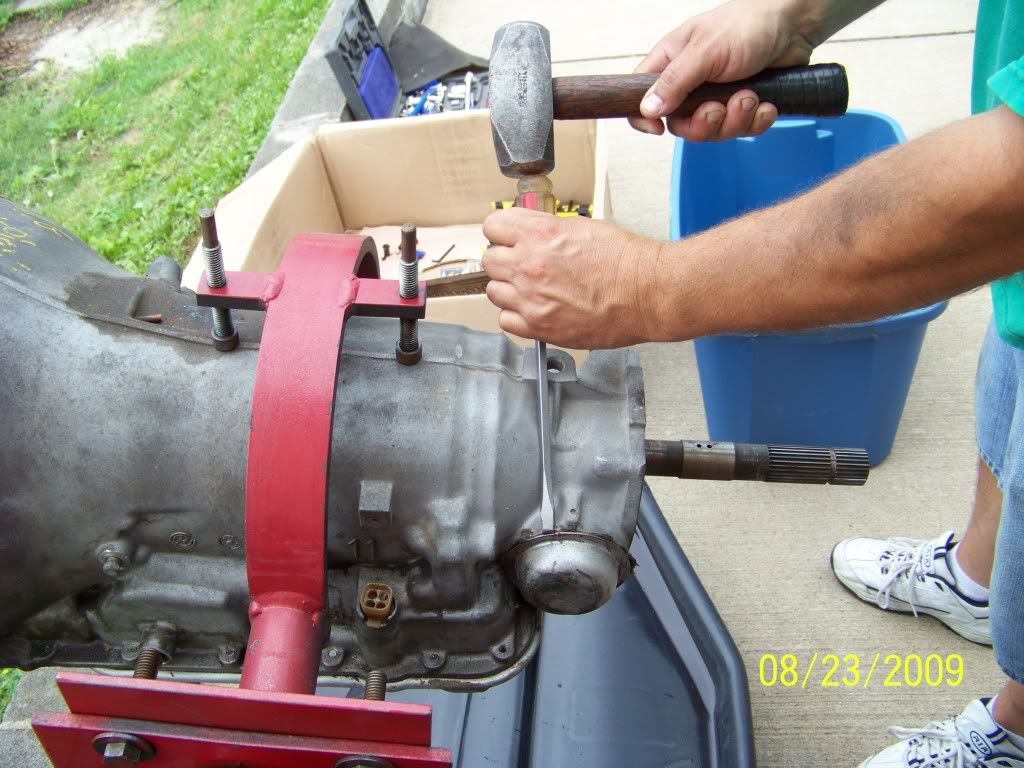 Governor exposed 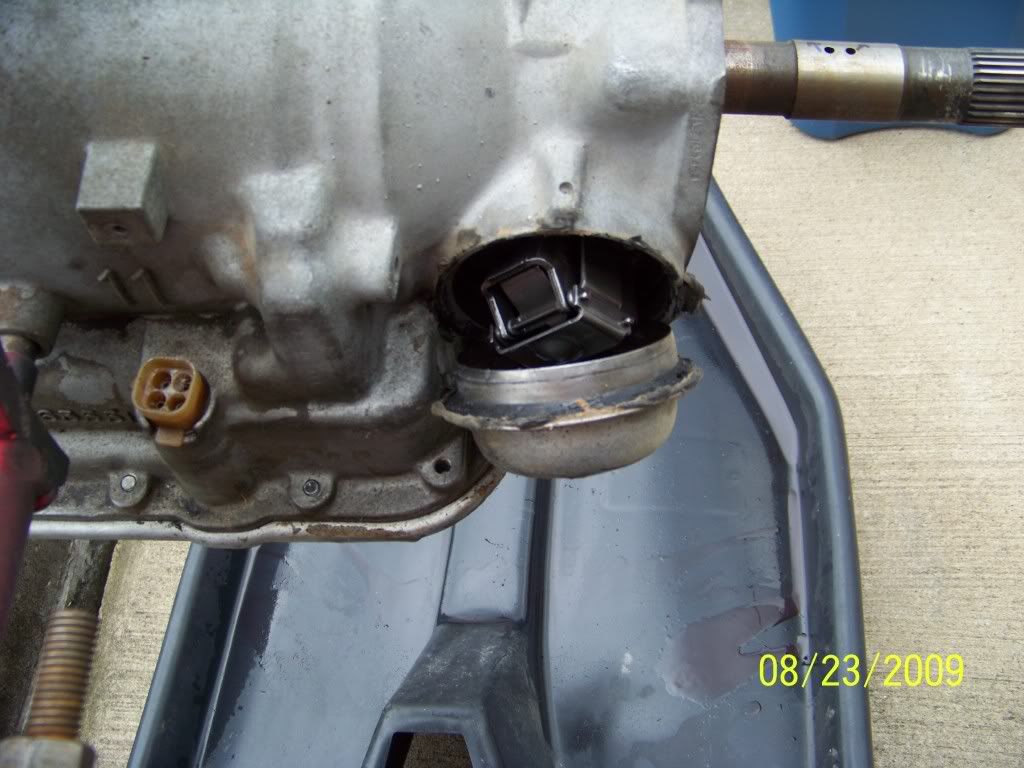 Governor is then rotated out for easy removal.Notice the green gear that will be replaced during the overhaul. 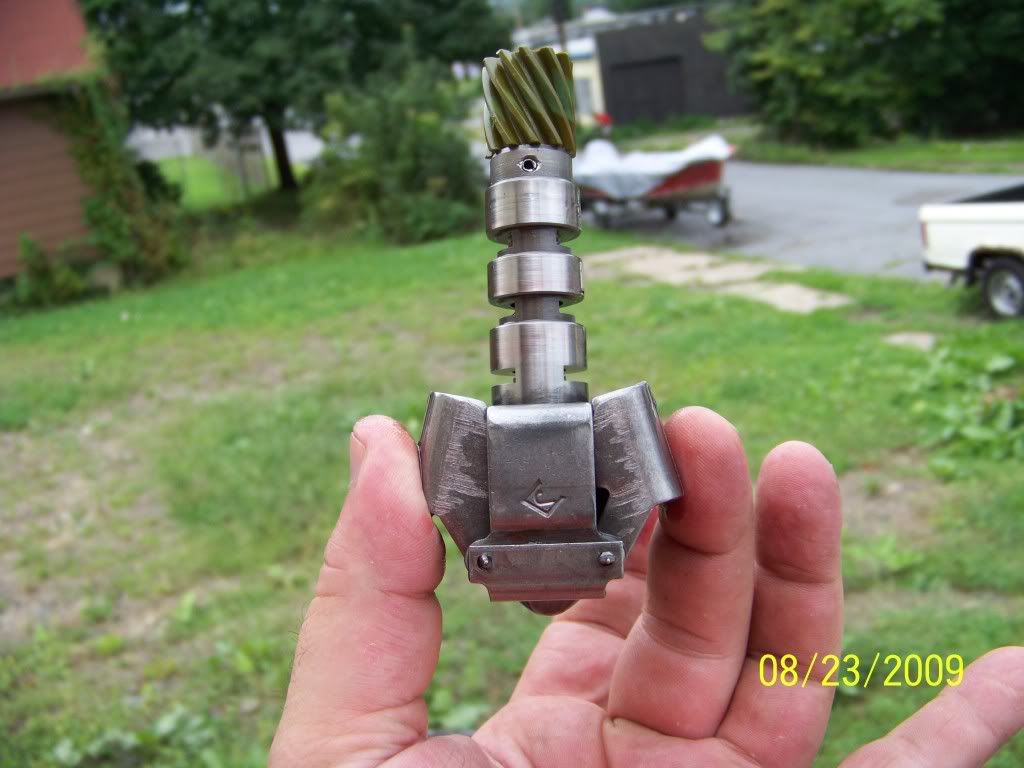 A quick peek at the governor's bore in the case reveals the origional hone marks. It is in great shape. 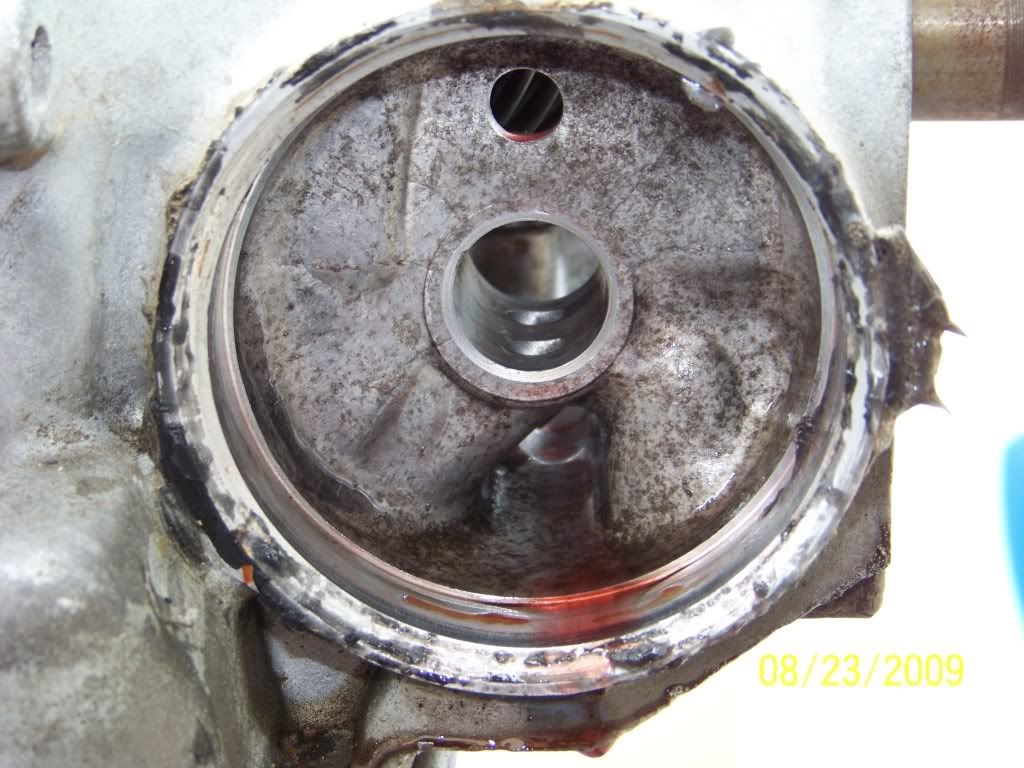 The governor cover below is a different story. The last moron, smashed the shit out of it, putting the governor in a bind. It is a $25 part that will need changing. 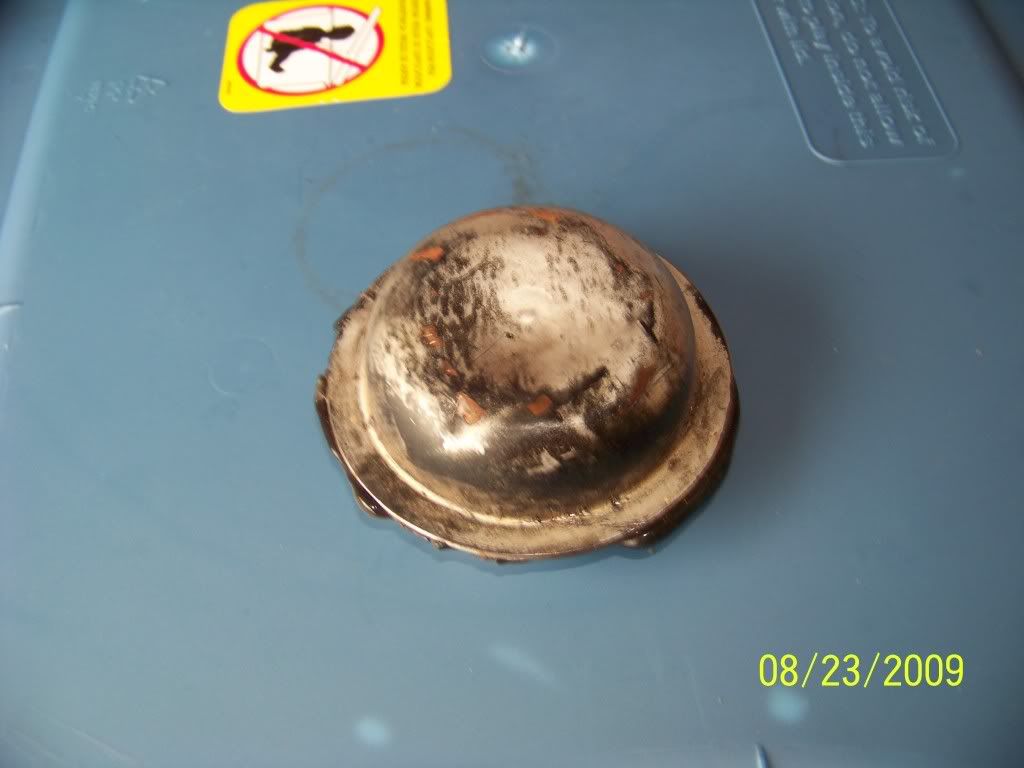 |
||
Posted on: 2009/8/24 2:43
Edited by PeteK on 2012/2/15 23:03:42 Edited by PeteK on 2012/2/15 23:07:25 |
|||
|
_________________
"It was really on a pass until it came apart." "Yeah. They always are." |
|||
|
Transfer
|
|
||
| PeteK | Re: 700R4 - 4L60 Build Up Inside | ||
|
Moderator
|
Now it is time to remove the pan. A 700R4 or 4L60's pan is easily identified. It has 16 - 13mm bolts holding it on, and is a distinct rectangular shape.
*Always remember that this trans is metric. There are ZERO SAE bolts. 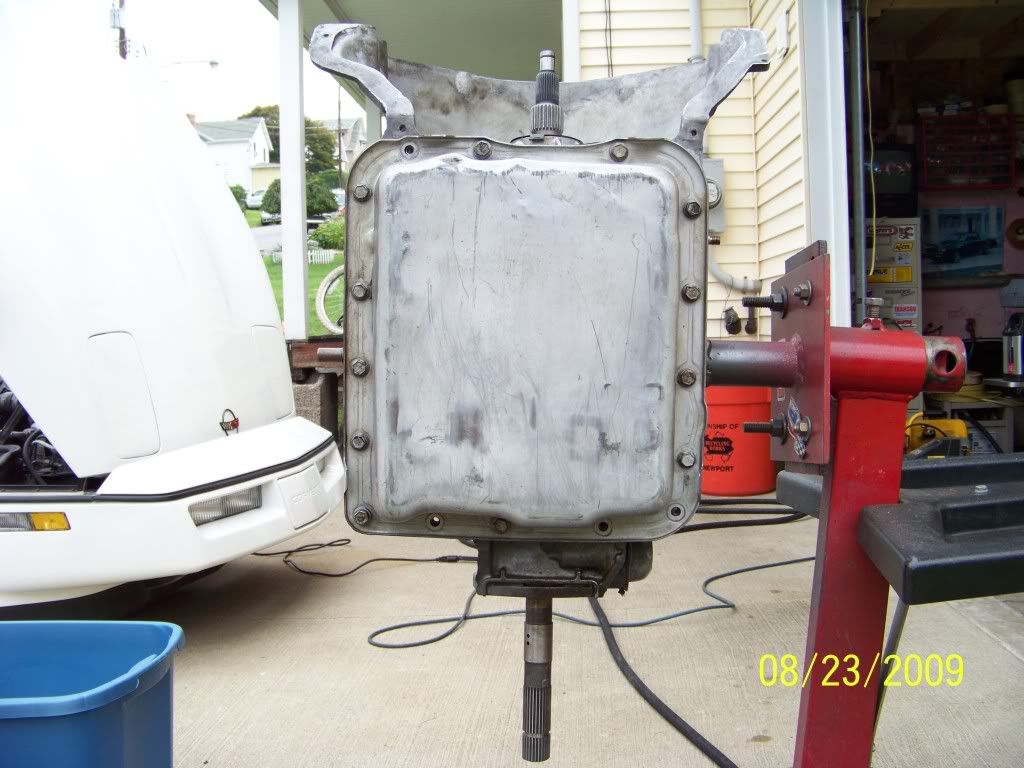 Removal of the pan reveals little trash. This probably was a decent core, or the fluid was changed (just prior to being pulled) as a last ditch effort to save a slipping trans. I doubt it though, as there was no burnt odor from the unit. 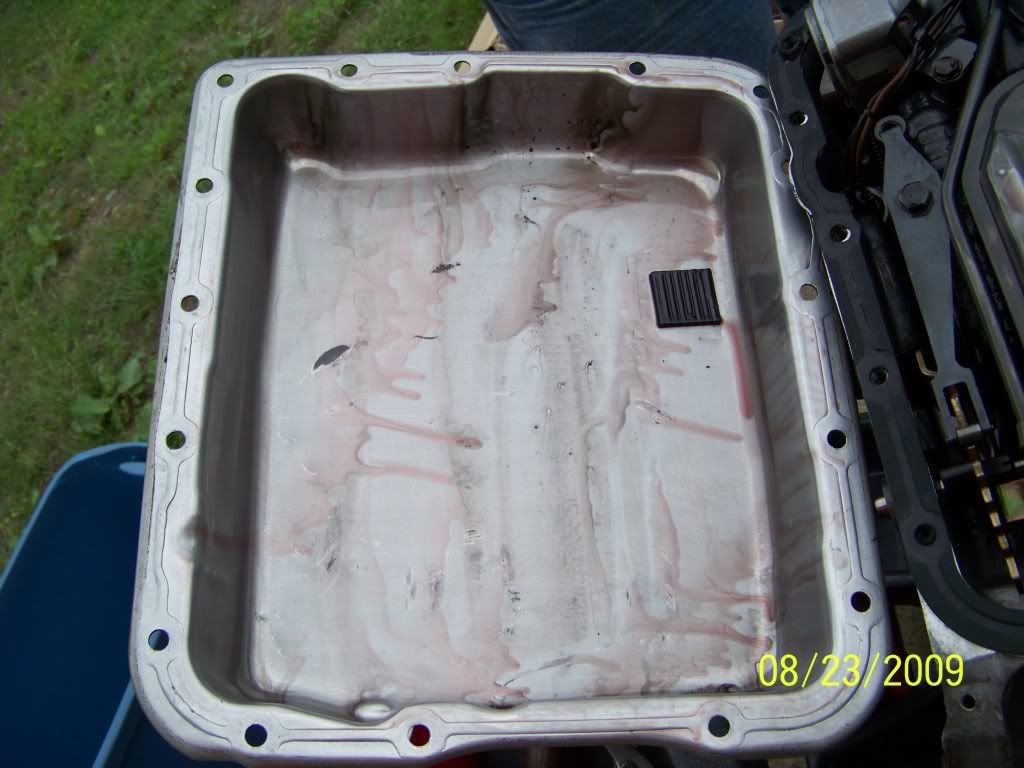 Next, the filter is gently wiggled off. The orange filter sealing washer always stays in the pump bore. 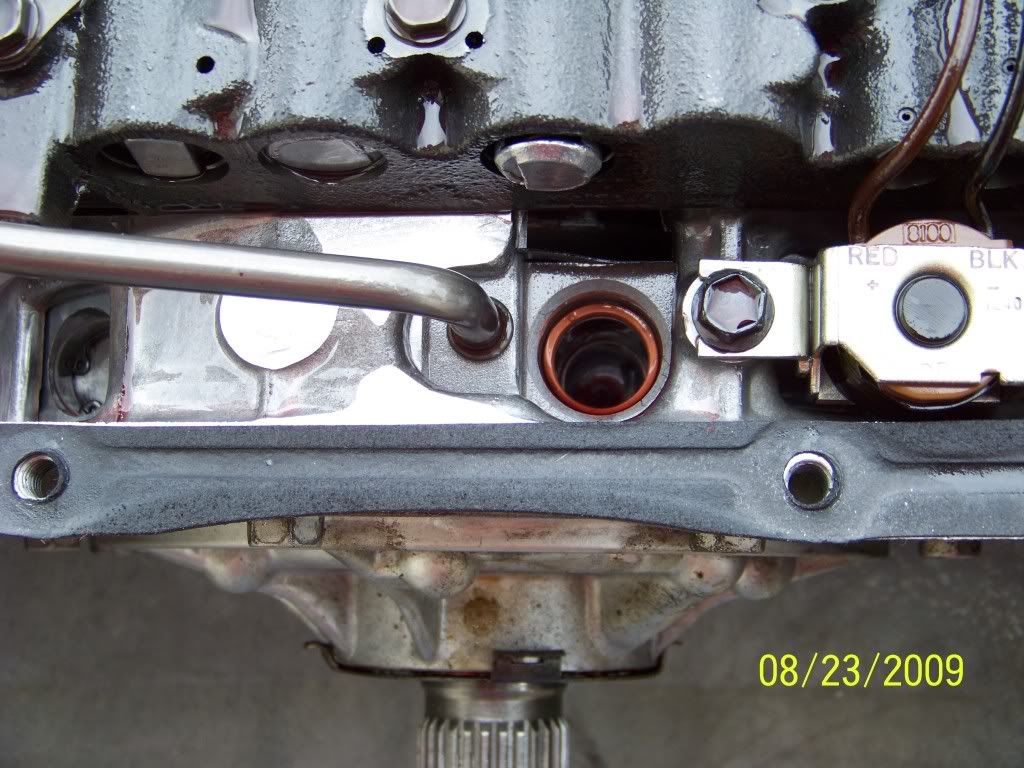 It needs to be removed carefully, without scratching the bore. I prefer to use my lock ring pliers. 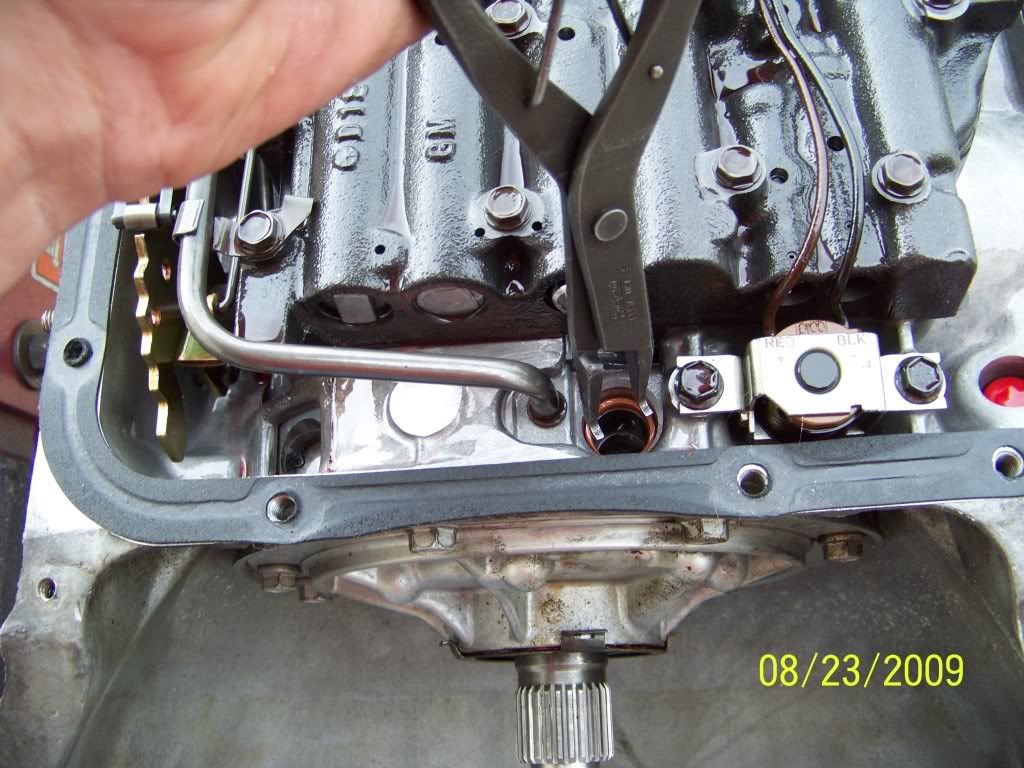 |
||
Posted on: 2009/8/24 2:56
Edited by PeteK on 2012/2/15 23:04:56 |
|||
|
_________________
"It was really on a pass until it came apart." "Yeah. They always are." |
|||
|
Transfer
|
|
||
| PeteK | Re: 700R4 - 4L60 Build Up Inside | ||
|
Moderator
|
Next, remove the 3 bolts that hold the 1-2 accumulator on. The word accumulator means shock absorber. This unit cushions the 1-2 shift, based on the tension of the spring inside.
 Removing it exposes the piston and spring. 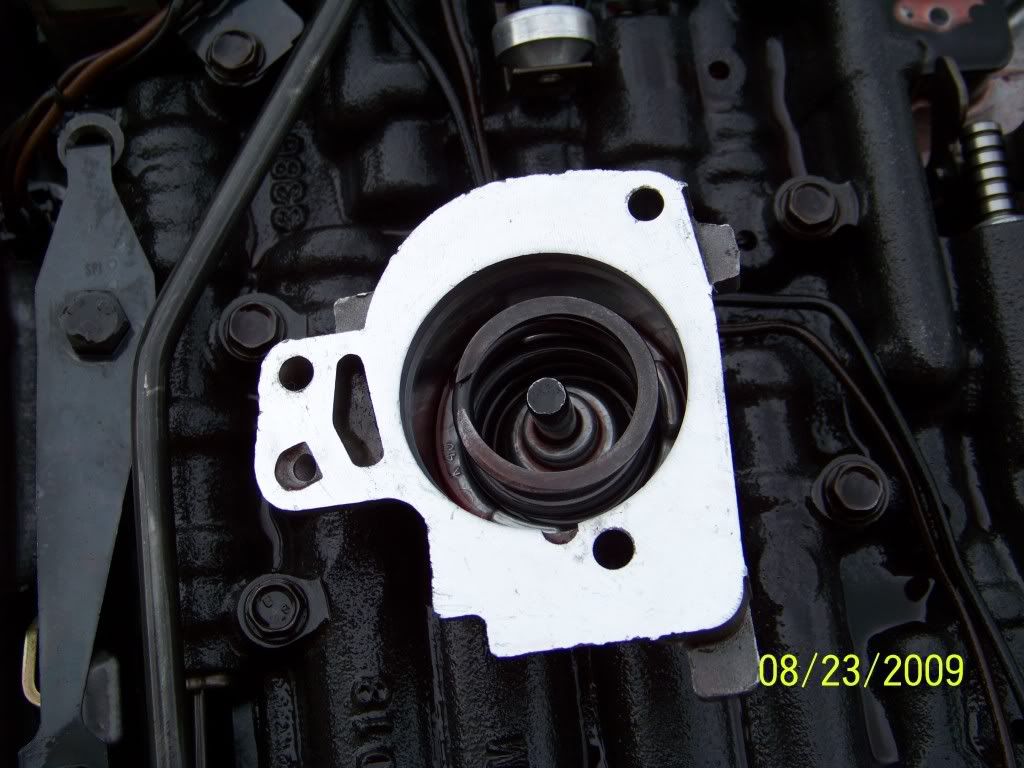 Removal of the piston from the bore reveals that the $40 accumulator cover is scarred, and is ruined.  Part number for the new one: 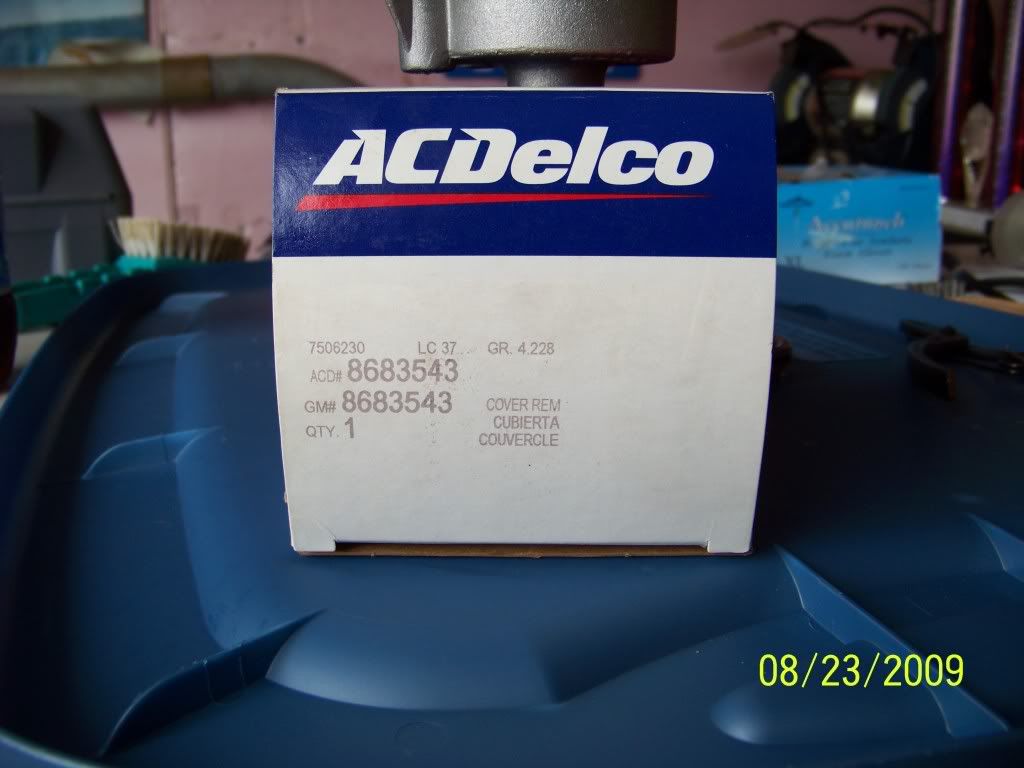 |
||
Posted on: 2009/8/24 3:03
Edited by PeteK on 2012/2/15 23:06:05 |
|||
|
_________________
"It was really on a pass until it came apart." "Yeah. They always are." |
|||
|
Transfer
|
|
||
| PeteK | Re: 700R4 - 4L60 Build Up Inside | ||
|
Moderator
|
Next, the aux valve body and the feed tube for it is removed. The aux valve body is also an accumulator. It cushions the shift into drive or reverse, and is helpful for not beating the trans to death while shifting from reverse to drive, as when one is stuck in the snow, and is trying to rock back and forth.
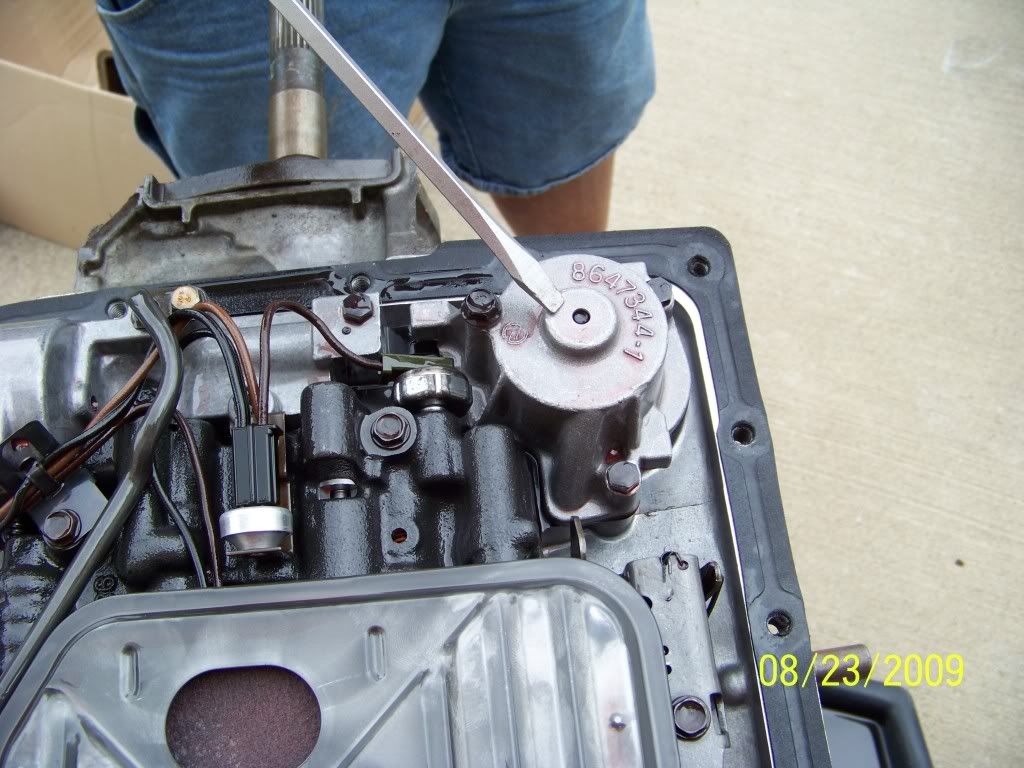
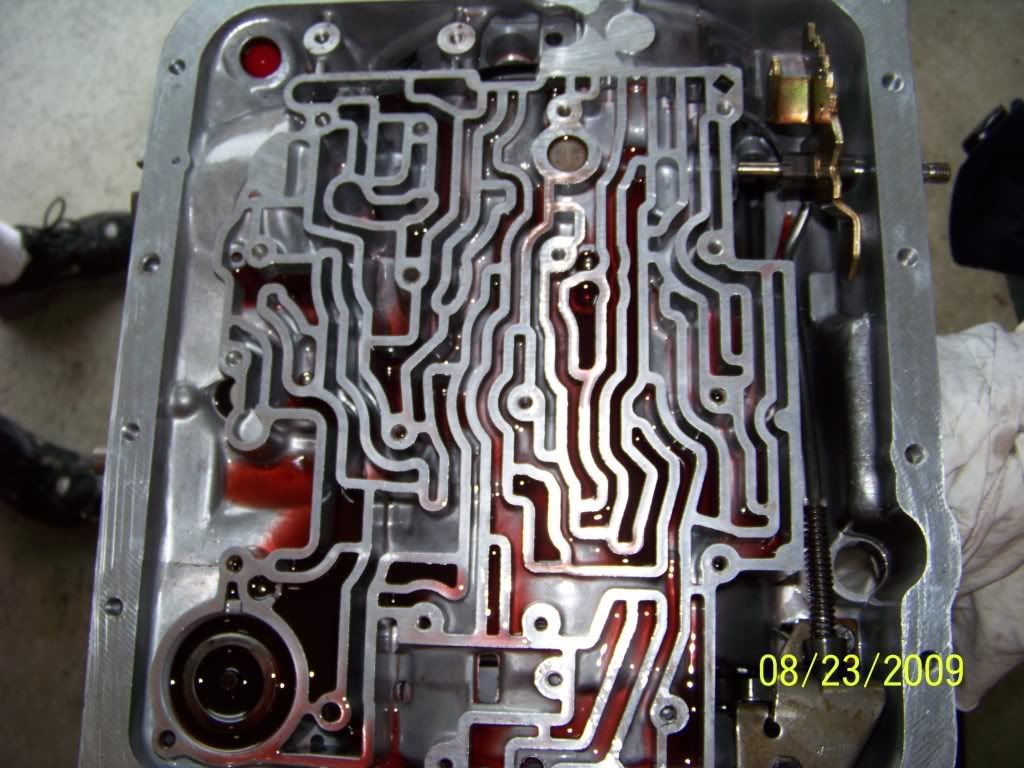
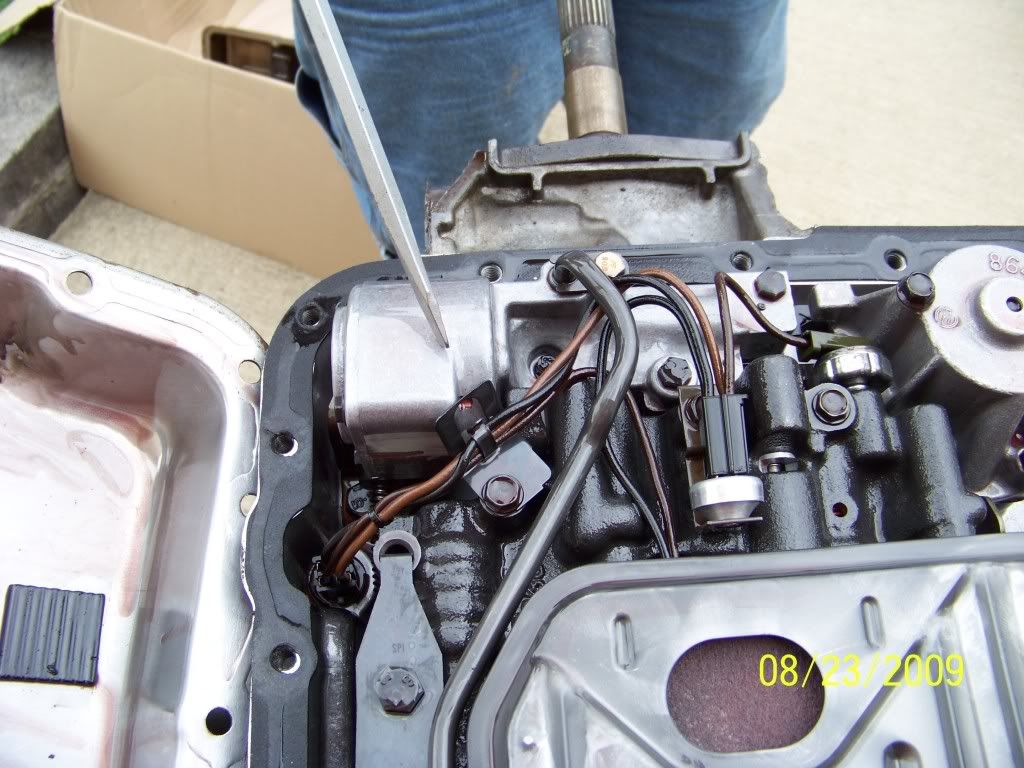 I then remove the electrical lock up connector from the case using an 11/16, 12 point, deep socket. The socket us used to depress the retaining tabs. The last guy busted this to shit as well, so I just pushed out the busted mess. Pic below shows the new aftermarket piece next to the shot factory piece: 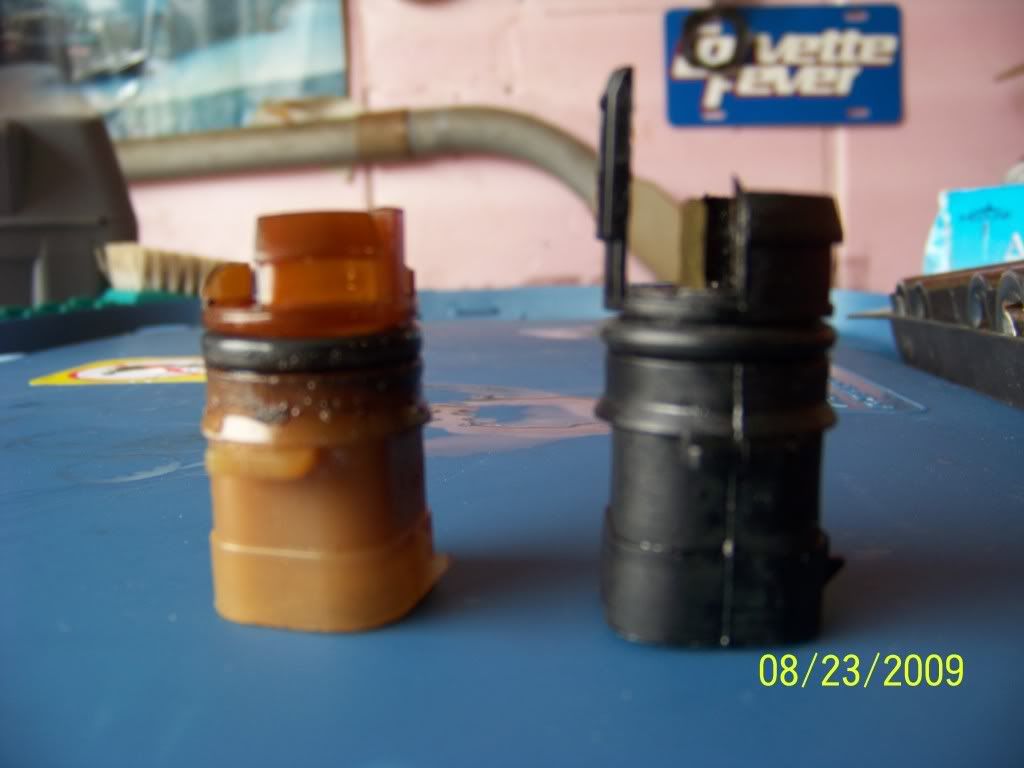 I then pull the 2 bolts that hold in the lock up solenoid, then I remove the whole harness. 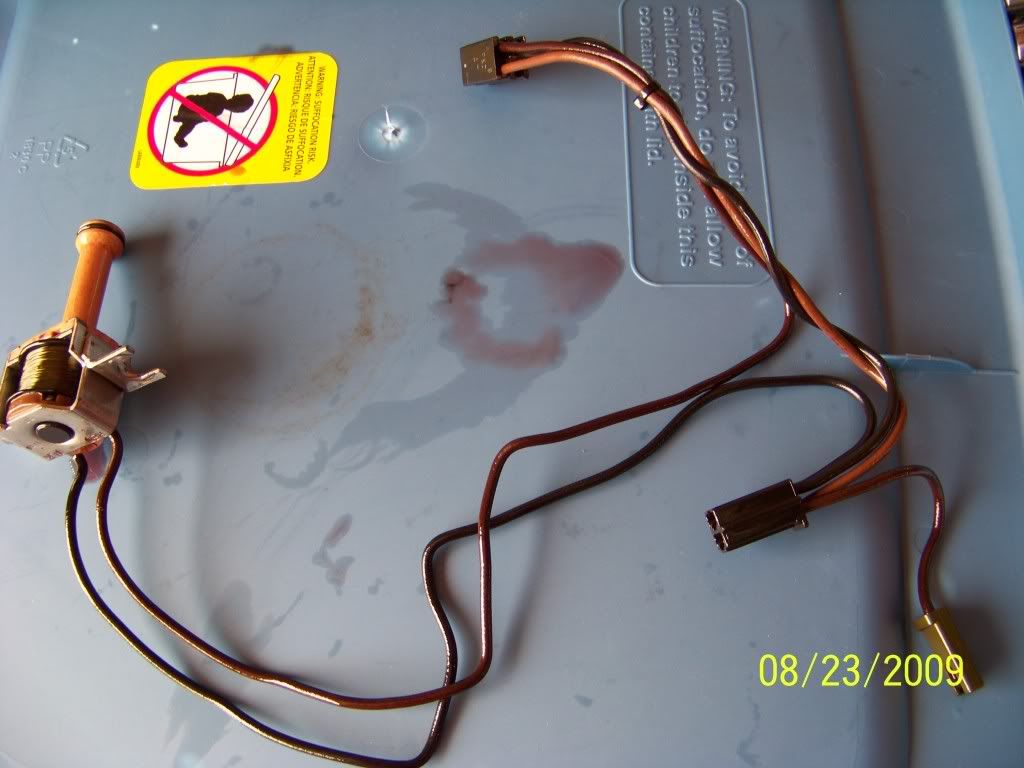 Now, I remove the main valve body and seperator plate as a unit. By removing them together, it keeps the check balls in place. Notice the seperator plate is beat up badly where the accumulator spring beat on it. Seperator plate is not normally replaced on a build, but is nescessary here. Another $30 part to add to the parts purchase list. 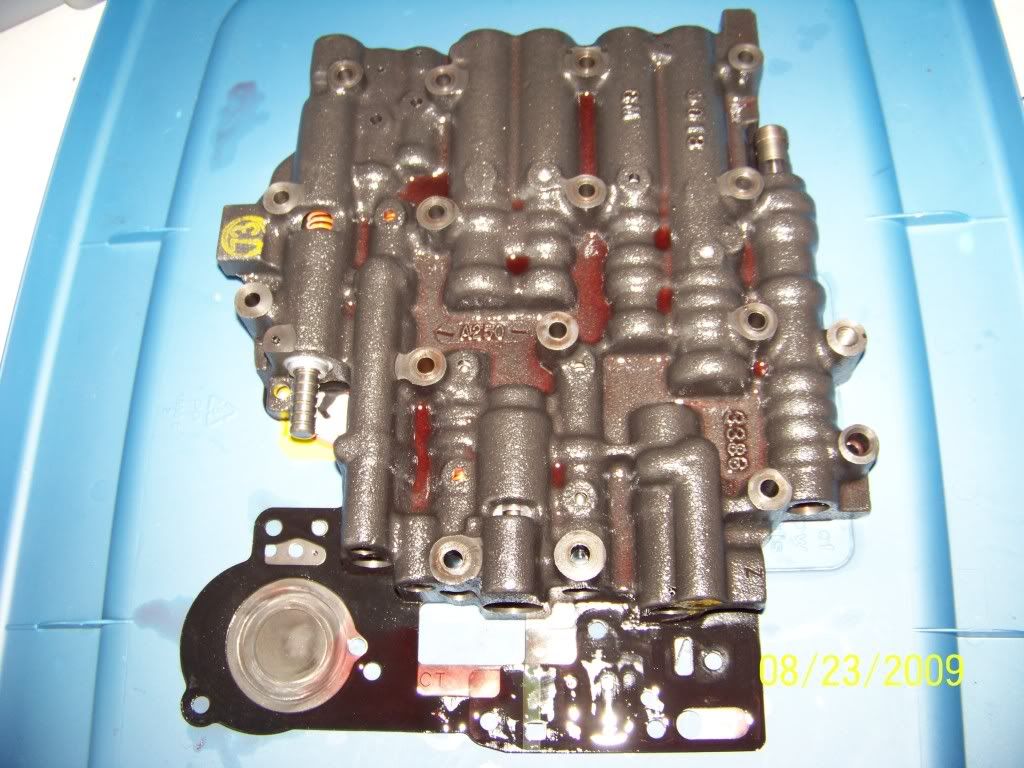 |
||
Posted on: 2009/8/24 3:17
Edited by PeteK on 2012/2/15 23:09:15 |
|||
|
_________________
"It was really on a pass until it came apart." "Yeah. They always are." |
|||
|
Transfer
|
|
||
| PeteK | Re: 700R4 - 4L60 Build Up Inside | ||
|
Moderator
|
Now we have a good look at the worm track in the case.
 I can see that the 2 orifice screens are missing, and get annoyed by the last builders lack of professionalism. Then I notice the 3-4 accumulator bore in the case is a mess. There are 3 options. 1) Scrap the case 2) Install a transgo shift kit, as it blocks off the 3-4 accumulator. 3) Sleeve it with a $40 sleeve kit. In this case, I am selecting option 3. It pisses me off that the last guy left out a 30 Cent screen, and caused this $40 problem. 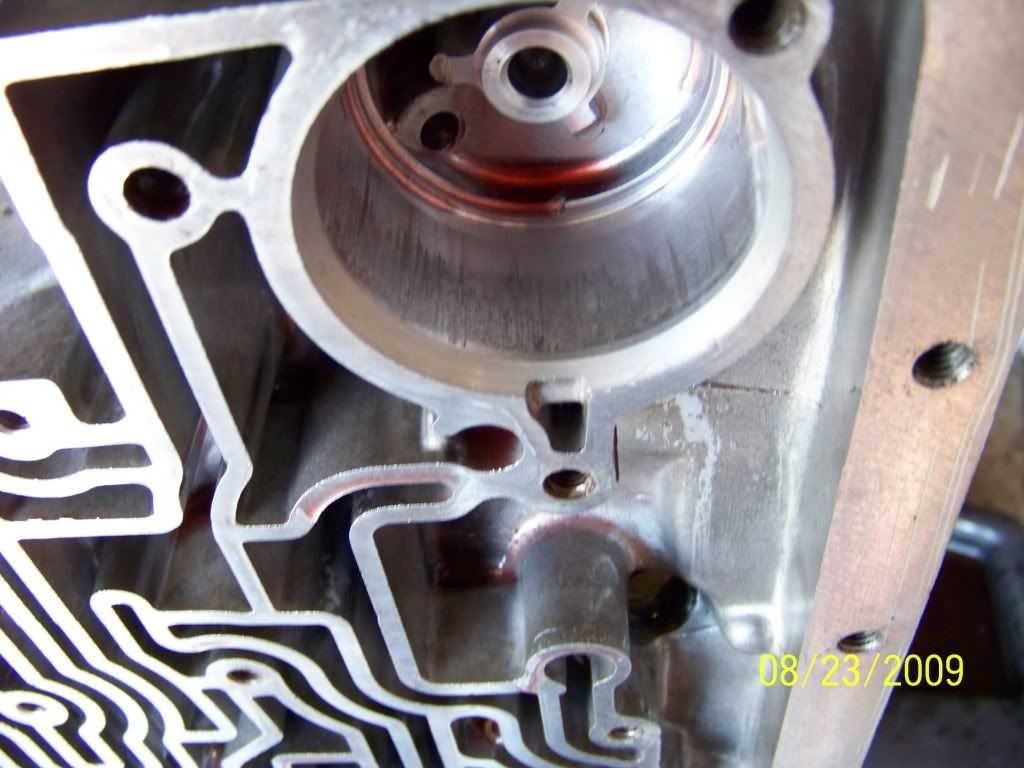 |
||
Posted on: 2009/8/24 3:33
Edited by PeteK on 2012/2/15 23:10:11 |
|||
|
_________________
"It was really on a pass until it came apart." "Yeah. They always are." |
|||
|
Transfer
|
|
||
| BrianCunningham | Re: 700R4 - 4L60 Build Up Inside | ||
|
Senior Guru

|
nice "how to"
|
||
Posted on: 2009/8/24 16:48
|
|||
|
_________________
Polo Green 95 LT1 6-spd http://mysite.verizon.net/vzevcp74/ 383 LT1/Vortech Supercharger/AFR heads/Rod end suspension/Penske-Hardbar dual rate coilovers/Wilwood 6pot brakes NCCC Governor: http://BayStateCorvetteClub.com |
|||
|
Transfer
|
|
||
| iCorvette | Re: 700R4 - 4L60 Build Up Inside | ||
|
Senior Guru
|
how much did you pick up the core for, would it not be better to get a better core of known quality, e.g. never been rebuilt?
I didn't know that wires could be submerged in hot oil, does it not cook the insulation and cause problems with age, as in this case, making it a risk to keep it in there? |
||
Posted on: 2009/8/24 22:08
|
|||
|
_________________
|
|||
|
Transfer
|
|
||
| PeteK | Re: 700R4 - 4L60 Build Up Inside | ||
|
Moderator
|
That is a typical core. I paid $200 for it.Findin a virgin core that is 20 years old or more is not likely. You don't know what you get till you open it up. The wires do get brittle with age. I will be cutting up this harness and rewiring it for a 4th gear only lock up. If I were putting it back to stock, it would be another $70 part to replace. The lesson here is that trans builds cost alot of money, and sometimes for good reason. A less than reputable builder would slap this puppy back together, give a 30 day warranty, and move on to the next victim.
|
||
Posted on: 2009/8/24 23:52
|
|||
|
_________________
"It was really on a pass until it came apart." "Yeah. They always are." |
|||
|
Transfer
|
|
||
| Aboatguy | Re: 700R4 - 4L60 Build Up Inside | ||
|
Senior Guru
 |
Great thread so far, looking forward to when you get deeper into the trans.
|
||
Posted on: 2009/8/25 1:17
|
|||
|
Transfer
|
|
||
| PeteK | Re: 700R4 - 4L60 Build Up Inside | ||
|
Moderator
|
Now that the pan, and everything in it is removed, it is time to get to the meat and potatoes.
First to be removed is the pump. I sharpied the bolts red. Also visible is the tip of the input shaft coming through it, and the snap on front seal retainer.  After the bolts come out, a special puller is used to remove it. 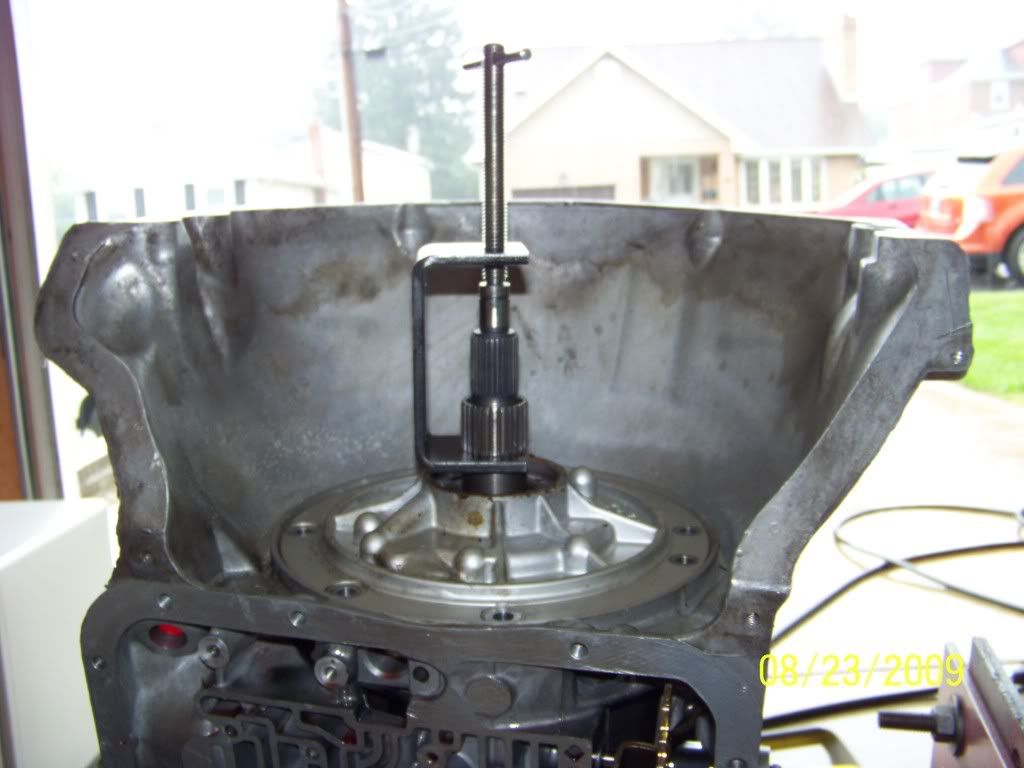 Pump on the bench 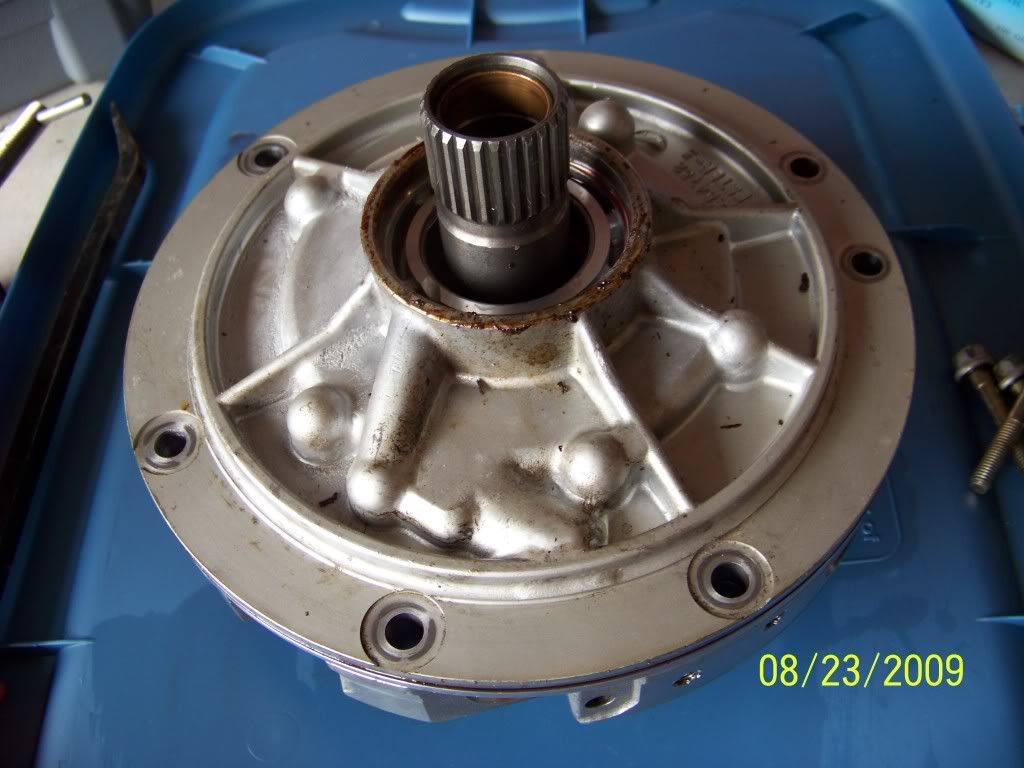 With the pump removed, the input and reverse drum come out as a pair. The band will likely give you grief, but a screwdriver will wiggle it out of the way. Notice the machined surface on the reverse drum. That is where the band clamps. In spite of the pic, it is in great shape. I will not be reusing it on this trans though, as I am installing a new drum for the extra wide band I am using. 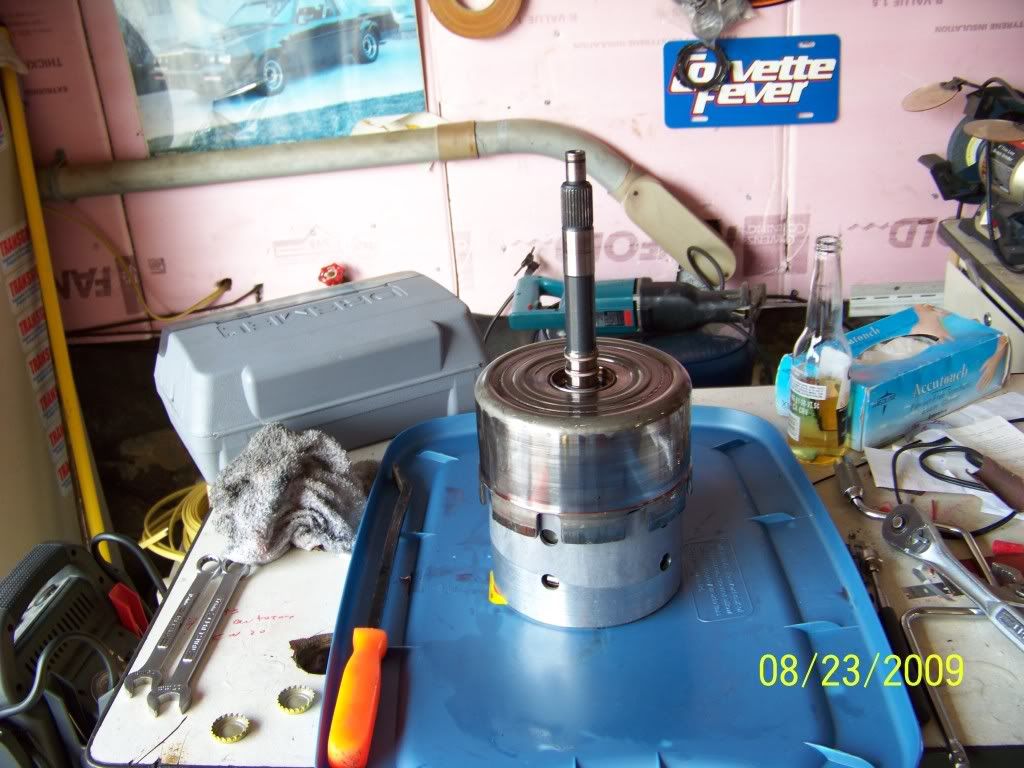 The pic below shows the trans case gutted down to the front planetary set. Notice the band still laying in the case. At this point, the "input" side of the trans is ripped down. Now, it is time to remove the output side. 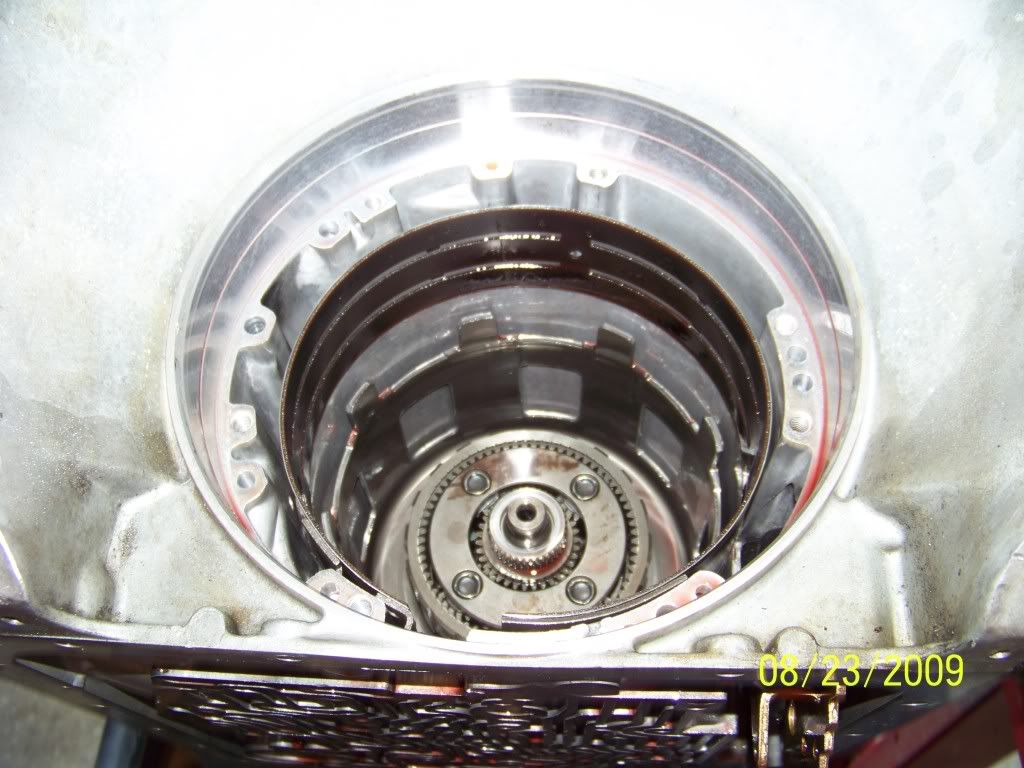 The sun gear pulls out, and there is a snap ring to be removed. After that occurs, the output shaft slides out and smashes your toes, and the front planet assembly is removed. Sun Gear: 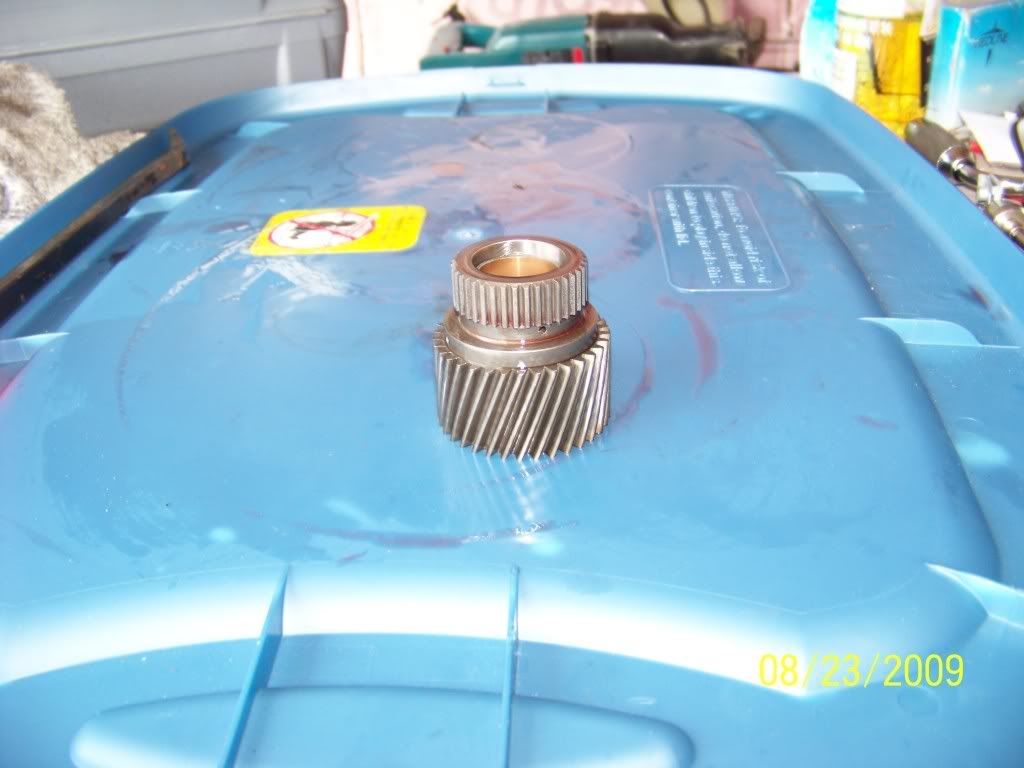 Front Planet assembly: 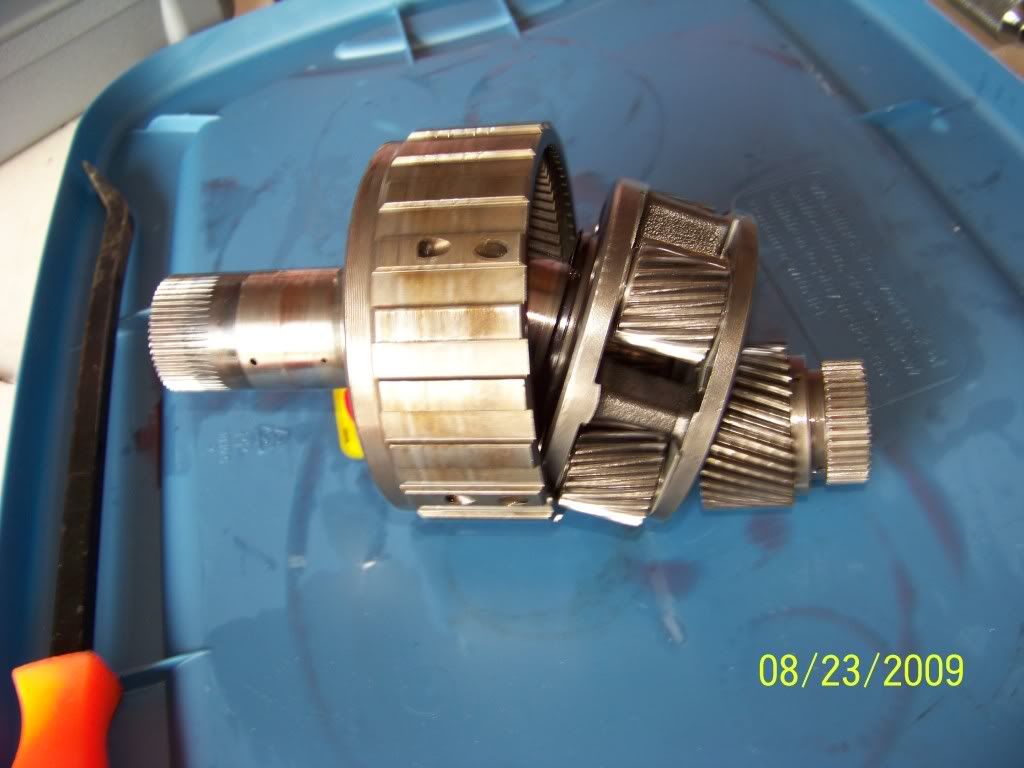 The pic below shows the reaction shell, and the front planet assembly mocked up as it sits in the trans. The large outer ring is the reaction shell, or "cookie cutter". This will be replaced by "The Beast" 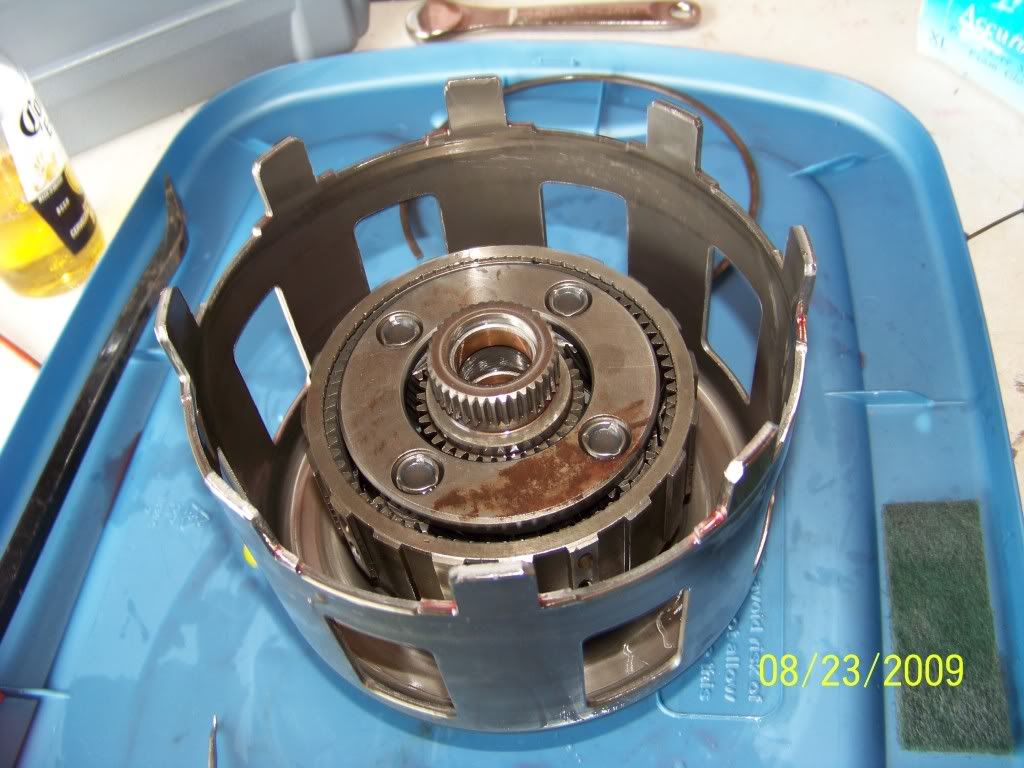 This pic shows the worn Reaction Shaft. The bushing located in the rear sun gear has worn this piece. I will be replacing it with a like new, used, $50 replacement piece. I will make oiling and bushing mods to prevent this from happening in the future. 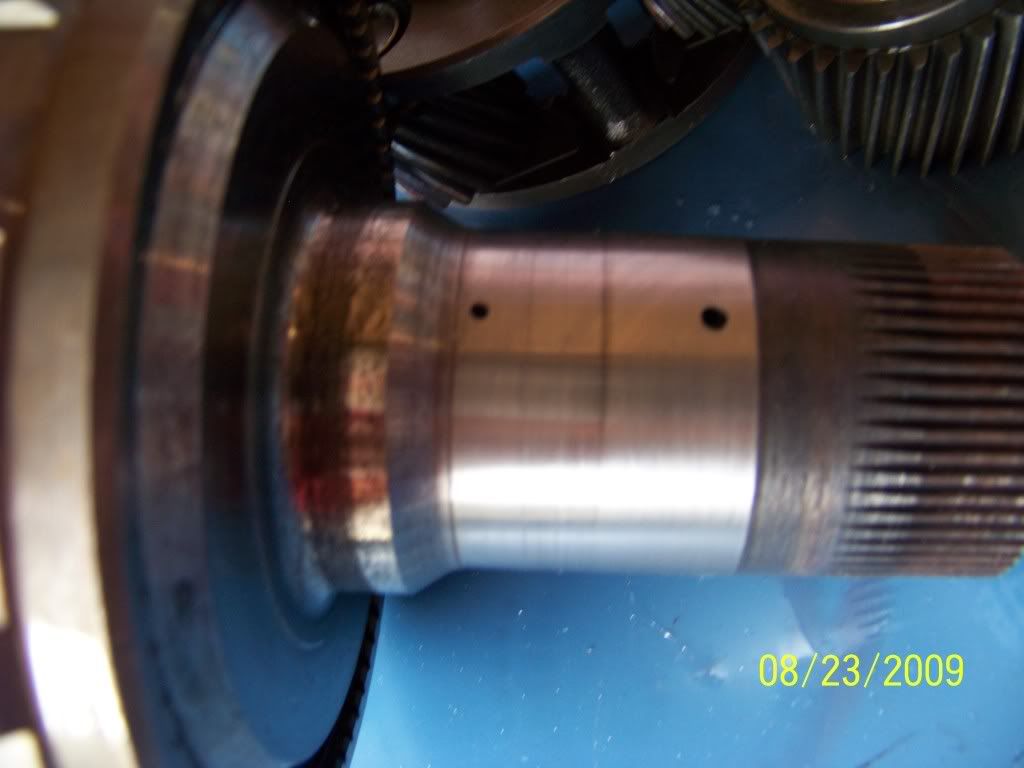 |
||
Posted on: 2009/8/25 1:22
Edited by PeteK on 2012/2/15 23:12:36 |
|||
|
_________________
"It was really on a pass until it came apart." "Yeah. They always are." |
|||
|
Transfer
|
|
||
| pianoguy | Re: 700R4 - 4L60 Build Up Inside | ||
|
Guru Emeritus
 
|
Excellent thread!!
|
||
Posted on: 2009/8/25 1:41
|
|||
|
_________________
1996 LT4 �Before you criticize someone, you should walk a mile in their shoes. That way when you criticize them, you are a mile away from them and you have their shoes.�- Jack Handey |
|||
|
Transfer
|
|
||
| PeteK | Re: 700R4 - 4L60 Build Up Inside | ||
|
Moderator
|
Quote:
Thank you! I am trying to be detailed, but not excessive for the teardown. Once everything is stripped down, I will take better step by step overhaul pics as I go. |
||
Posted on: 2009/8/25 1:47
|
|||
|
_________________
"It was really on a pass until it came apart." "Yeah. They always are." |
|||
|
Transfer
|
|
||
| PeteK | Re: 700R4 - 4L60 Build Up Inside | ||
|
Moderator
|
Remember that rebuilding an auto trans is time consuming and difficult. To avoid being overwhelmed, it is best to tear it down to sub assemblies only. Then overhaul each assembly, one at a time, and reassemble.
In transmission school, I had to do a 700 from my final grade. They are about the toughest to do, of all the rear wheel drive cars. Once you master a 700r4, everything else is less intense. |
||
Posted on: 2009/8/25 1:50
|
|||
|
_________________
"It was really on a pass until it came apart." "Yeah. They always are." |
|||
|
Transfer
|
|
||
| iCorvette | Re: 700R4 - 4L60 Build Up Inside | ||
|
Senior Guru
|
Quote:
Now I can see why, a proper job costs lots, as in anything, if the quality of workmanship is verifiable, and is performed by a true technician, then the piece of art is worth it's weight in gold. |
||
Posted on: 2009/8/25 3:58
|
|||
|
_________________
|
|||
|
Transfer
|
|
||
| mseven | Re: 700R4 - 4L60 Build Up Inside | ||
|
Senior Guru

|
Pete, nice article I am looking forward to getting your thoughts on the new plan set (quality fitment etc.)Thanks, Mick
|
||
Posted on: 2009/8/25 10:58
|
|||
|
Transfer
|
|
||
| Matatk | Re: 700R4 - 4L60 Build Up Inside | ||
|
Webmaster
 
|
So Pete, how can you tell what wear is good vs bad. For example, the orifice accumulators are bad, but the reverse drum, etc are good? What's the difference in wear? Grooves vs smooth? These will be things I'll look at when I rebuild mine. Thanks.
Matthew |
||
Posted on: 2009/8/25 13:09
|
|||
|
_________________
2002 EBM convertible, Magnusson supercharger, cam, headers, etc. 1989 Corvette...RIP |
|||
|
Transfer
|
|
||
| PeteK | Re: 700R4 - 4L60 Build Up Inside | ||
|
Moderator
|
Quote:
Any wear you can feel in the accumulator bores will tear up the rubber seal. Same applies to bushing wear surfaces. If you can feel it, it needs to be changed. Worn bushing surfaces will tear up the new bushing, and drop internal pressures. I go by experience, but on my first couple of dozen, if I was concerned, I changed it. |
||
Posted on: 2009/8/25 14:25
|
|||
|
_________________
"It was really on a pass until it came apart." "Yeah. They always are." |
|||
|
Transfer
|
|
||
| Matatk | Re: 700R4 - 4L60 Build Up Inside | ||
|
Webmaster
|
Thanks, Pete. If there is a slight ridge/groove, can you sand it lightly with fine wet/dry sandpaper or do you have to sleeve it as suggested?
Matthew |
||
Posted on: 2009/8/25 16:05
|
|||
|
_________________
2002 EBM convertible, Magnusson supercharger, cam, headers, etc. 1989 Corvette...RIP |
|||
|
Transfer
|
|
||
| PeteK | Re: 700R4 - 4L60 Build Up Inside | ||
|
Moderator
|
If I see a minor flaw, I stick a brake cylinder hone in the bore that is well lubed with atf. I spin it by hand 4 or 5 revolutions and re-inspect. If it looks good, I reuse it. If not I toss the 1-2 accumulator, or sleeve the 3-4 case bore.
*Remember that a transgo shift kit eliminates the 3-4 accumulator. If a shift kit is desired simply use a transgo, and kill 2 birds with 1 stone. Transgo kit runs about $70 more than the sleeve kit. |
||
Posted on: 2009/8/25 18:27
|
|||
|
_________________
"It was really on a pass until it came apart." "Yeah. They always are." |
|||
|
Transfer
|
|
||
| Matatk | Re: 700R4 - 4L60 Build Up Inside | ||
|
Webmaster
|
Thanks, Pete, I already have the transgo shift kit waiting to go in so that'll solve that problem if it arises.
Matthew |
||
Posted on: 2009/8/25 22:45
|
|||
|
_________________
2002 EBM convertible, Magnusson supercharger, cam, headers, etc. 1989 Corvette...RIP |
|||
|
Transfer
|
|
||
| PeteK | Re: 700R4 - 4L60 Build Up Inside | ||
|
Moderator
|
I shall pick up where I left off.
At this point, the rear planetary assembly should be removed from the trans. I apologize, but I got lazy, and did not take a pic here. Not sure why, just got by me. No worries though, because I will photo document each and every step of the re-assembly and component overhauls. After the planetarys are out, there is another snap ring that holds in the lo-reverse clutchpack. A pison assembly applies it, and all is shown below. Piston, and Spring-Lo/Reverse 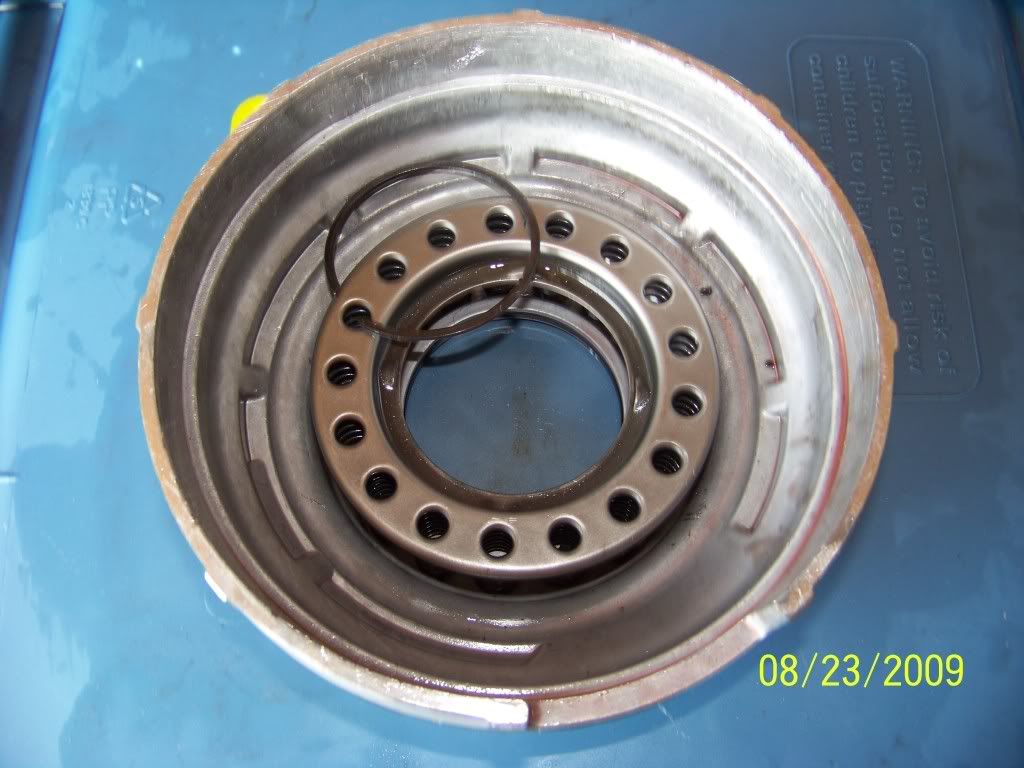 Piston still in case, with special spring compressor to remove it 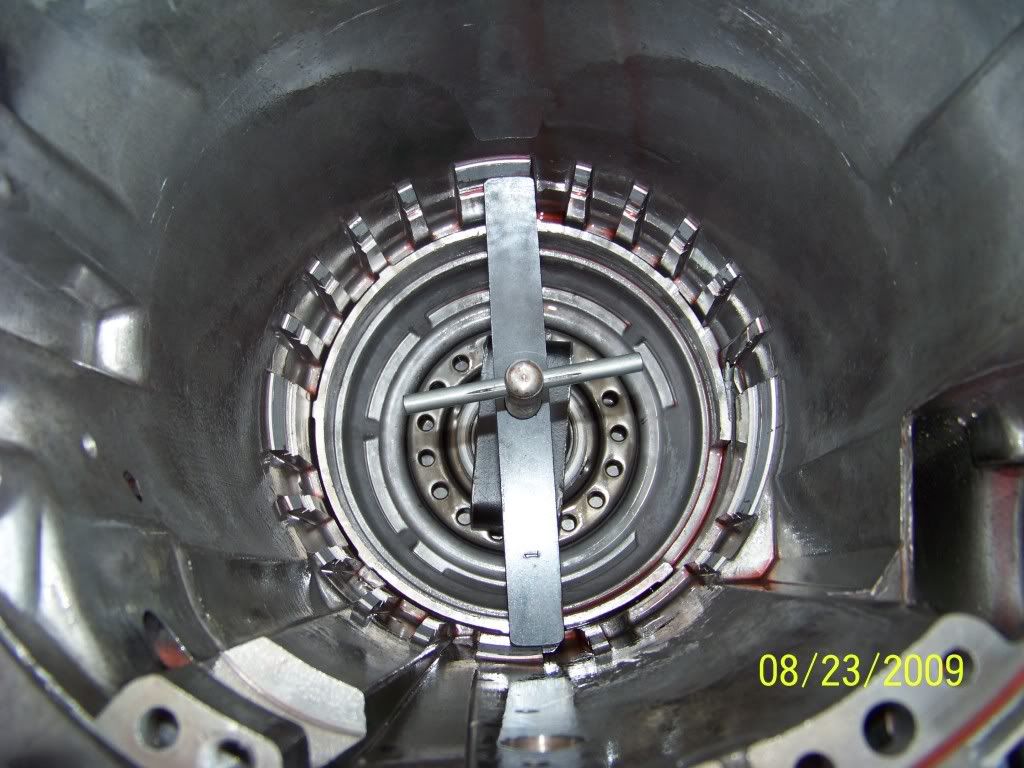 After the snap ring is removed, air is put to this port to pop lo-reverse piston out of it's bore. 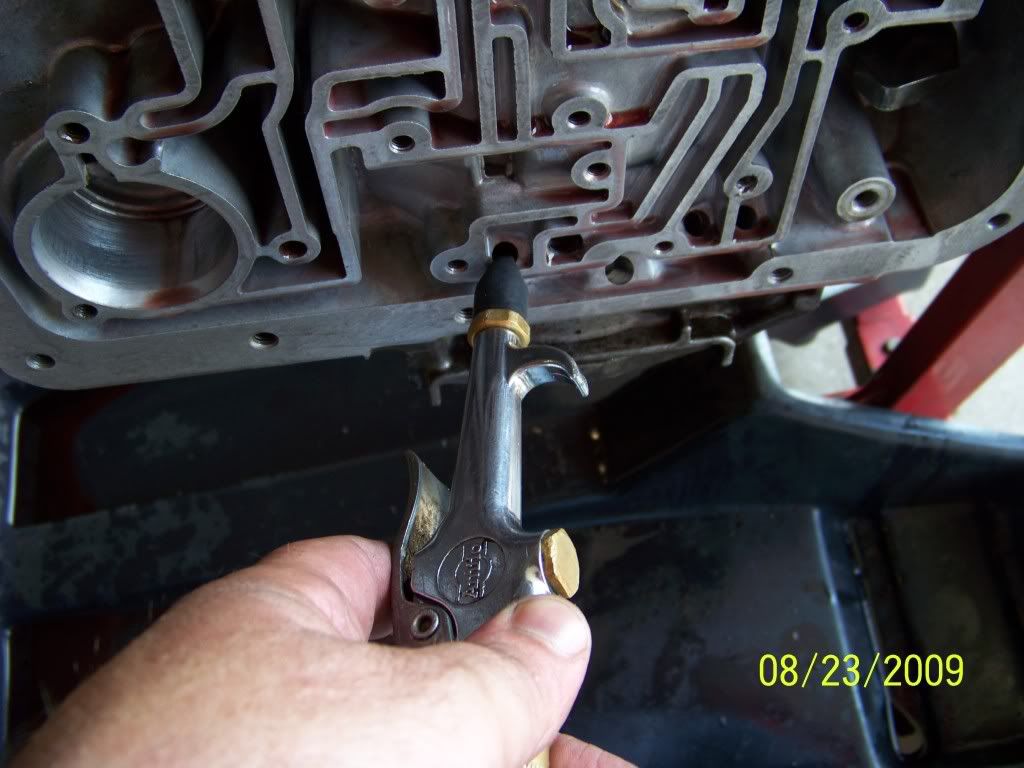 Now the case is about bare. Rear Case bushing comes out next:  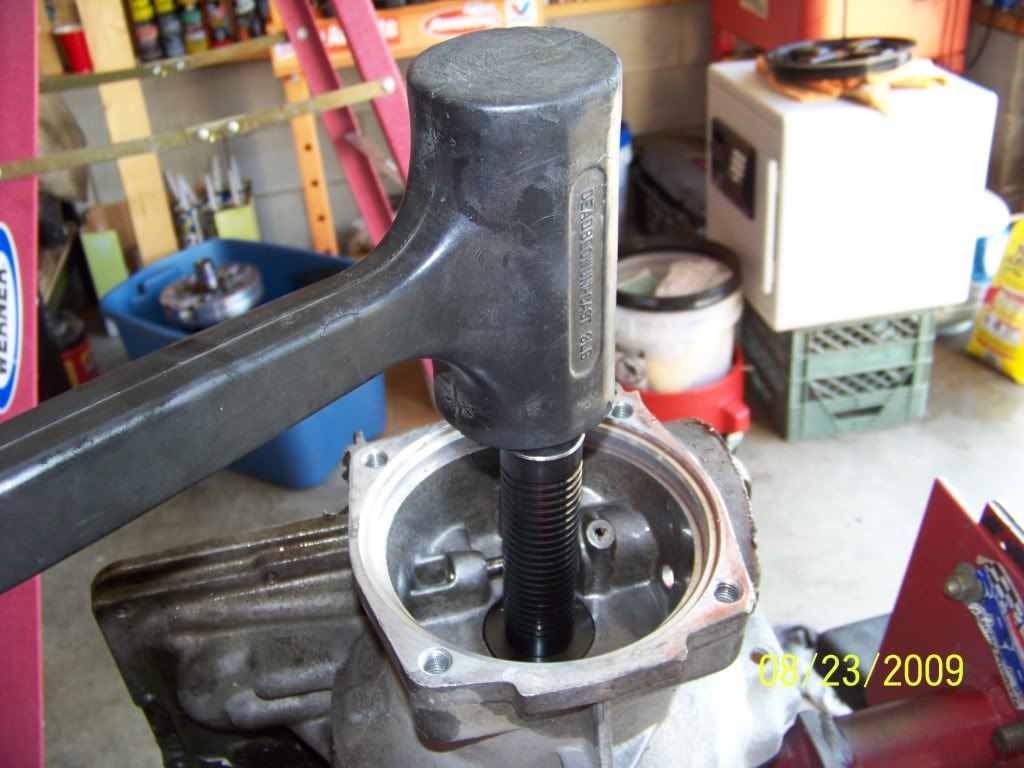 At this point, case is gutted, and cleaned throughly. After cleaning and painting, I have about 5 hours time invested to get to this point. |
||
Posted on: 2009/8/27 2:47
Edited by PeteK on 2012/2/15 23:14:32 |
|||
|
_________________
"It was really on a pass until it came apart." "Yeah. They always are." |
|||
|
Transfer
|
|
||
| PeteK | Re: 700R4 - 4L60 Build Up Inside | ||
|
Moderator
|
Trans case cleaned, painted and ready to begin building:
Before: After: 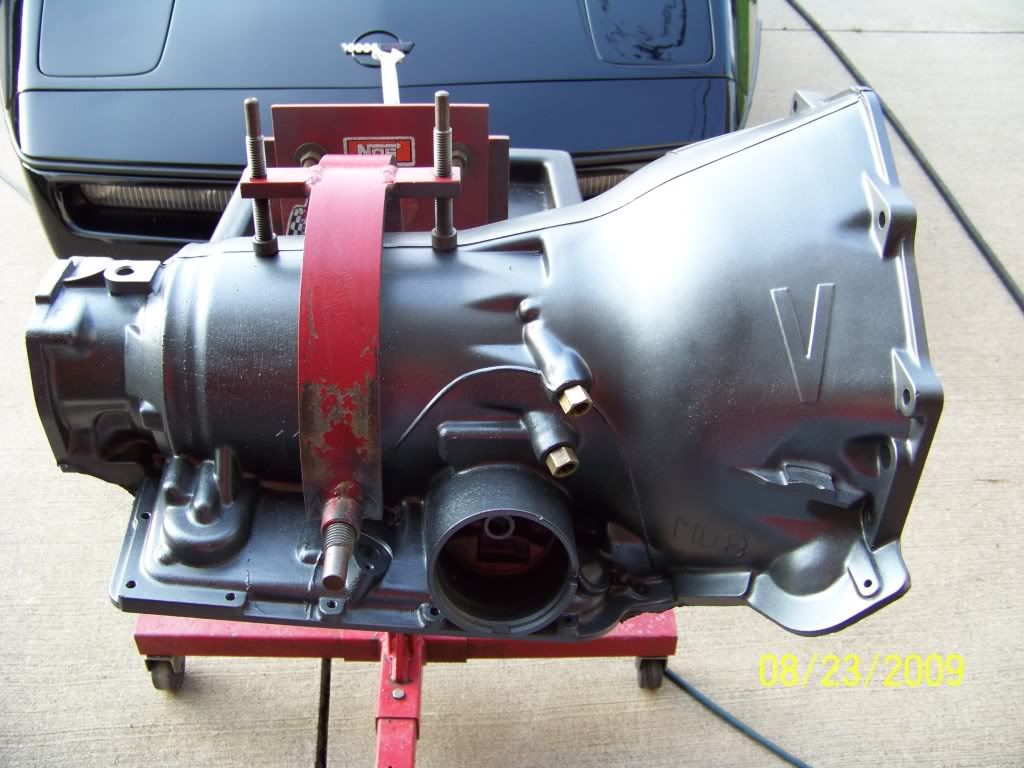 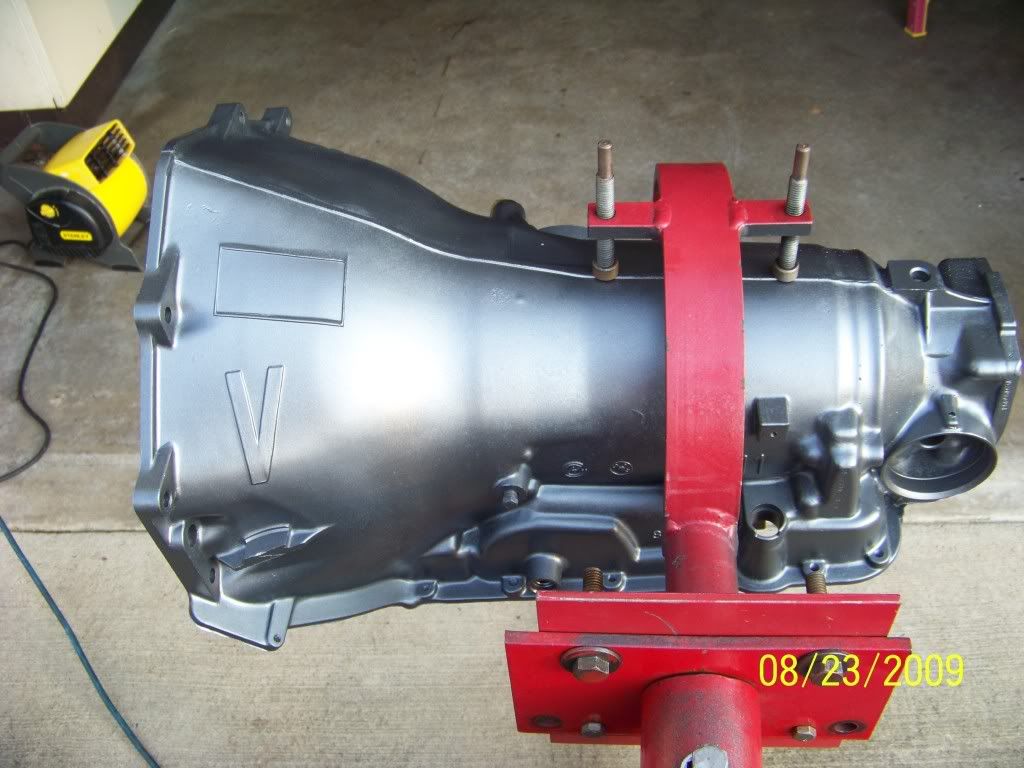 The fittings shown below do not get sealant. If you put sealant on the threads, the case will crack when you tighten them down. 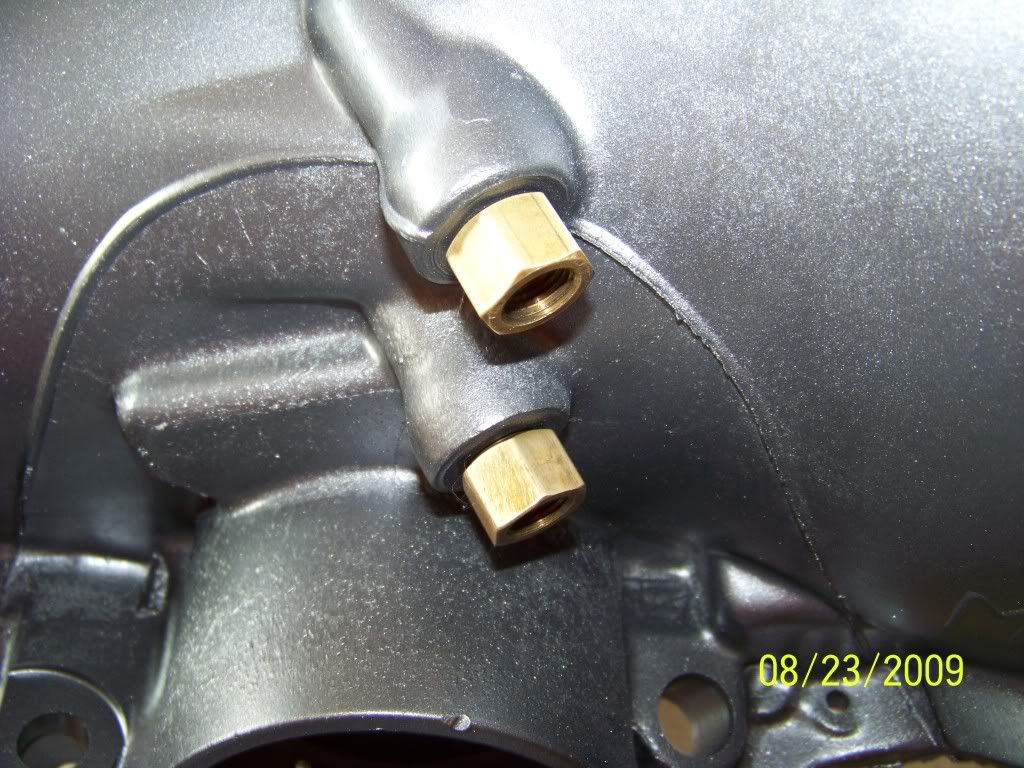 New metal vent tube is installed by simply sliding it in. The metal tube is from a late model 4L60E, and superceeds the discontinued plastic, yellow tubes. 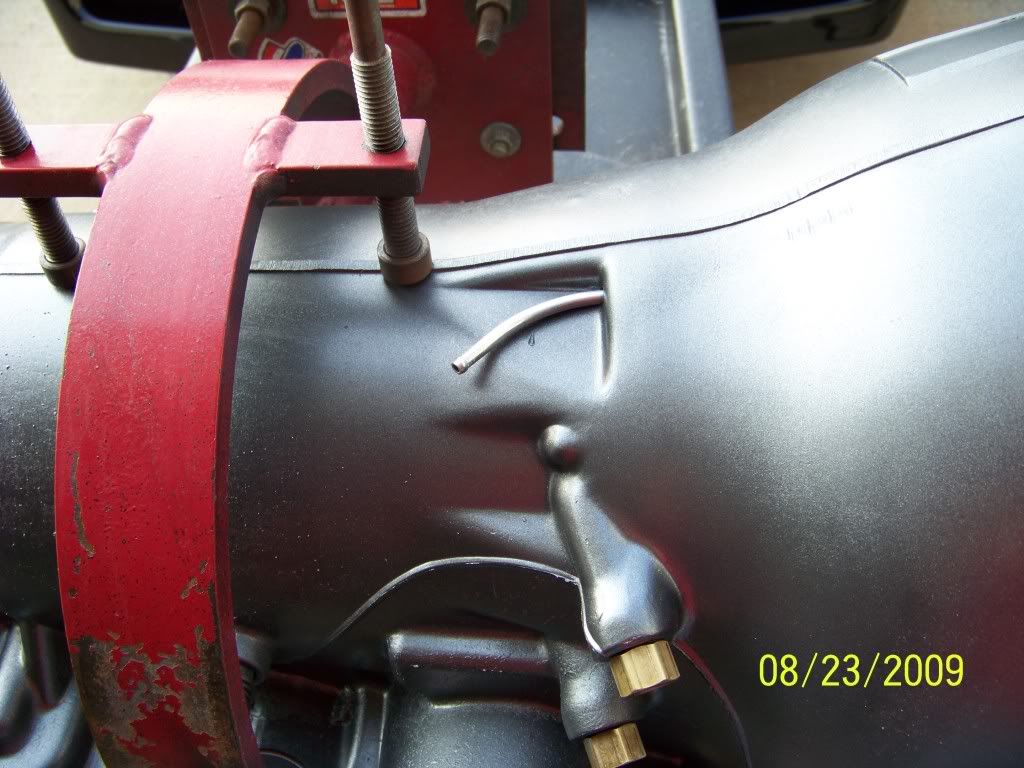 |
||
Posted on: 2009/8/27 2:53
Edited by PeteK on 2012/2/15 23:16:07 |
|||
|
_________________
"It was really on a pass until it came apart." "Yeah. They always are." |
|||
|
Transfer
|
|
||
| Aboatguy | Re: 700R4 - 4L60 Build Up Inside | ||
|
Senior Guru
|
 More Please |
||
Posted on: 2009/8/28 0:39
|
|||
|
Transfer
|
|
||
| 86PACER | Re: 700R4 - 4L60 Build Up Inside | ||
|
Guru Newb
 
|
When it's time for the torque converter to be installed, do you prefer to install it empty or do you pre-fill it.
|
||
Posted on: 2009/11/24 10:49
|
|||
|
Transfer
|
|
||
| PeteK | Re: 700R4 - 4L60 Build Up Inside | ||
|
Moderator
|
Quote:
I lube the front pump seal and converter snout with Vaseline, then I add 1/2 to 1 qt of fluid to the converter. Once the engine fires, it sucks the pan dry filling the converter. This happens within 20 seconds. Then I shut off the engine, and pour 4 more qts into the trans. With a stock pan, the 9 qts used should get you within 1-2 qts of the full mark, so I then sneak up on the level as trans warms up. |
||
Posted on: 2009/11/24 12:34
|
|||
|
_________________
"It was really on a pass until it came apart." "Yeah. They always are." |
|||
|
Transfer
|
|
||
| Steve40th | Re: 700R4 - 4L60 Build Up Inside | ||
|
Elite Guru
 
|
Pete in post #10, the aux valve body has two black rollpins( one is visible on top right), one is flush on top, and the one lower towards where the green electrical connector is, is that flush also, or is the roll pin hanging out a little?
|
||
Posted on: 2010/3/4 3:58
|
|||
|
_________________
Ko'u ohana aia ku'a ikaika |
|||
|
Transfer
|
|
||
| PeteK | Re: 700R4 - 4L60 Build Up Inside | ||
|
Moderator
|
Steve,
Many of the roll pins protrude. They are installed until they are just slightly below flush, on the opposite, machined side of the valve body. |
||
Posted on: 2010/3/4 17:46
|
|||
|
_________________
"It was really on a pass until it came apart." "Yeah. They always are." |
|||
|
Transfer
|
|
||
| Steve40th | Re: 700R4 - 4L60 Build Up Inside | ||
|
Elite Guru
|
Thanks
|
||
Posted on: 2010/3/4 22:46
|
|||
|
_________________
Ko'u ohana aia ku'a ikaika |
|||
|
Transfer
|
|
||
| Danspeed1 | Re: 700R4 - 4L60 Build Up Inside | ||
|
Elite Guru
 
|
Any updates on this thread. I am looking to do the exact same thing and would like to see the continuation of the step by step!
DG |
||
Posted on: 2011/1/21 17:01
|
|||
|
_________________
1971 Chevelle SS (The Original) 1972 Chevelle SS 454 1995 Corvette Convertible 1996 Ford Explorer 2009 Cadillac CTS-v |
|||
|
Transfer
|
|
||
| Steve40th | Re: 700R4 - 4L60 Build Up Inside | ||
|
Elite Guru
|
|||
Posted on: 2011/1/21 18:33
|
|||
|
_________________
Ko'u ohana aia ku'a ikaika |
|||
|
Transfer
|
|
||
You can view topic.
You cannot start a new topic.
You cannot reply to posts.
You cannot edit your posts.
You cannot delete your posts.
You cannot add new polls.
You cannot vote in polls.
You cannot attach files to posts.
You cannot post without approval.
|
|