


 All Posts (96LT4CE)
Re: AC issue: now with exact details, pics and videos |
||
|---|---|---|
|
Guru Newb
 
Joined:
2005/9/16 0:00 From NWI
Posts:
112
 |
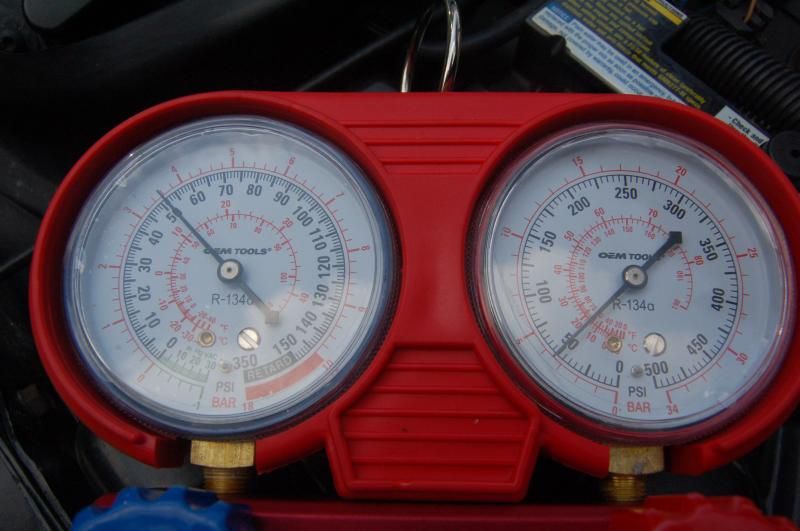
here are the static readings. car hasn't been on since yesterday and from what I've read the ambient temp isn't critical for this. Based on these readings should I go ahead and return the manifold gauges?
Posted on: 2014/7/14 21:58
|
|
|
_________________
My shoulder hurts bad |
||
 Transfer Transfer
|
 
|
|
Re: AC issue: now with exact details, pics and videos |
||
|---|---|---|
|
Guru Newb
Joined:
2005/9/16 0:00 From NWI
Posts:
112
|
Id this the chart I should be going by when I check the pressure?
If so I assume the first line is the ambient air temp (outside) 2nd line is the high side pressure thirn line is low side and fourth is the output of the ac vent 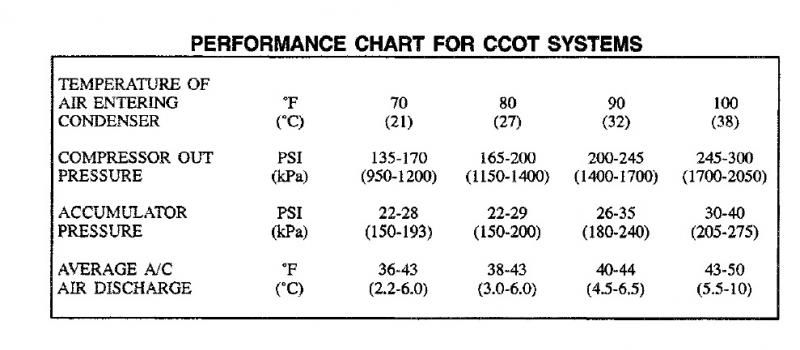 which is the high side connection in the vehicle?
Posted on: 2014/7/14 17:21
|
|
|
_________________
My shoulder hurts bad |
||
|
Transfer
|
|
|
Re: AC issue: now with exact details, pics and videos |
||
|---|---|---|
|
Guru Newb
Joined:
2005/9/16 0:00 From NWI
Posts:
112
|
No luck. Head is clean and still the same issue.
Gonna go back and finish putting it together.
Posted on: 2014/7/13 23:20
|
|
|
_________________
My shoulder hurts bad |
||
|
Transfer
|
|
|
Re: Sunday Chat 07.13.14 |
||
|---|---|---|
|
Guru Newb
Joined:
2005/9/16 0:00 From NWI
Posts:
112
|
tree came down in the neighbors yard due to the t-storms last night. No power from 2am - 7am. a mess in her yard too!
drugs for shoulder wearing off, major pain!!!
Posted on: 2014/7/13 20:12
|
|
|
_________________
My shoulder hurts bad |
||
|
Transfer
|
|
|
Re: AC issue: now with exact details, pics and videos |
||
|---|---|---|
|
Guru Newb
Joined:
2005/9/16 0:00 From NWI
Posts:
112
|
OK, Andy... I feel like a dumb ass. See your PM's!
The head was pulled and cleaned. Gotta run some errands so reinstall wont be till a little later. Good write up coming on that. I'm gonna disco the negative battery cable and leave it unhooked while I run the errands that way we can say EVERY possible measure was taken with this! When I reinstall I will run the diagnostic again this time toggling through b4 hitting the "enter" key
Posted on: 2014/7/13 20:08
|
|
|
_________________
My shoulder hurts bad |
||
|
Transfer
|
|
|
Re: AC issue: now with exact details, pics and videos |
||
|---|---|---|
|
Guru Newb
Joined:
2005/9/16 0:00 From NWI
Posts:
112
|
In the diagnostic mode I did scroll through. If you watch the video again you will see that when I enter the mode the screen shows: -00 when I hit the fan auto button the display changes to just : 00 meaning no codes.
As far as the head unit needing to be power cycled. The car was in the garage with a dead battery for several months. It had a new battery installed about 6 weeks ago. The battery was disconnected for a short time about 3 weeks ago so any power cycling should have been complete already. I'm going to attack the head in the next few minutes. and finally, no I have not received an e-mail from Andy yet. I know people are busy so thank you to everyone for helping me out. I'll report back about eh head and do a write up with pics on it as well. Henderson
Posted on: 2014/7/13 17:01
|
|
|
_________________
My shoulder hurts bad |
||
|
Transfer
|
|
|
Re: AC issue: now with exact details, pics and videos |
||
|---|---|---|
|
Guru Newb
Joined:
2005/9/16 0:00 From NWI
Posts:
112
|
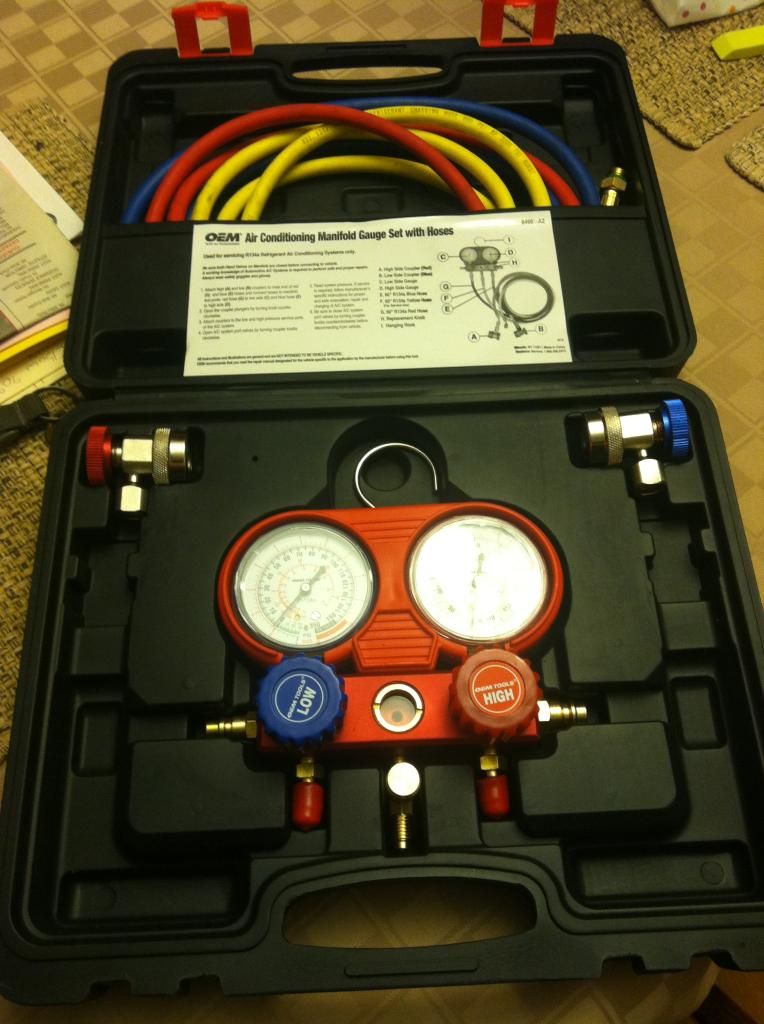
Tool in hand
Posted on: 2014/7/13 3:13
|
|
|
_________________
My shoulder hurts bad |
||
|
Transfer
|
|
|
Re: AC issue: now with exact details, pics and videos |
||
|---|---|---|
|
Guru Newb
Joined:
2005/9/16 0:00 From NWI
Posts:
112
|
Matatk, you in the Plainfield/naperville area?
I can get these from the loaner tool program at Auto Zone: http://www.autozone.com/autozone/acce ... temIdentifier=290026_0_0_ In addition I own a Klein CL200 amp clamp with temp probes so getting accurate readings will be ok. Bogus, I did not get an e-mail  sent you a pm
Posted on: 2014/7/12 17:12
|
|
|
_________________
My shoulder hurts bad |
||
|
Transfer
|
|
|
Re: Friday hangout 11 July 2014 |
||
|---|---|---|
|
Guru Newb
Joined:
2005/9/16 0:00 From NWI
Posts:
112
|
Setting up MRI
Possible torn rotator cuff Waiting to get a shot in the shoulder. Some kind of roids
Posted on: 2014/7/11 22:38
|
|
|
_________________
My shoulder hurts bad |
||
|
Transfer
|
|
|
Re: How To Part 1: Drain and Flush |
||
|---|---|---|
|
Guru Newb
Joined:
2005/9/16 0:00 From NWI
Posts:
112
|
lol, I wish my issue was from wrenching!
I just hope my issue doesn't effect my wrenching!!
Posted on: 2014/7/11 21:17
|
|
|
_________________
My shoulder hurts bad |
||
|
Transfer
|
|
|
Re: Friday hangout 11 July 2014 |
||
|---|---|---|
|
Guru Newb
Joined:
2005/9/16 0:00 From NWI
Posts:
112
|
I'll look into that book. Thanks for the heads up.
In the waiting room now. We will see what's going on. The irony is there is a car show going on outside the dr'soffice right now. Lotta nice Vettes
Posted on: 2014/7/11 21:15
|
|
|
_________________
My shoulder hurts bad |
||
|
Transfer
|
|
|
Re: Friday hangout 11 July 2014 |
||
|---|---|---|
|
Guru Newb
Joined:
2005/9/16 0:00 From NWI
Posts:
112
|
took a sick day to go to the Dr. Something is seriously wrong with my shoulder. I guess we will know at 4:30pm CST
Posted on: 2014/7/11 18:45
|
|
|
_________________
My shoulder hurts bad |
||
|
Transfer
|
|
|
Re: How To Part 1: Drain and Flush |
||
|---|---|---|
|
Guru Newb
Joined:
2005/9/16 0:00 From NWI
Posts:
112
|
It's funny that you mention rust and cars sitting.
My car sat in the garage unused for over 18 months. Closer to 24 actually. With that said, I have a FOLLOW up thread to my DIY's coming up addressing exactly what you mentioned. It has now been 10 days since I completed the work and about 350 miles and there are a few things I have noticed already that are in line with your mentioning of rust. Stay tuned!
Posted on: 2014/7/11 18:41
|
|
|
_________________
My shoulder hurts bad |
||
|
Transfer
|
|
|
Re: AC issue: now with exact details, pics and videos |
||
|---|---|---|
|
Guru Newb
Joined:
2005/9/16 0:00 From NWI
Posts:
112
|
yup, 96 LT4 Collectors
No edit button available so here are the links in the same order as above.
Posted on: 2014/7/11 18:30
|
|
|
_________________
My shoulder hurts bad |
||
|
Transfer
|
|
|
LT4 PCV valve 90 degree elbow |
||
|---|---|---|
|
Guru Newb
Joined:
2005/9/16 0:00 From NWI
Posts:
112
|
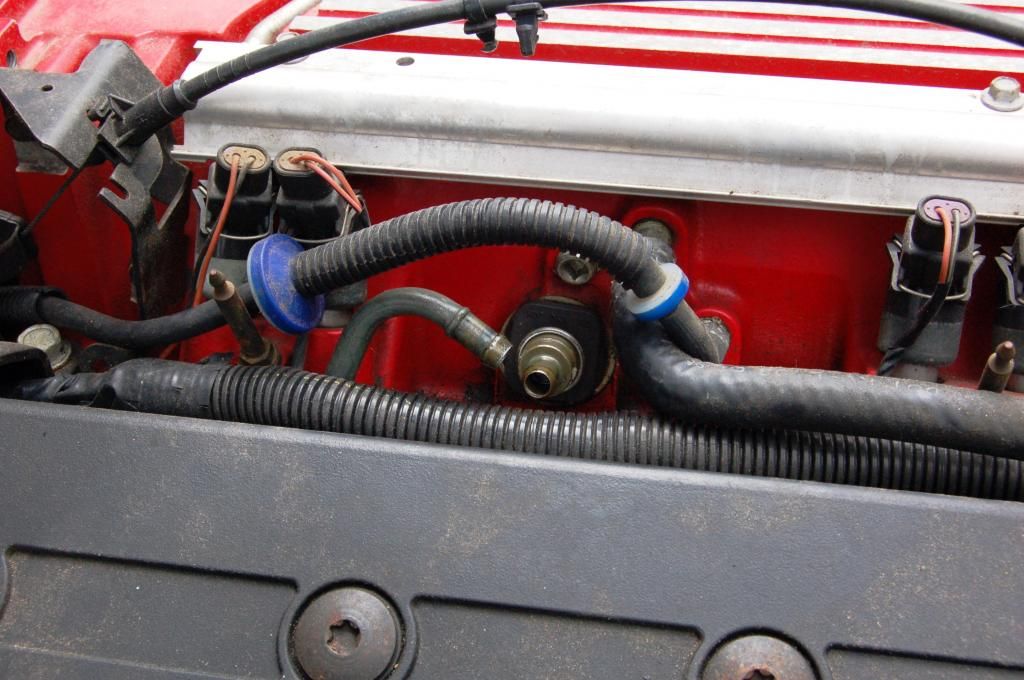
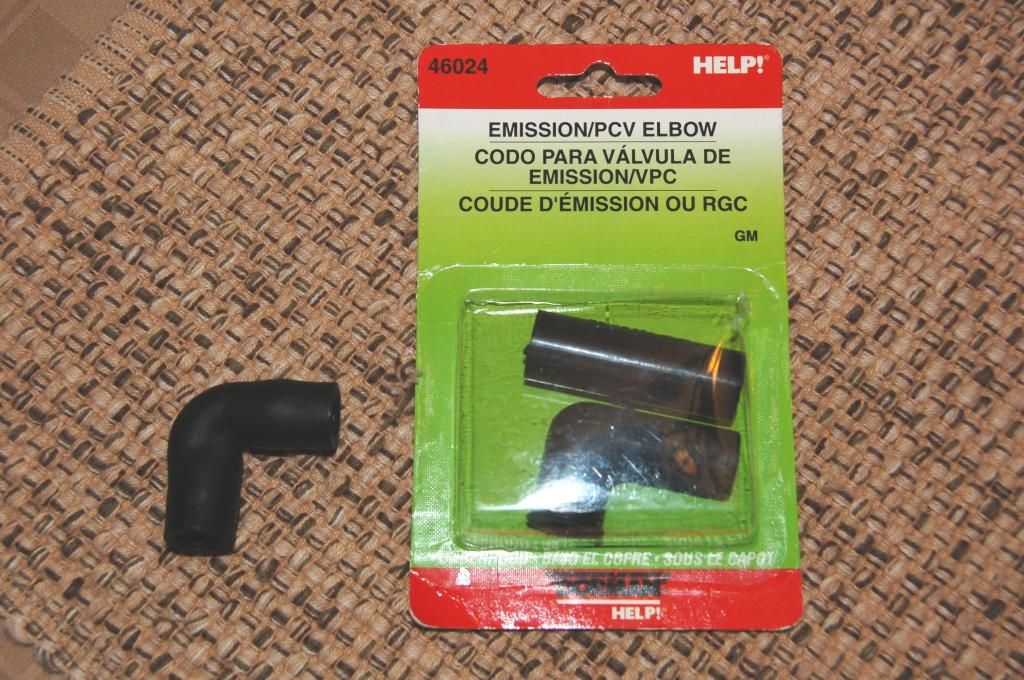
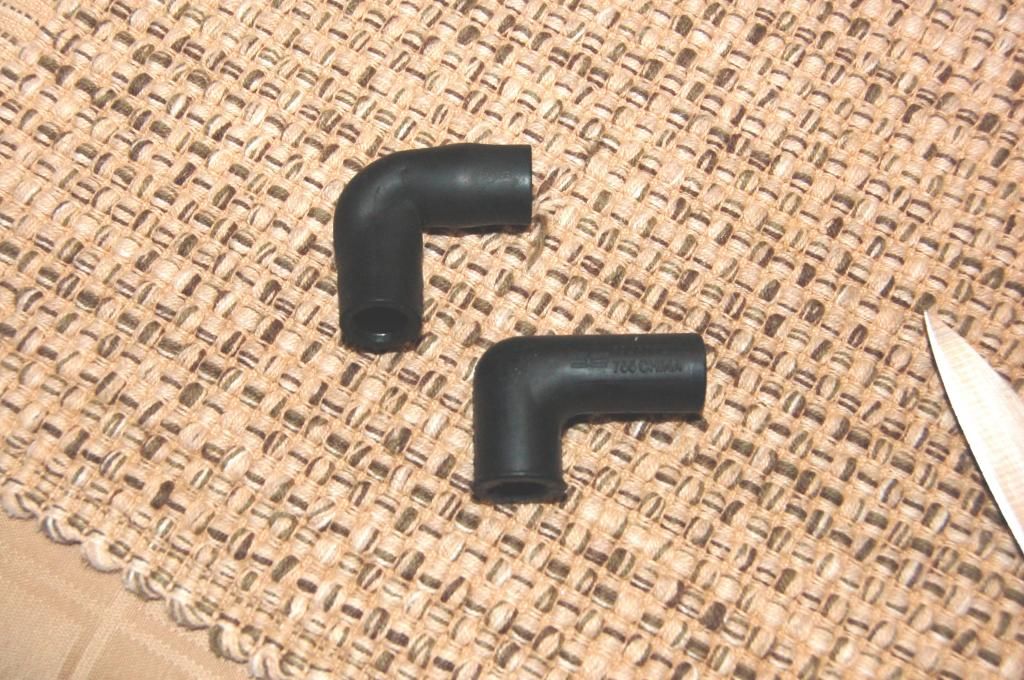
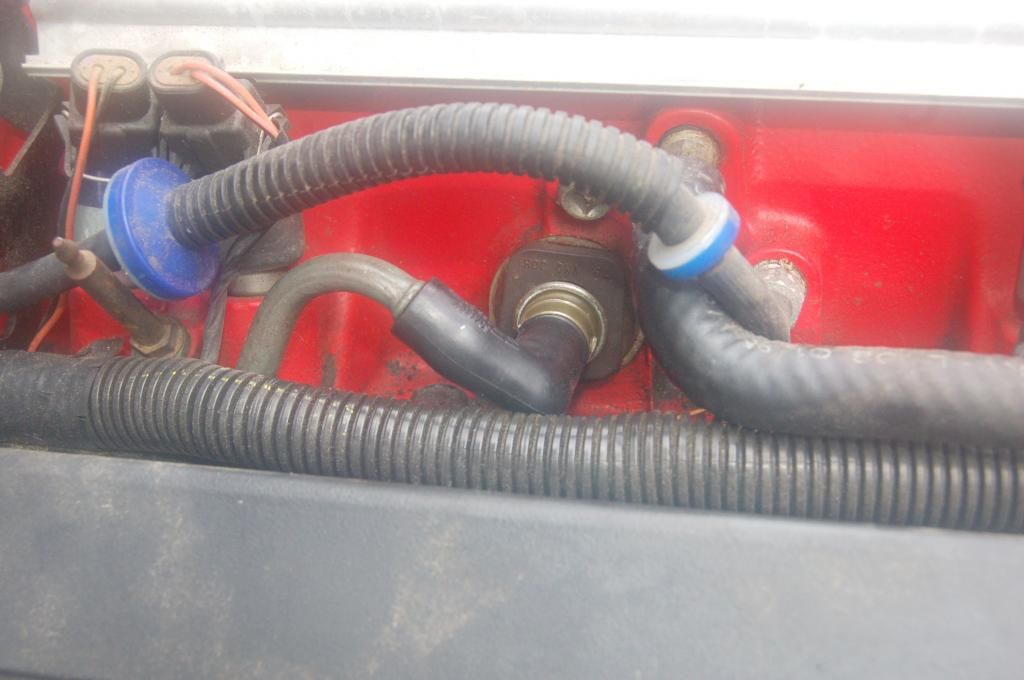
Just a quick bit of info in case anyone is looking. On the LT4 top end driver's side. There is a PCV valve that is attached to a solid line via a 90 degree elbow. that elbow om my car was old, and deteriorated to the point it collapsed on itself. I went to the Chevy dealer who said the part was only sold as a complete assembly for $40+. I ended up searching and found an almost exact match at Advanced Auto for $5. For anyone that may be going through this issue, here ya go.
Posted on: 2014/7/11 6:01
|
|
|
_________________
My shoulder hurts bad |
||
|
Transfer
|
|
|
AC issue: now with exact details, pics and videos |
||
|---|---|---|
|
Guru Newb
Joined:
2005/9/16 0:00 From NWI
Posts:
112
|
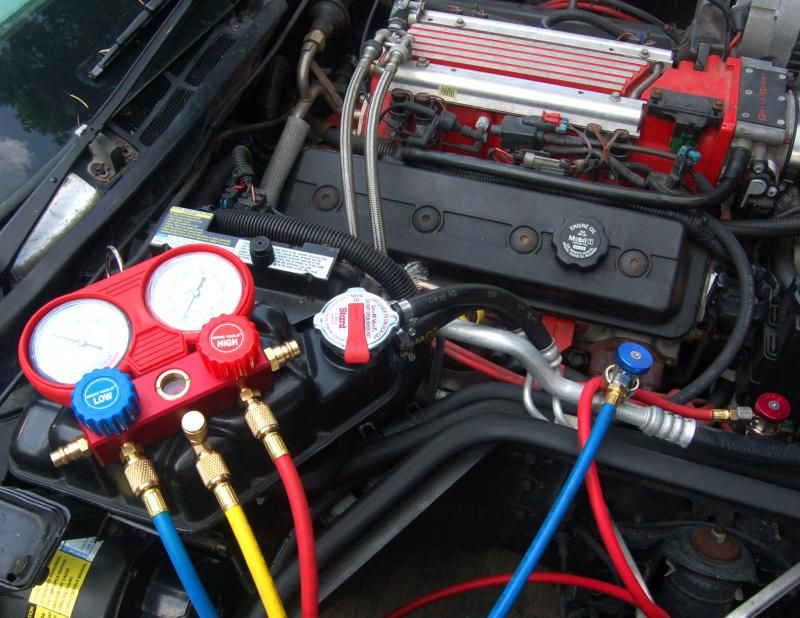
Still issues with the AC not blowing cold. But now I can describe as with detail. Any and all help is greatly appreciated.
1st I checked the low side with the vehicle off and having sat all night:  I then started the vehicle and set the controller to OFF. As you can see from the video the ac compressor cycles and and gets wet from condensation: 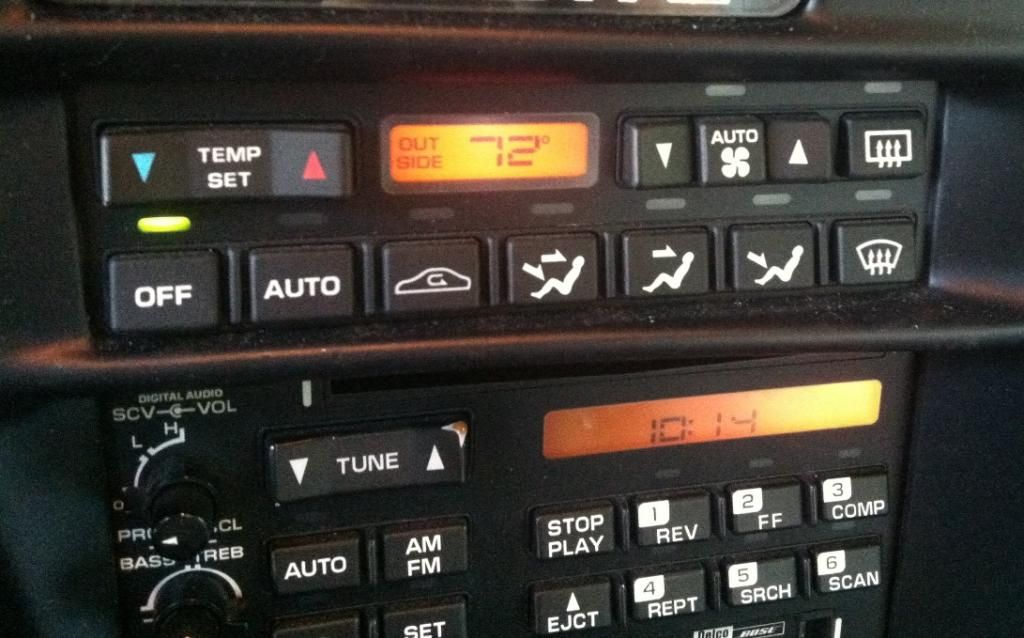 http://youtu.be/eIf0KS1D5ss I then moved the controls to recirculate. In this mode the compressor did not cycle on at all. The low side reading remained static: 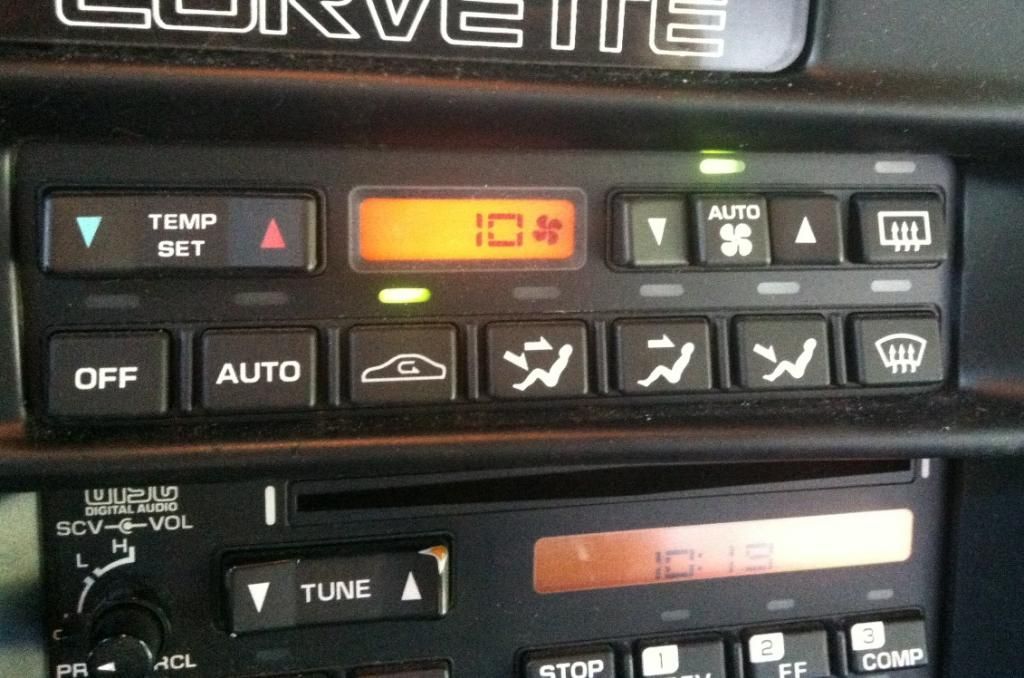 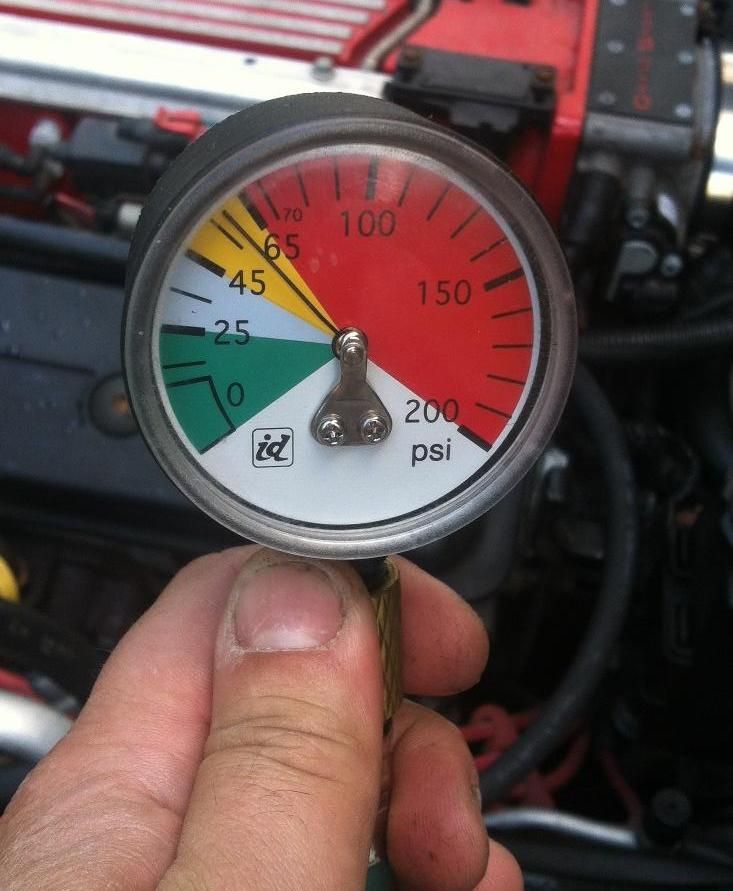 Then moved to the head feet setting. Again, compressor did not cycle on, reading remained static. in addition by this time teh accumulator was dry as a bone from the condesation a few minutes earlier:  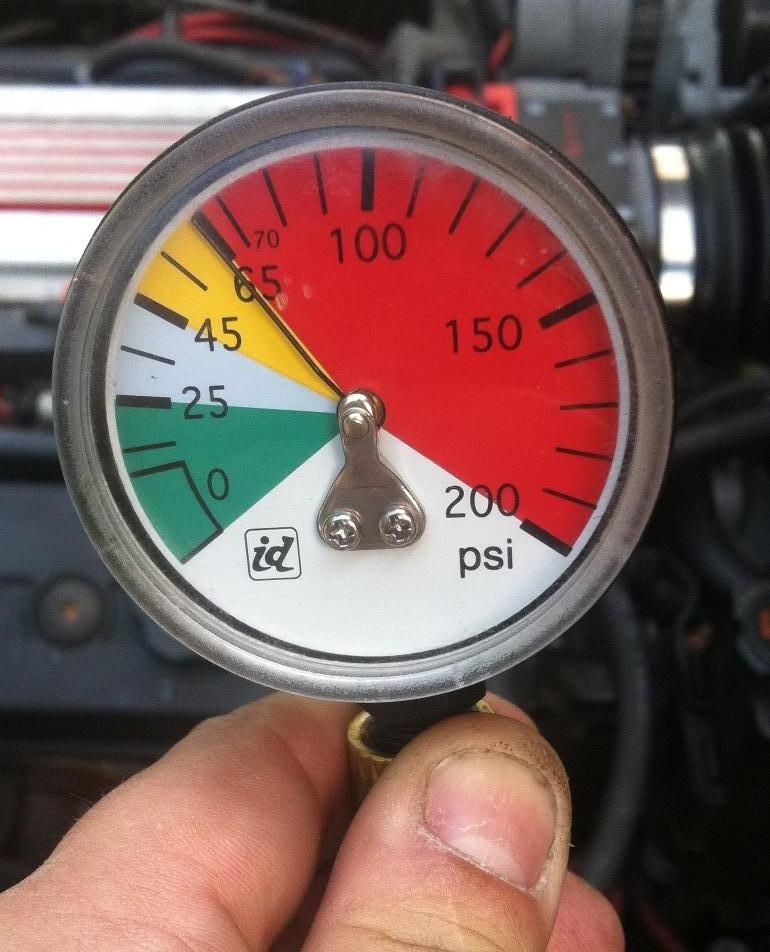 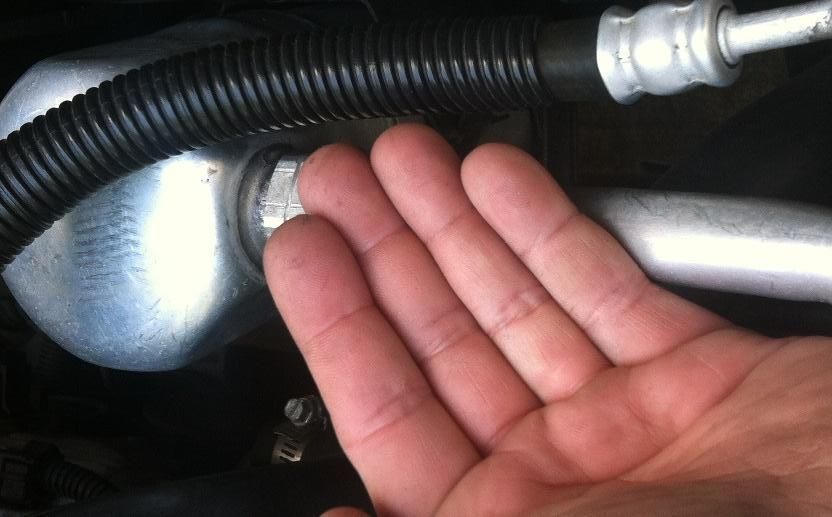 Moved the controller to head only. Compressor began to cycle but NO condensation was present. 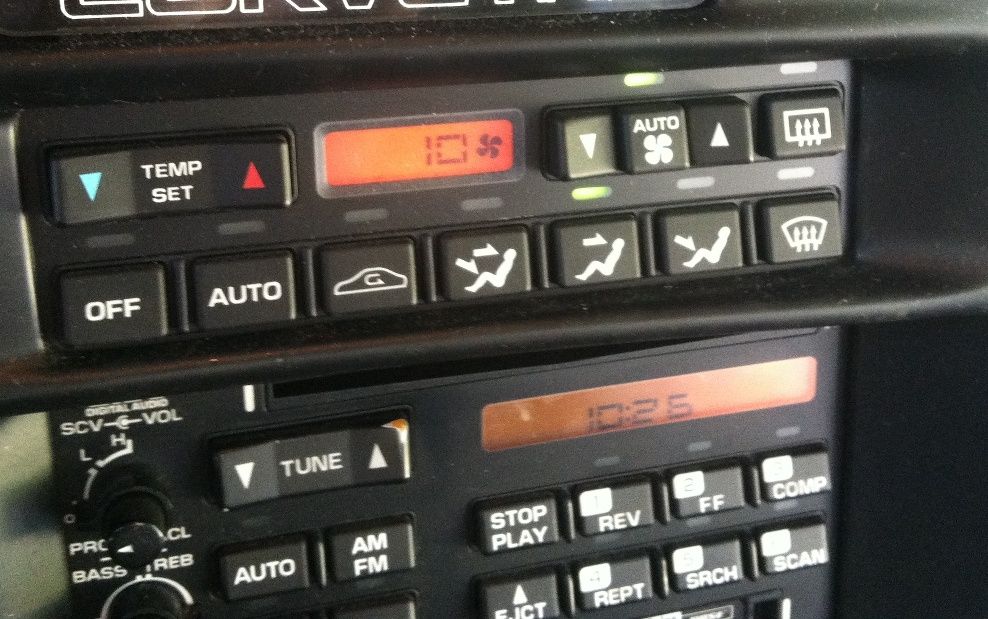 http://youtu.be/m08akONDlKk Changed setting to feet. Again compressor began to cycle but no condensation was present. 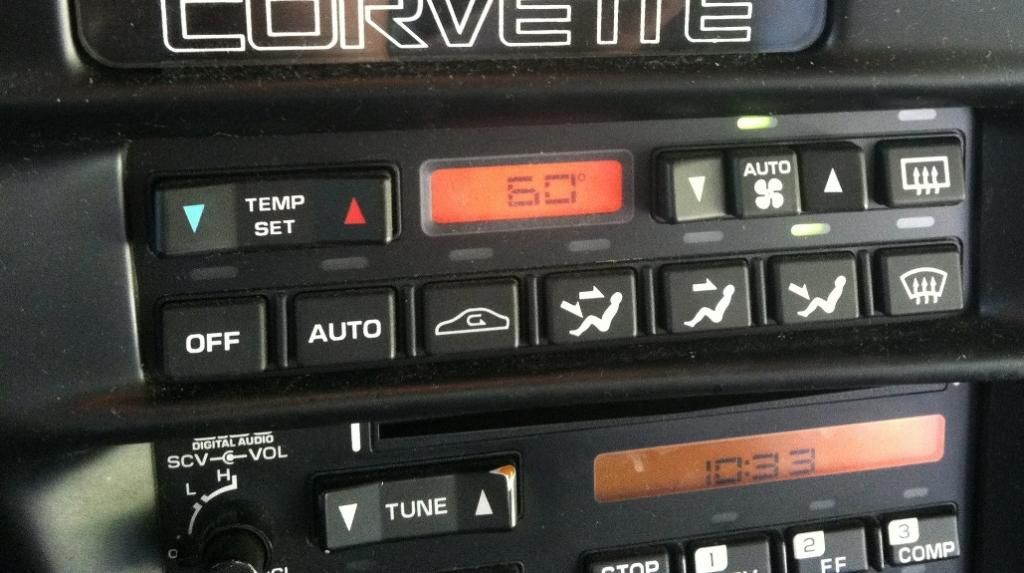 http://youtu.be/XvNPnIcH4yk i also ran the AC check on the head. No codes: http://youtu.be/QdaGf6StcOE After all my testing I shut the car off and came back about 20 min later to get a static reading with the car off. This is what i got: 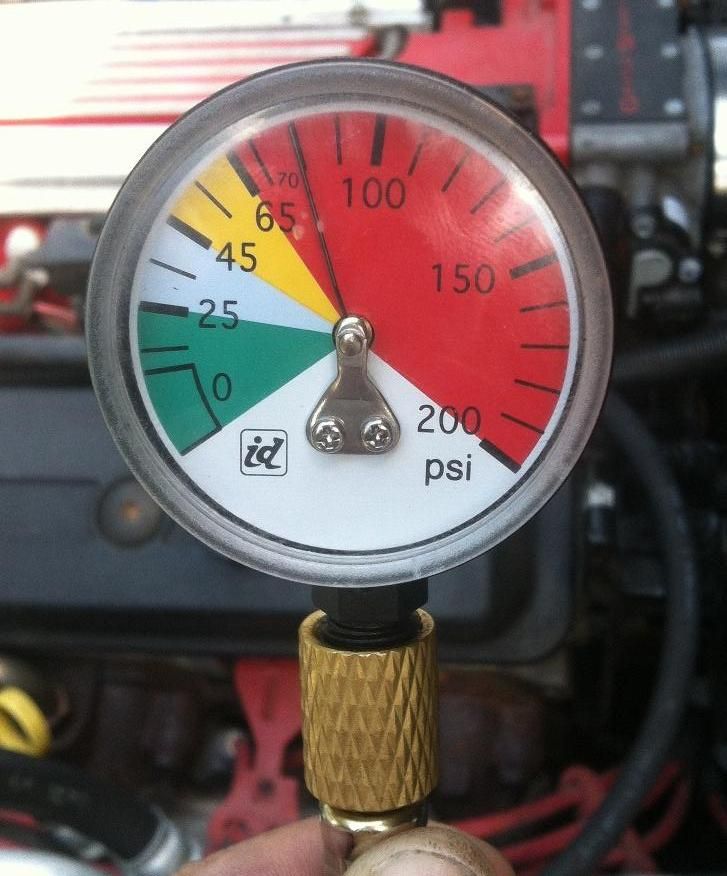 Any ideas on what the issue may be? TIA
Posted on: 2014/7/11 5:31
|
|
|
_________________
My shoulder hurts bad |
||
|
Transfer
|
|
|
Re: How To Part 1: Drain and Flush |
||
|---|---|---|
|
Guru Newb
Joined:
2005/9/16 0:00 From NWI
Posts:
112
|
This is the part of the story where if this was just a clean and flush I would say re install the overflow tank, load a t-stat and then do your fill procedure. But this inst that story. All this was done as a precursor to what really got us here, and that is the need for a radiator replacement. So with taht said, be on the look out for part 2 which is just that. A detailed thread on radiator replacement. The work is already done, pictures taken etc. But doing a thread like this takes a lot of time, and I need a break. I hope part 1 is helpful to at least one person out there!
Good luck, take your time and don't be scared
Posted on: 2014/7/11 4:49
|
|
|
_________________
My shoulder hurts bad |
||
|
Transfer
|
|
|
Re: How To Part 1: Drain and Flush |
||
|---|---|---|
|
Guru Newb
Joined:
2005/9/16 0:00 From NWI
Posts:
112
|
Now that we have the engine block flushed, the radiator flushed, and the system "dry" we can focusing on cleaning the high fill and overflow reservoirs
High Fill first: 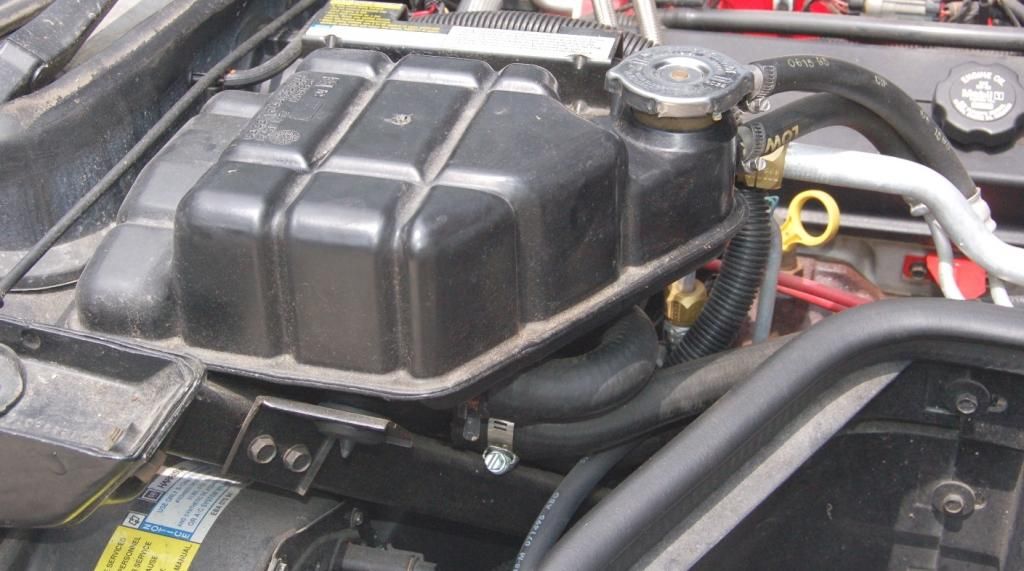 1st loosen and remove both hoses attached to it: 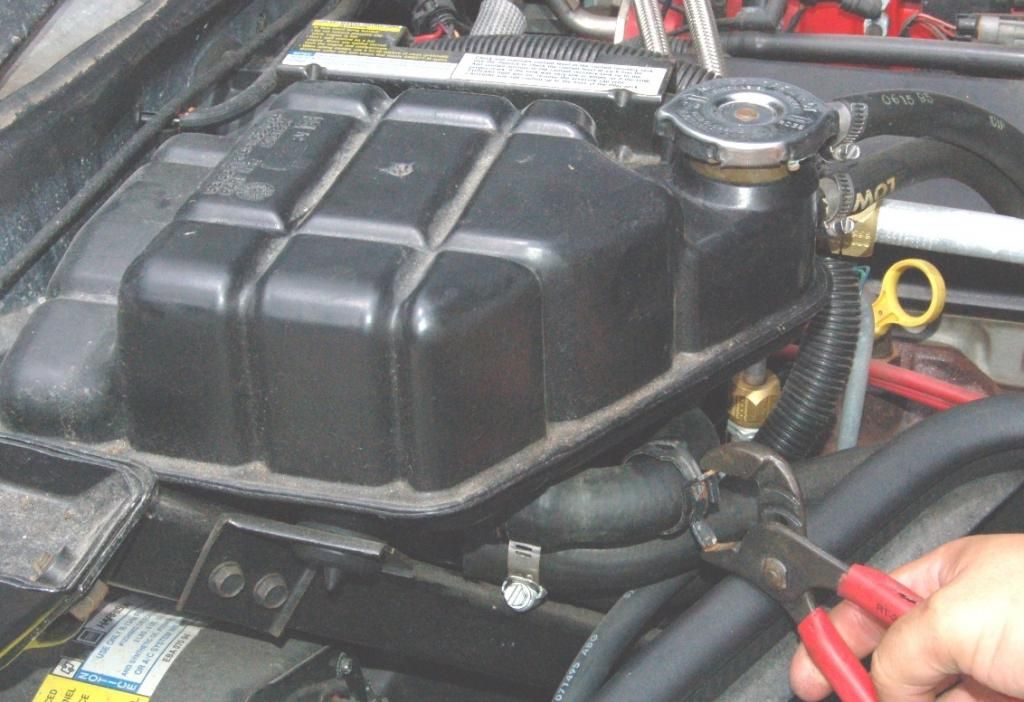 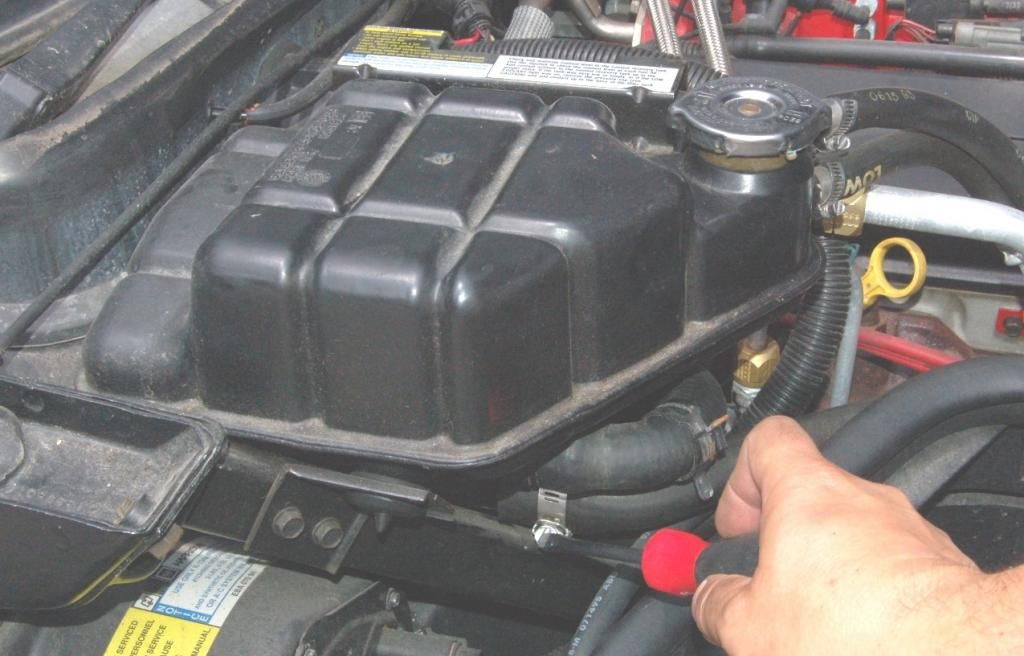 next remove the two top screws:  once the two top screws are removed you will be able to lift the tank out of it's place. Don't pull to hard as you still have to disconnect the wiring plug from the bottom. When lifting it out of place there is a plastic spike that's molded into the tank. It will be press fit into a rubber grommet. Gentle pressure will get it out. also, in my pic I still have the hoses attached. pull those 1st so that they will not be in your way. Once teh tank is removed go ahead and rinse it out and flush ant debris that may be trapped inside. 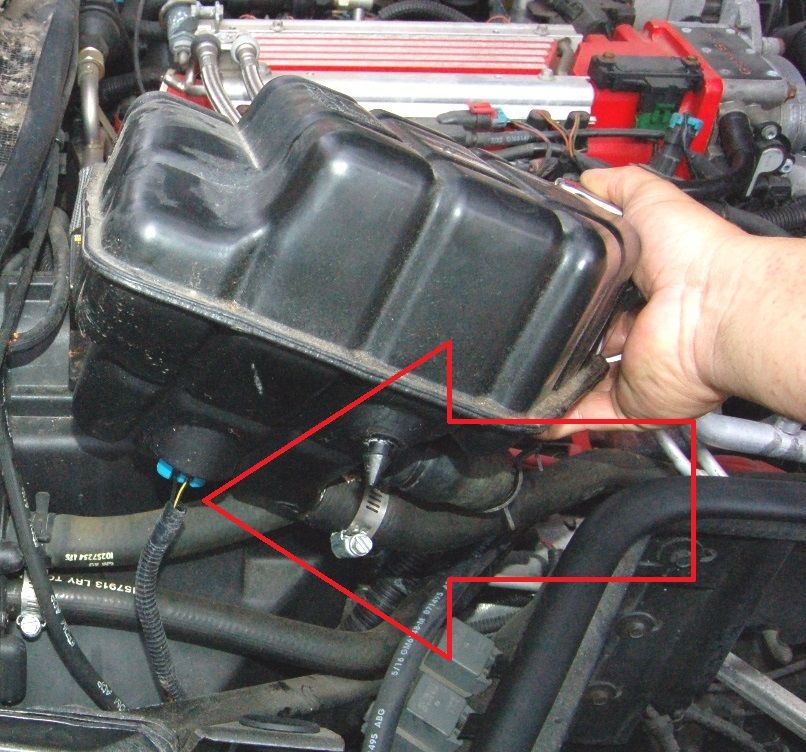 As a side track, while the tank is out, now is a great time to flush your heater core! One of the heater core hoses was attached to the high fill tank the other needs to be separated from it's valve to get access. Once separated use a garden hose at 1/4 to 1/2 open to flush the core. Flush from one hose for a minute or so then switch to the other hose. 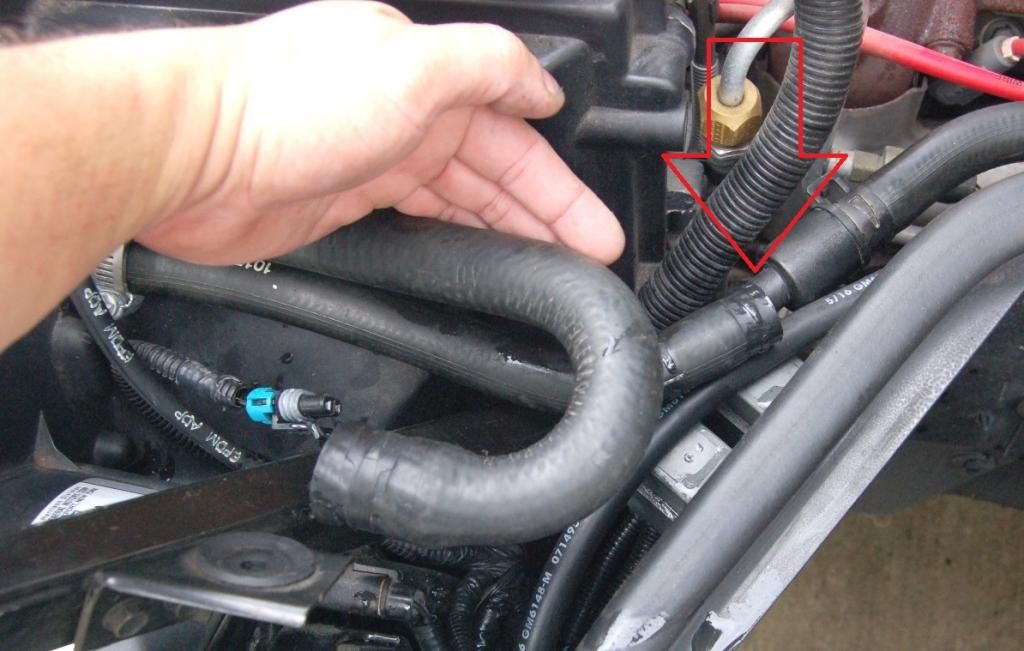 Once the heater core has been flush and the tank cleaned simply reverse the steps to reassemble. 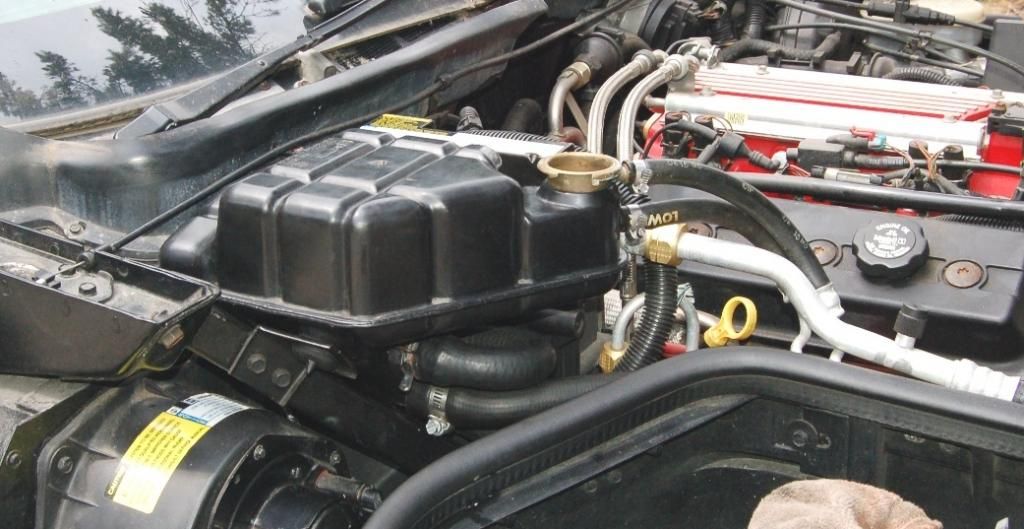 Now we turn to the overflow tank. Loosen one screw and remove three bolts. 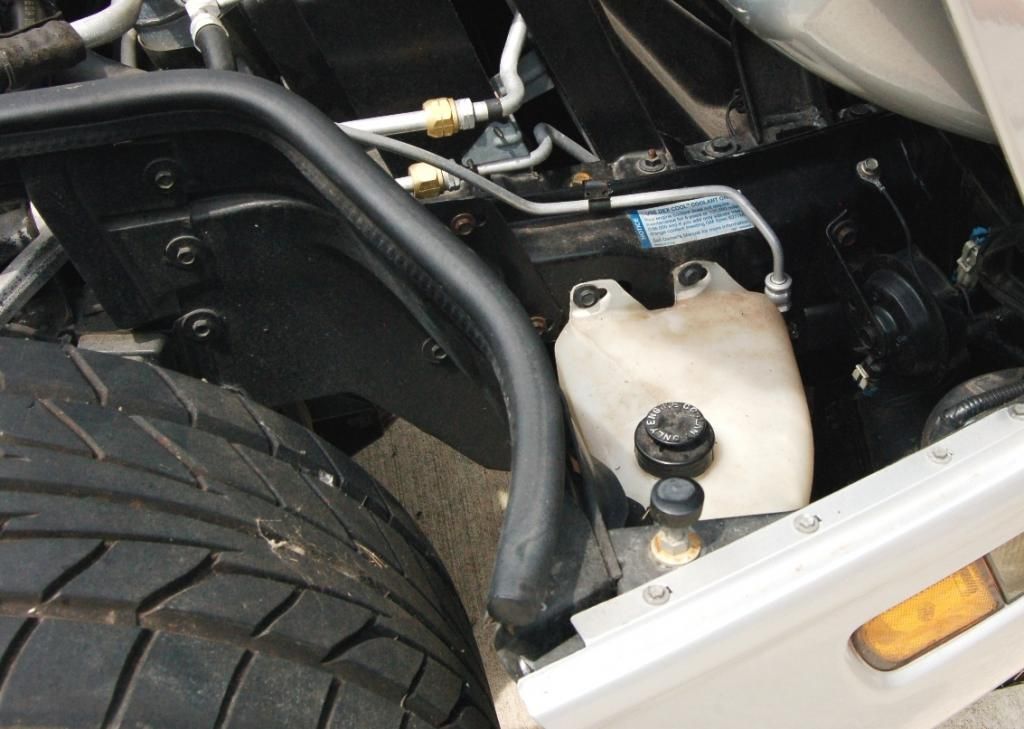  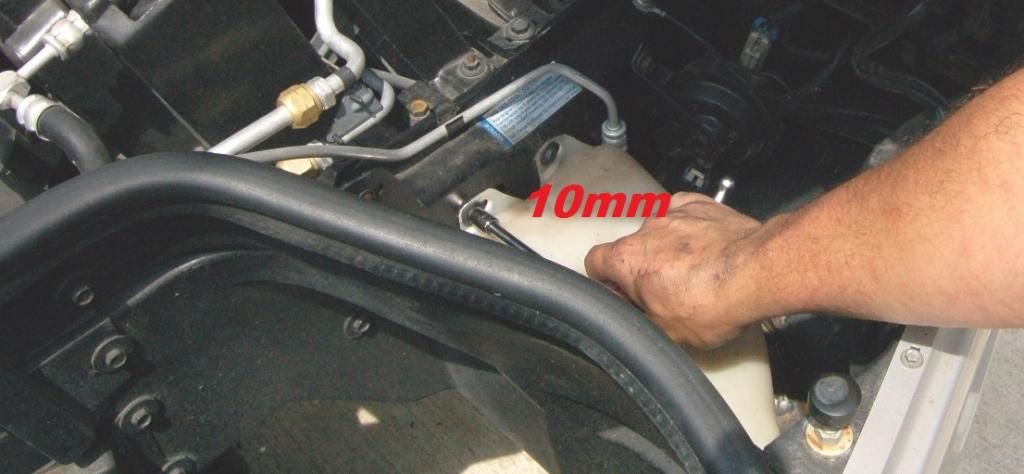 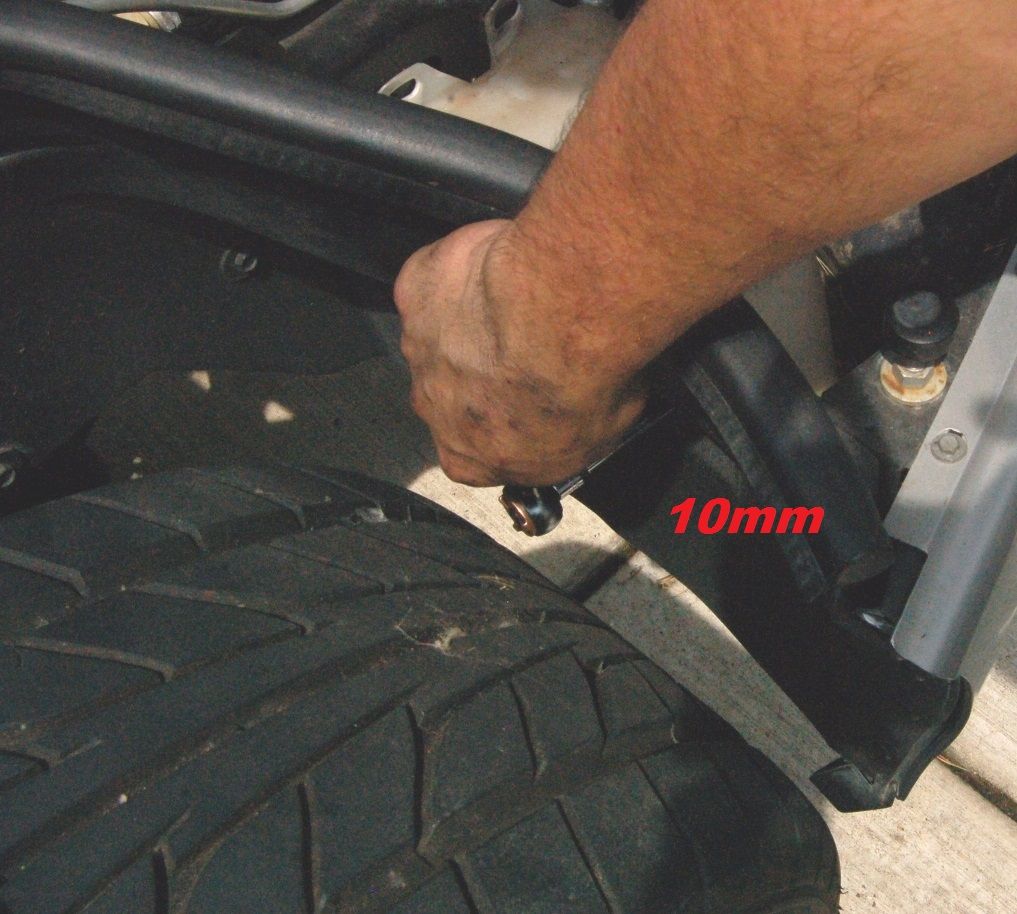 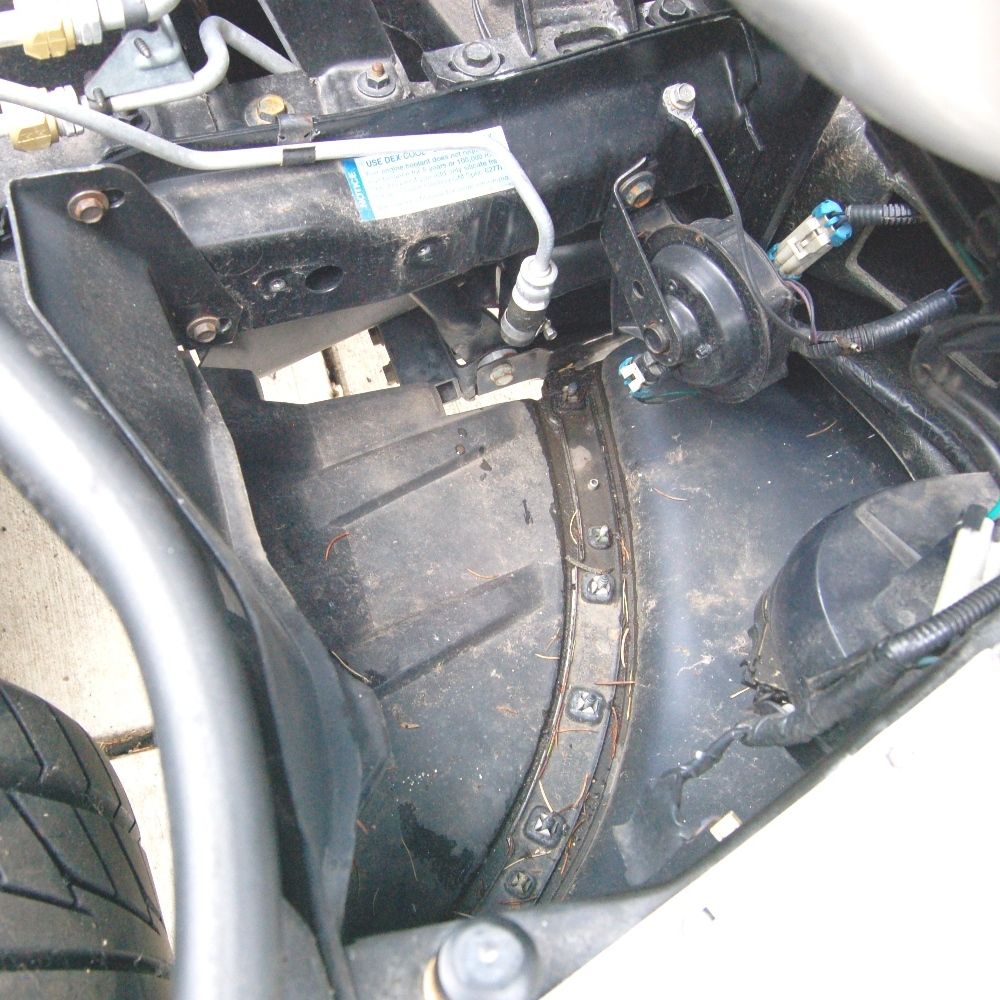 once out, clean: 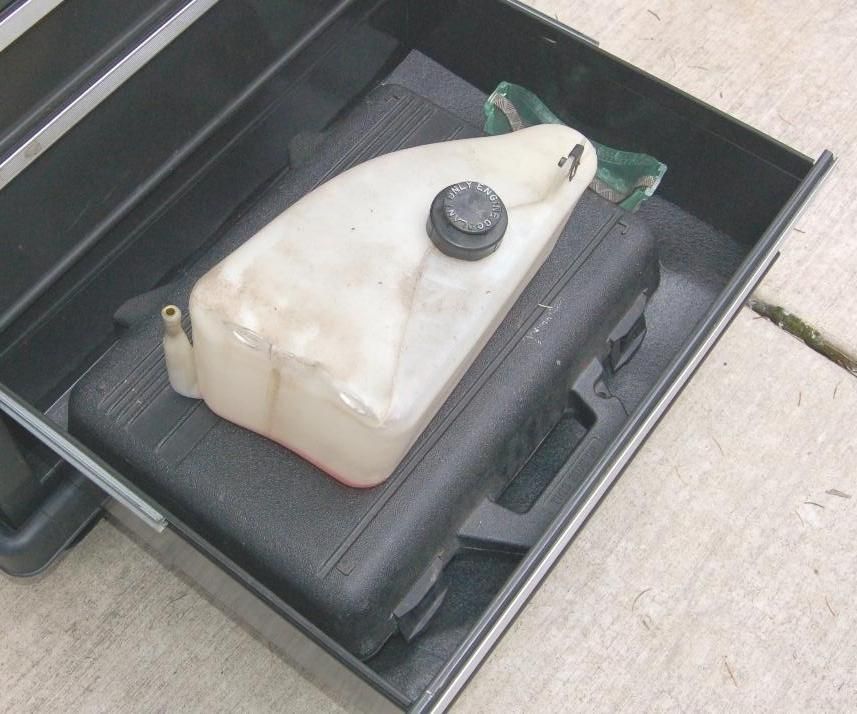 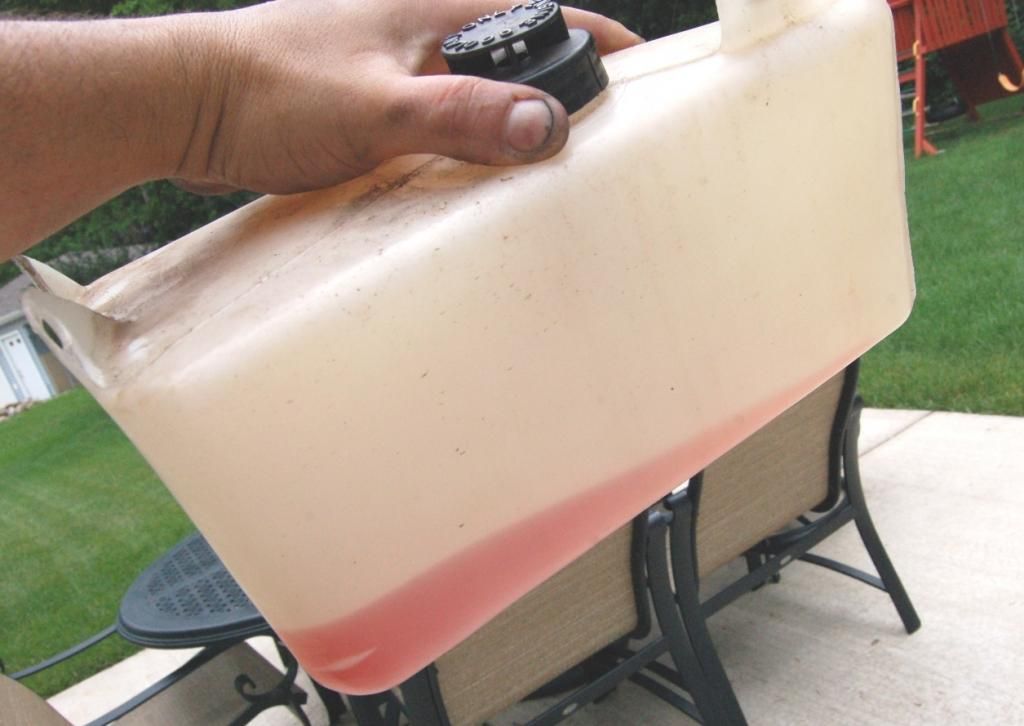
Posted on: 2014/7/11 4:44
|
|
|
_________________
My shoulder hurts bad |
||
|
Transfer
|
|
|
Re: How To Part 1: Drain and Flush |
||
|---|---|---|
|
Guru Newb
Joined:
2005/9/16 0:00 From NWI
Posts:
112
|
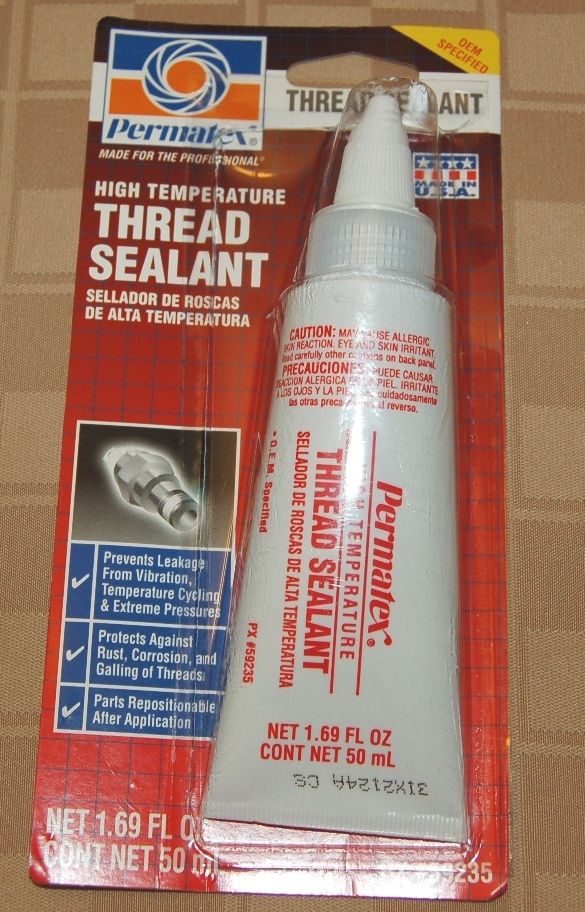
By this time my thread about KS thread sealer was going strong and we learned that GM used some ultra top secret red in color thread sealer no one knew what it was or where to get it. So based on that thread the best choice I found was this:
 After letting the car air out over night with the KS removed it was now time to re install them. First it was time to put thread sealer on. leave the first 1/3 of the threads clean and apply to the 2nd 2/3: 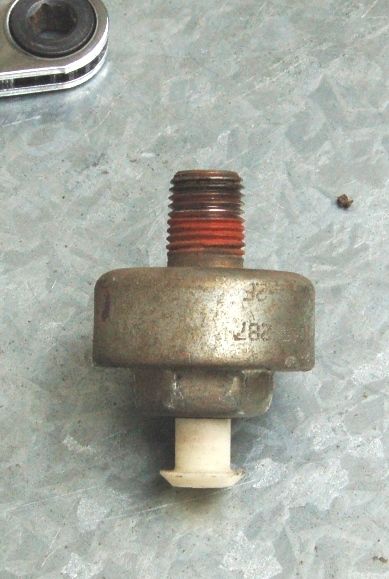 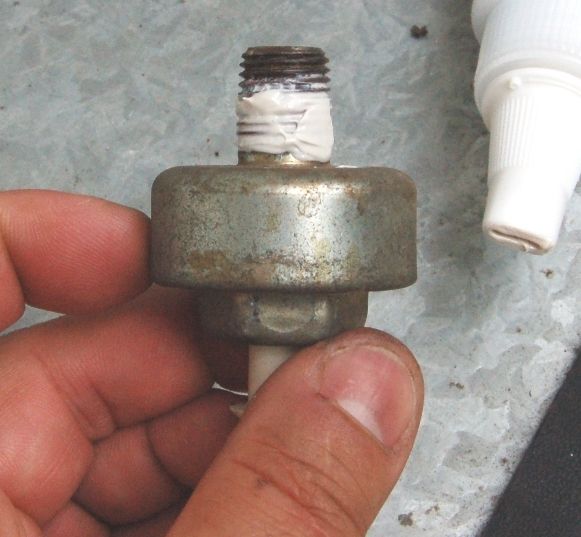 After you install the KS using your 22mm socket and torquing to 15 foot pounds go ahead and replace the electrical plug and shields: 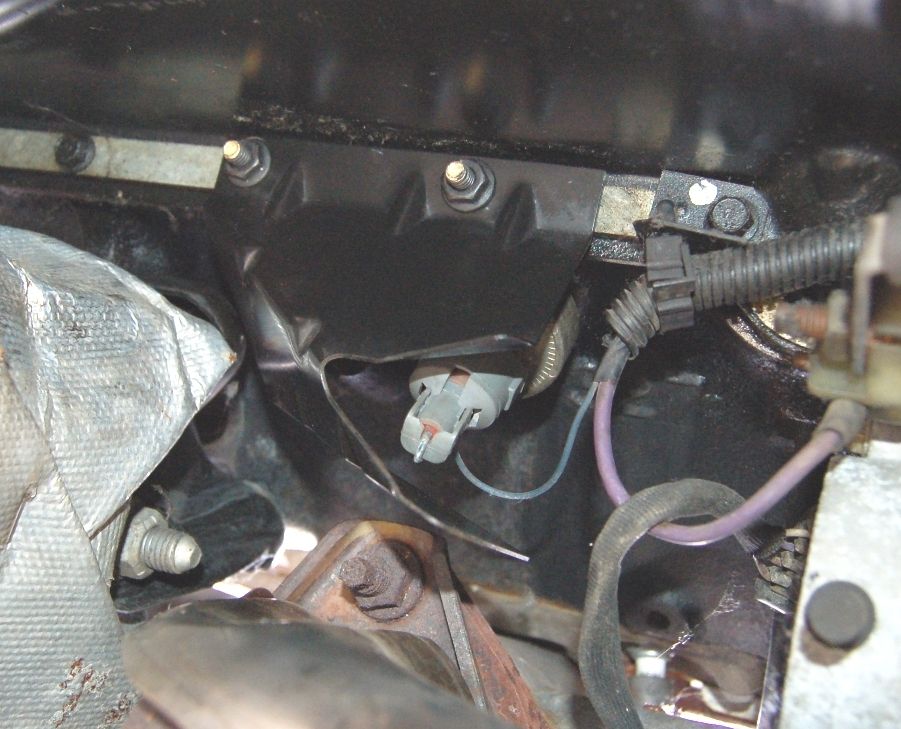
Posted on: 2014/7/11 3:40
|
|
|
_________________
My shoulder hurts bad |
||
|
Transfer
|
|
|
Re: How To Part 1: Drain and Flush |
||
|---|---|---|
|
Guru Newb
Joined:
2005/9/16 0:00 From NWI
Posts:
112
|
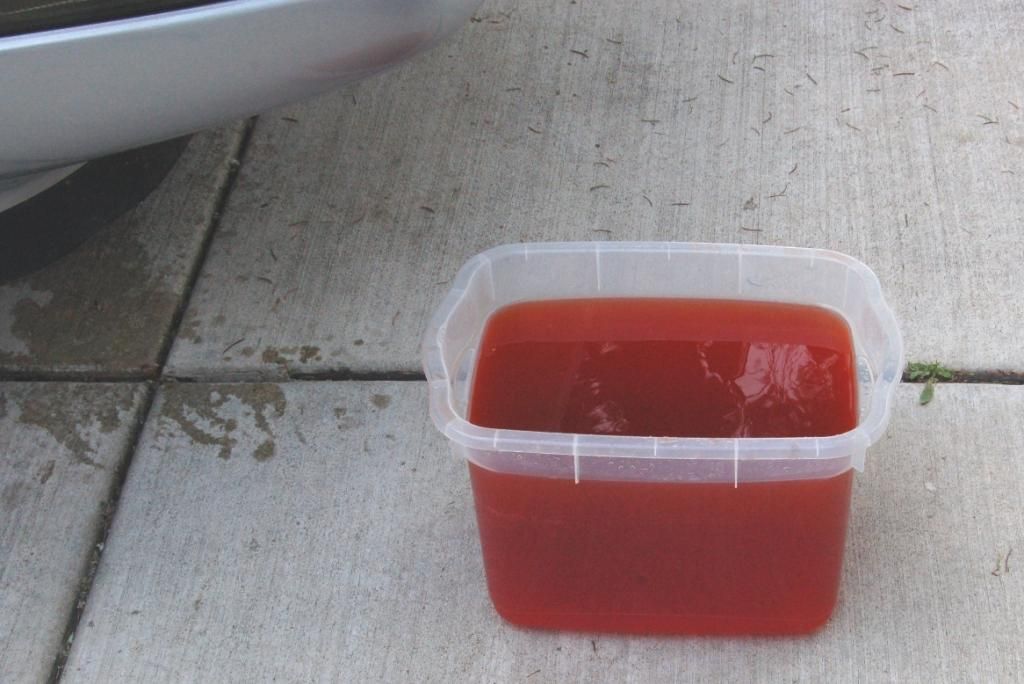
Once the KS are exposed its time to remove them. Remember to have something under you to catch the fluid. and if you were running the car like me, THE COOLANT MAY STILL BE HOT EVEN IF YOU FLUSHED ALMOST 10 GALLONS OF WATER THROUGH IT!
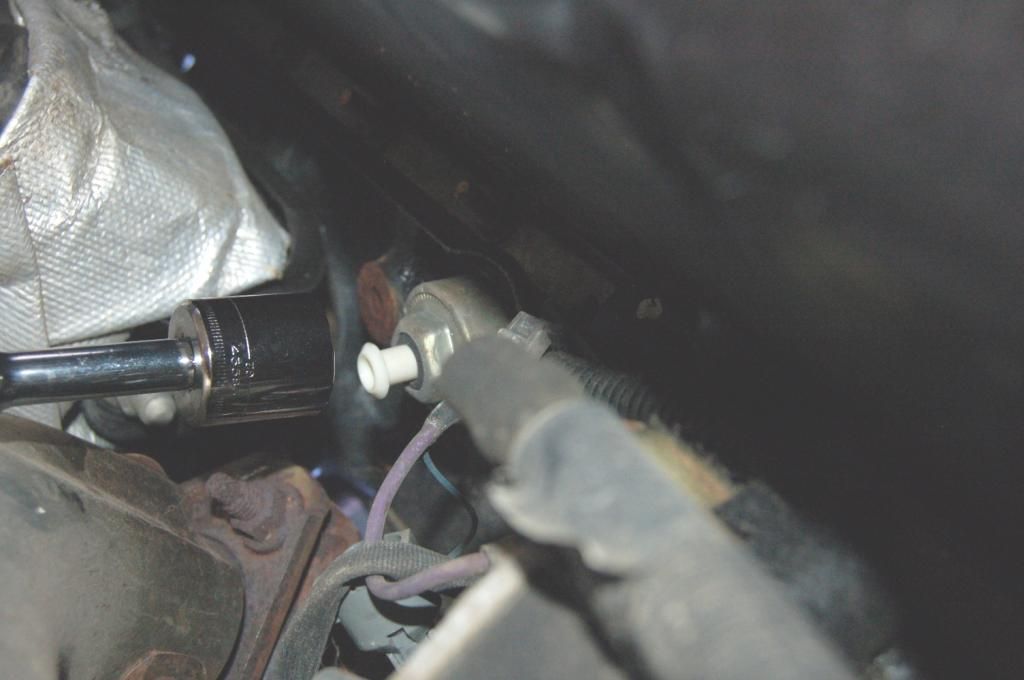 i pulled the KS on the passenger side 1st. In the block this is what came out. remember, the system has had almost 10 gallons of water through it: 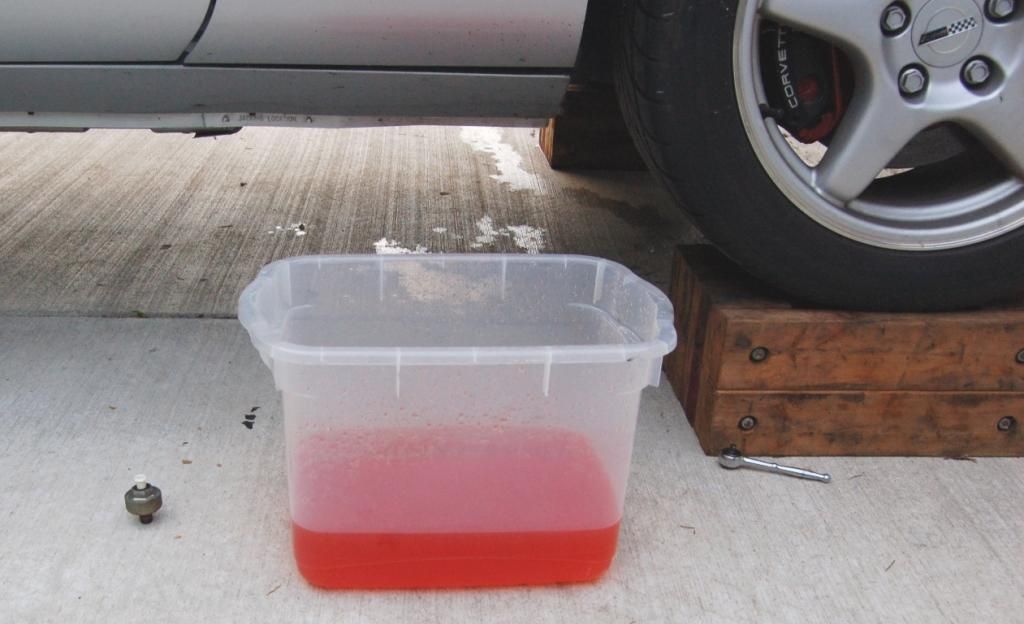 That's over 1 gallon out of just teh passenger side!!! 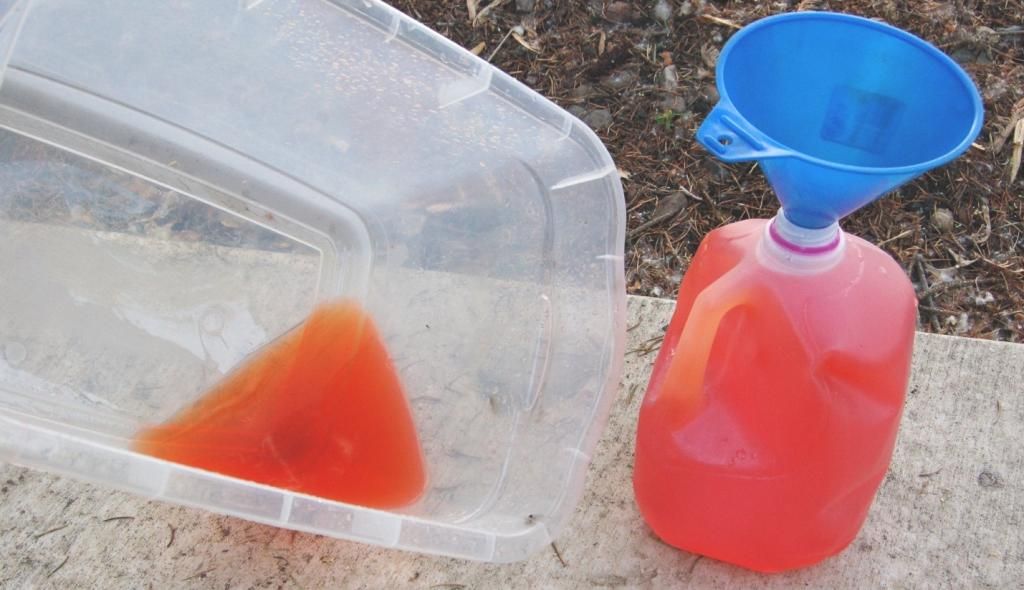 With the passenger KS out I decided to attack from the top with more water: 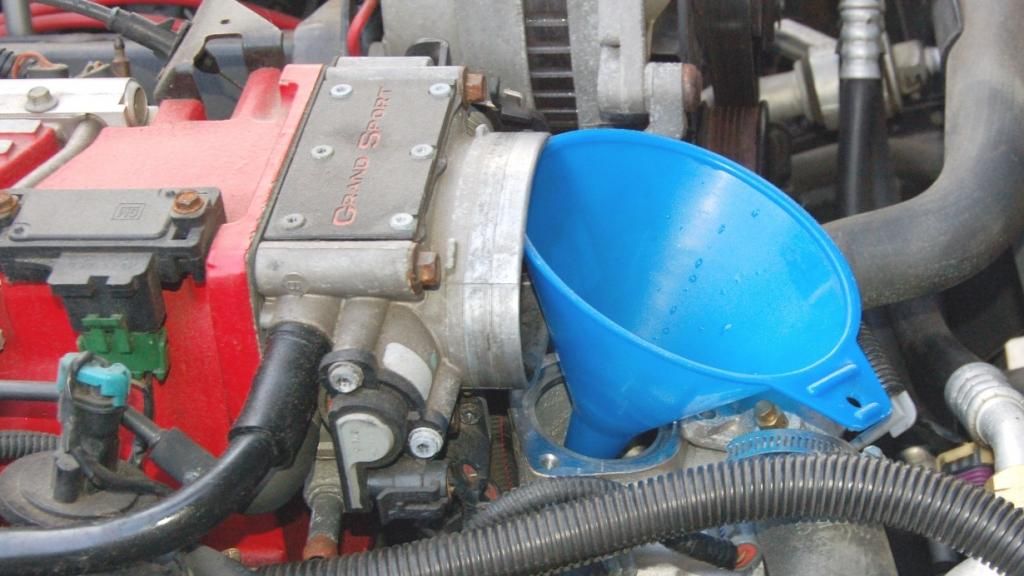 4.5 gallons from the top down and out the passenger side KS later.... Still ORANGE! 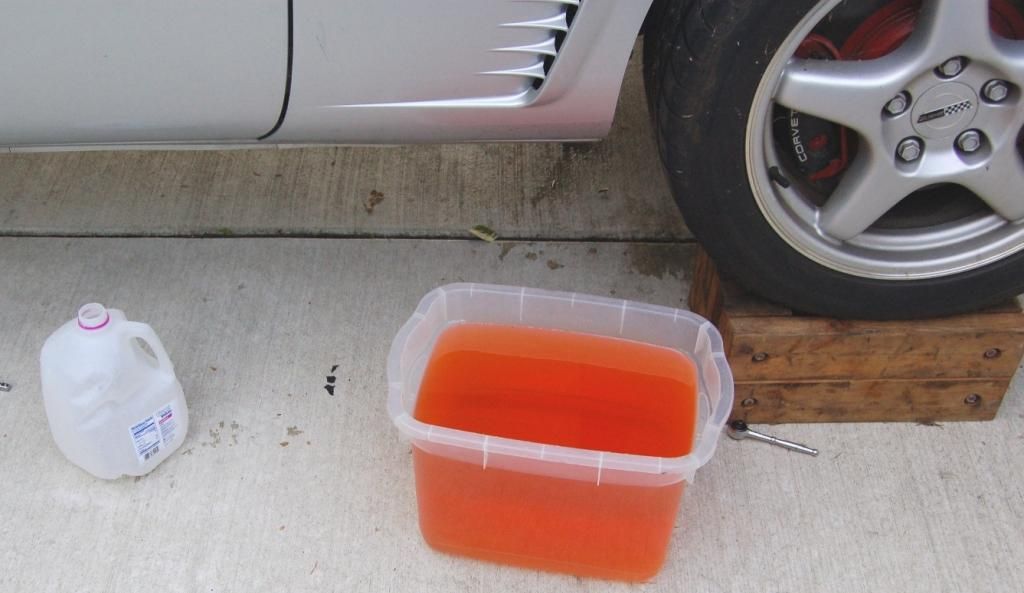 another 4.5 gallons 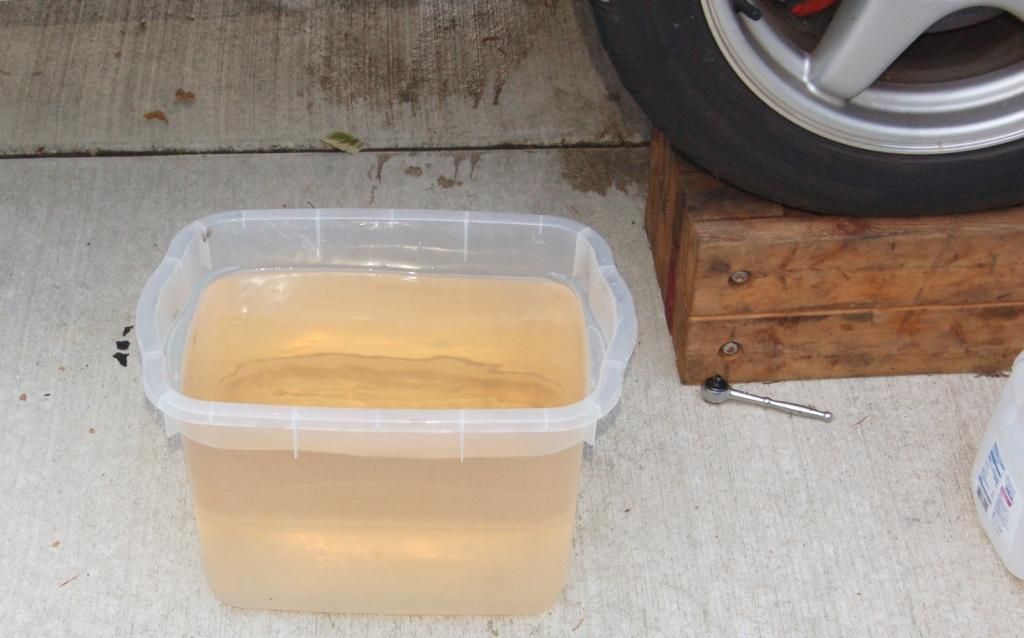 Frustrating! so I moved on to the driver side. But b4 I did I plugged the ks back into the passenger side. Even after flushing the passenger side with 9 gallons of water this is what came out of the drivers side: 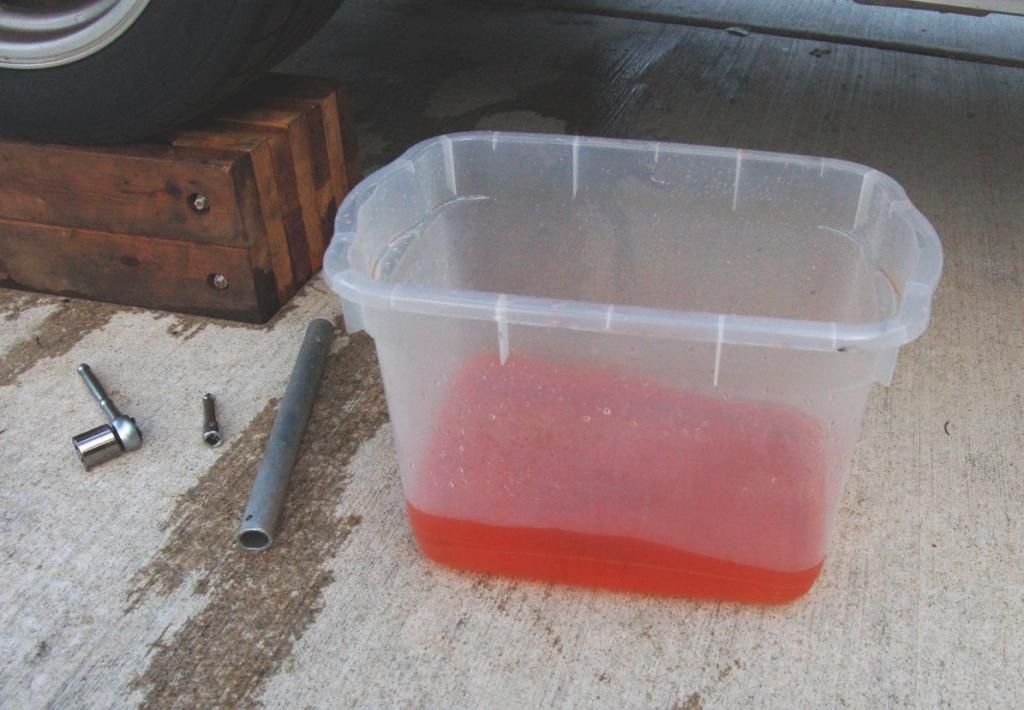 that's still close to 1 gallon of orange! 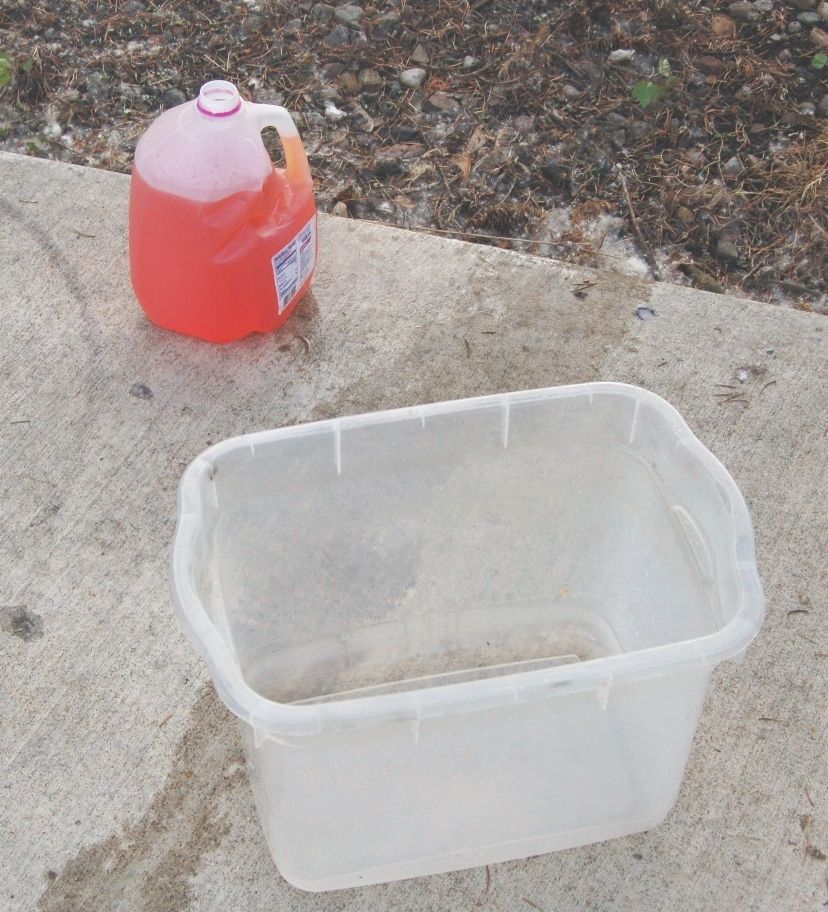 After only 3 gallons of water this is what I got: 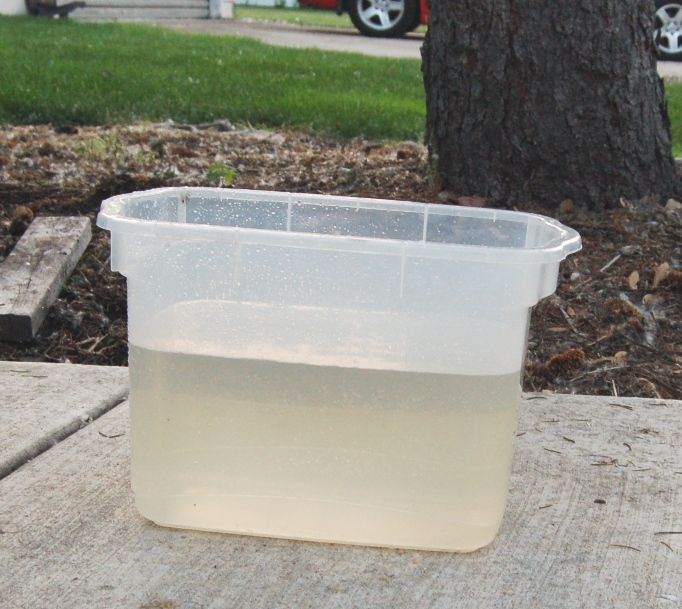 With my luck changing I pulled the passenger side KS and left the Drivers side out as well. Attacked from the top with the garden hose and just let it flow for a few minutes. 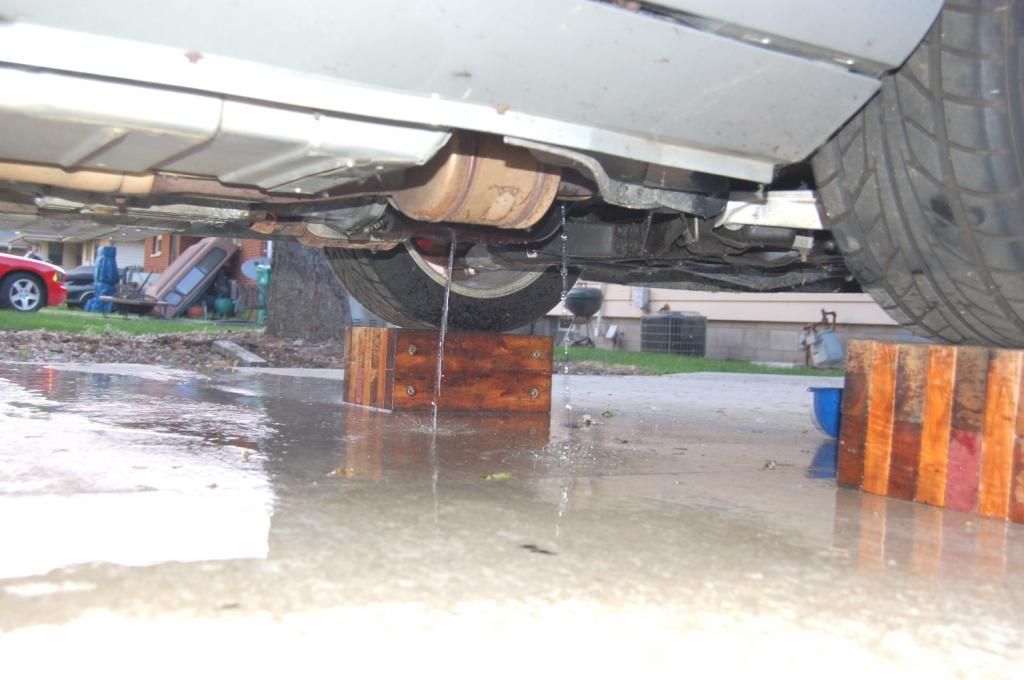 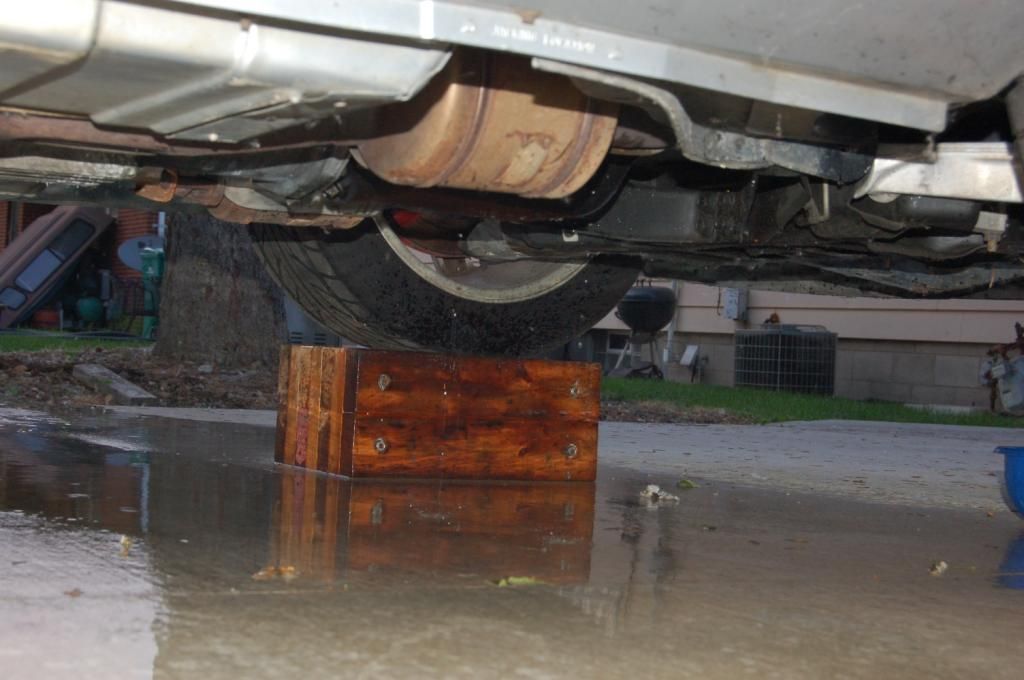 At this point saving the environment was the last thing on my mind. I was doing everything i could not to torch the car
Posted on: 2014/7/11 3:29
|
|
|
_________________
My shoulder hurts bad |
||
|
Transfer
|
|
|
Re: How To Part 1: Drain and Flush |
||
|---|---|---|
|
Guru Newb
Joined:
2005/9/16 0:00 From NWI
Posts:
112
|
Crawl under the passenger side and look near rhe header by the heat wrap and you'll see this.
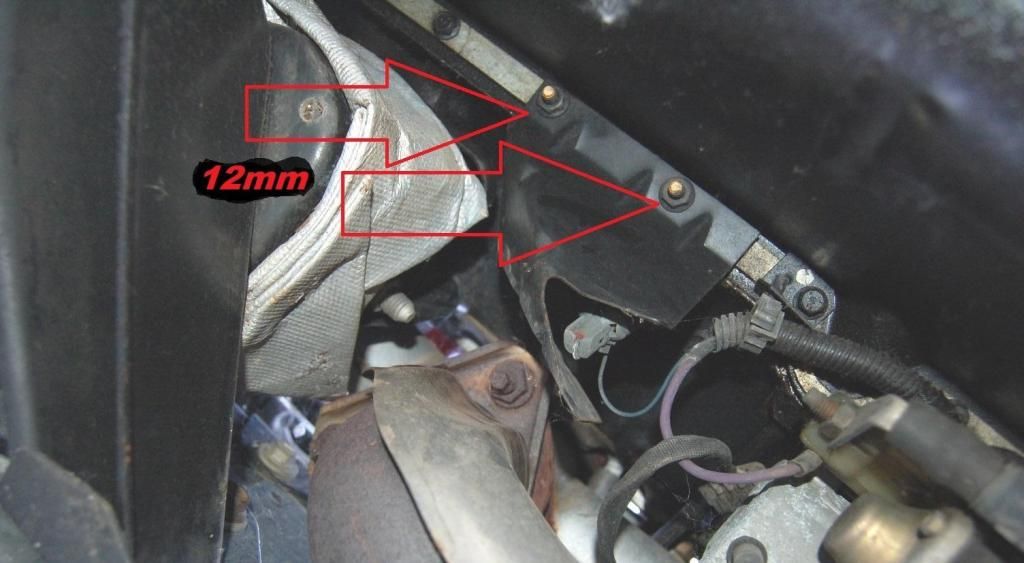 Driver side near the oil pan sensor and you'll see this: 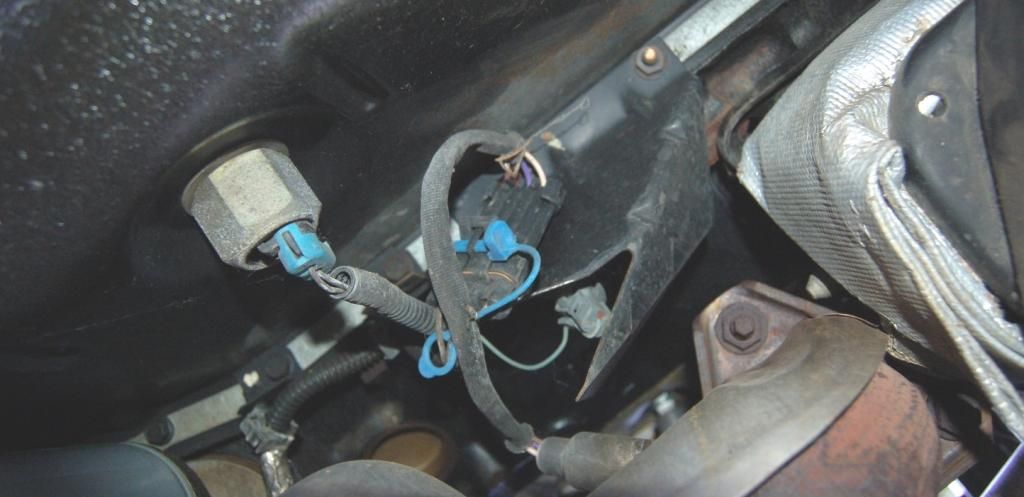 Those are teh shields that protect the KS. they have to be removed to gain access to them: 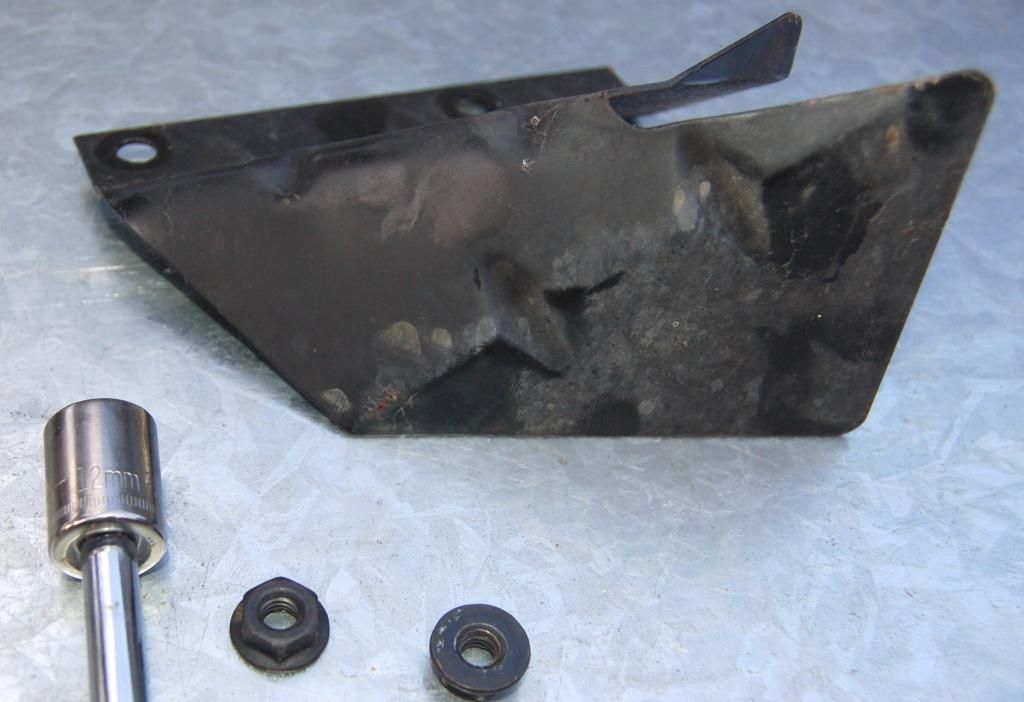 Once the shields are removed each knock sensor has a plug that needs to be removed. Just pinch and pull. and that will expose the KS 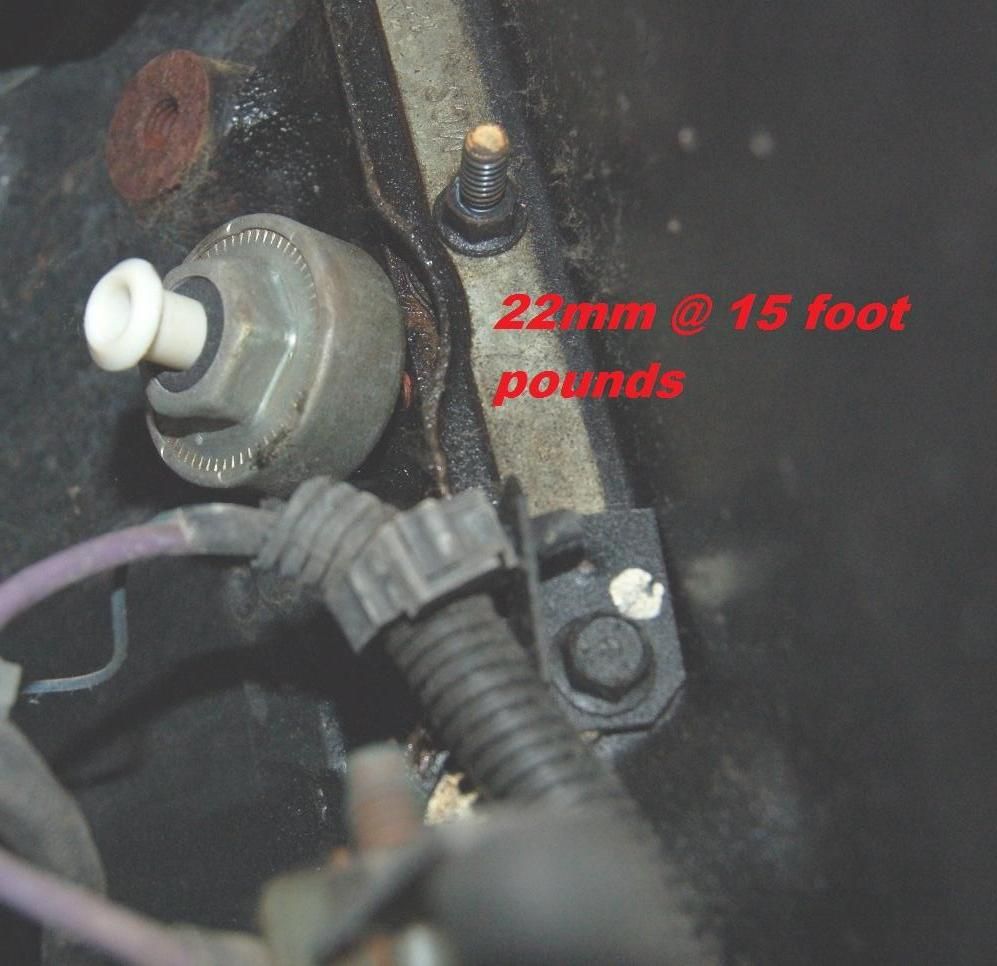
Posted on: 2014/7/11 3:15
|
|
|
_________________
My shoulder hurts bad |
||
|
Transfer
|
|
|
Re: How To Part 1: Drain and Flush |
||
|---|---|---|
|
Guru Newb
Joined:
2005/9/16 0:00 From NWI
Posts:
112
|
After I noticed my gallon of distilled water didn't even cause a dent in the system I filled the reservoir with 2 more gallons of water. repeated the process. then added another gallon of water and repeated the process. So now we have 4 gallons of water through the system. and here are the results.
 OK, I was done with running the car. The coolant comes out hot and it burns! I decided to just leave the pedcock open and let water flow. I added 5 gallons through the system. and here they are: 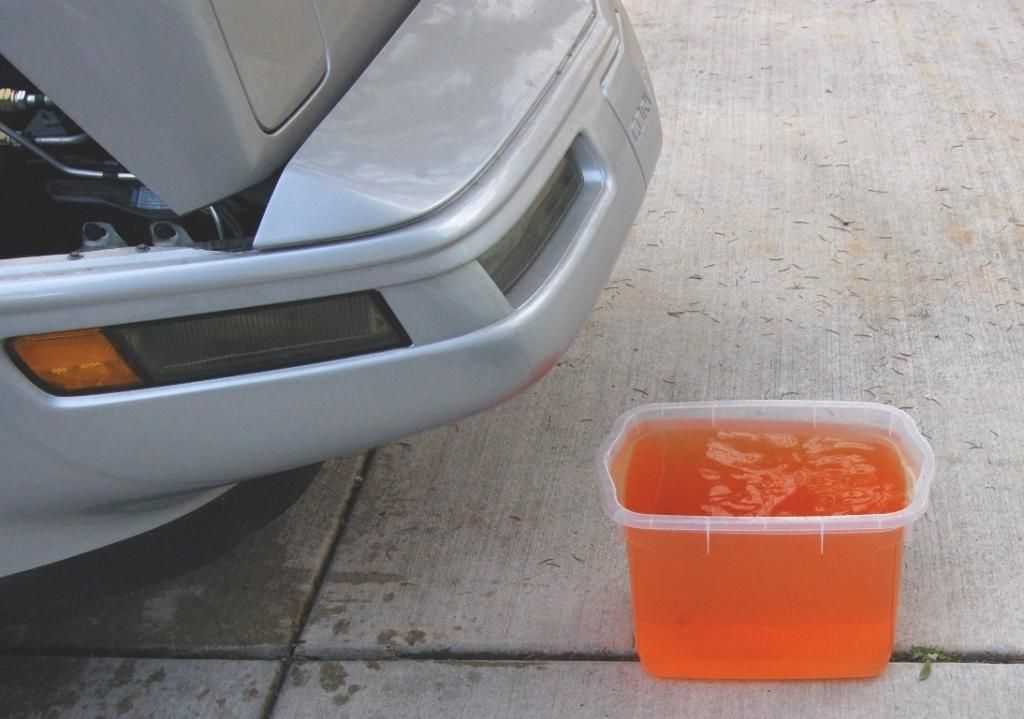 getting "cleaner" but still not clean. So another 4.5 gallons and we get to here: 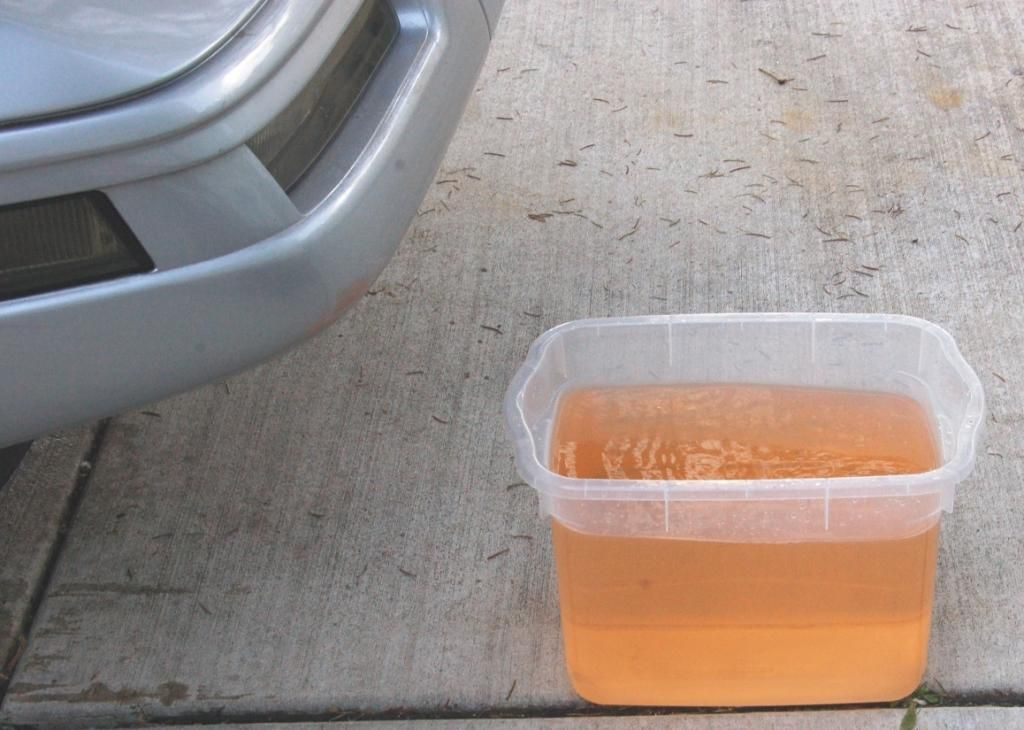 OMG. this is not working. By this time I've now come to the realization that if I wanna do this right the knock sensors have to come out!
Posted on: 2014/7/11 3:09
|
|
|
_________________
My shoulder hurts bad |
||
|
Transfer
|
|
|
Re: How To Part 1: Drain and Flush |
||
|---|---|---|
|
Guru Newb
Joined:
2005/9/16 0:00 From NWI
Posts:
112
|
I decided to try and flush the system by pulling the t-stat and flowing water through it. This is how I did it.
Close the pedcock and then pull the t-stat housing off: 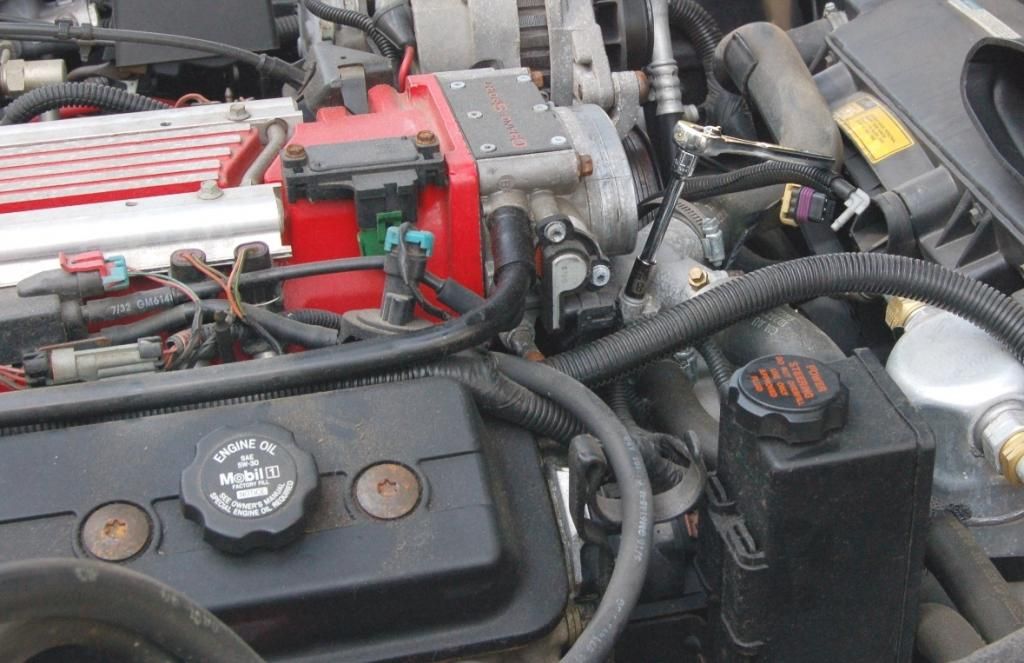 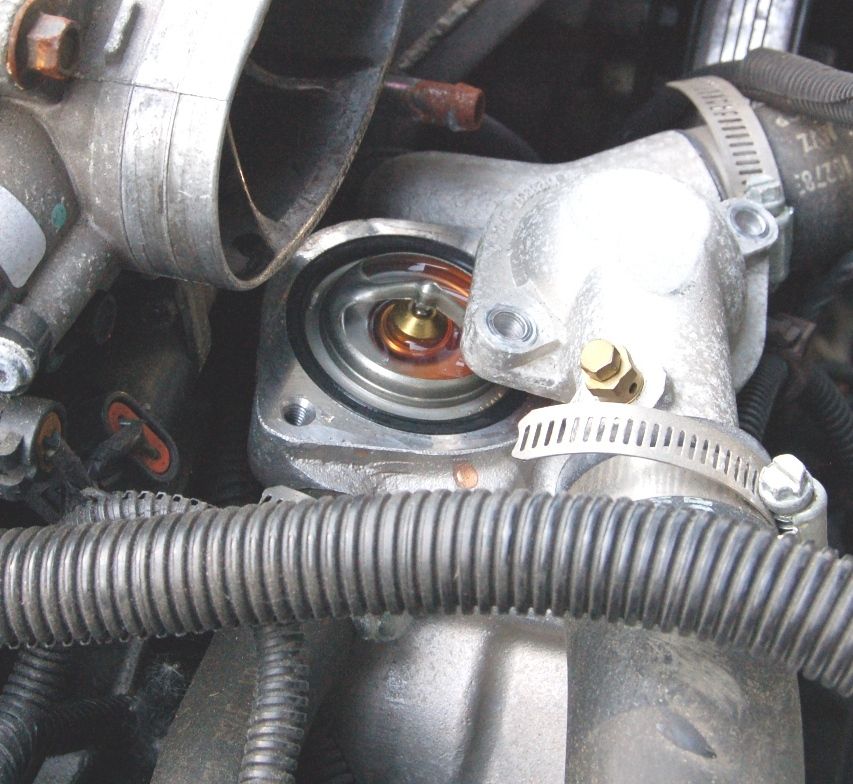 As you can see there was nothing wrong with my t-stat but since I was already there i will replace anyway. Cheap insurance: 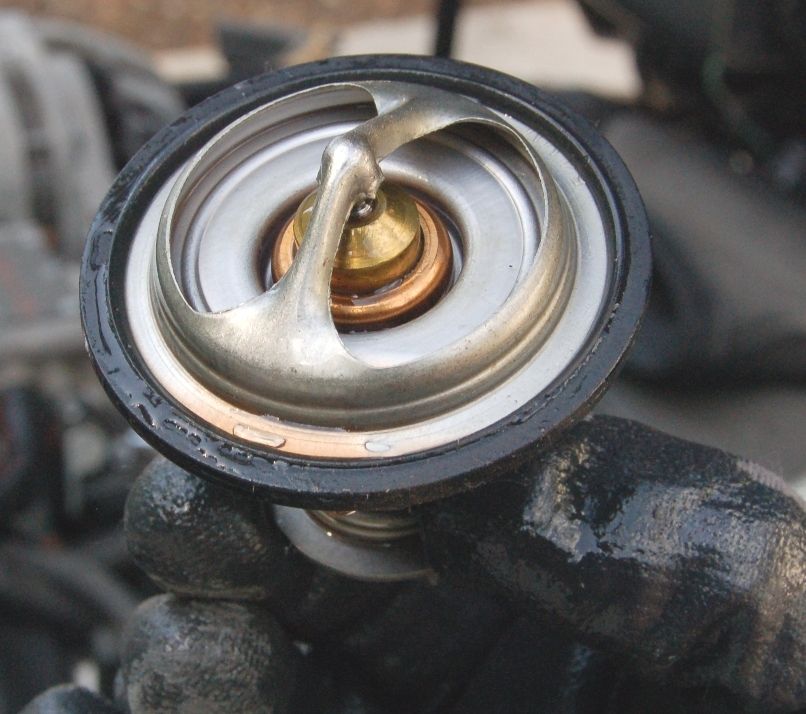 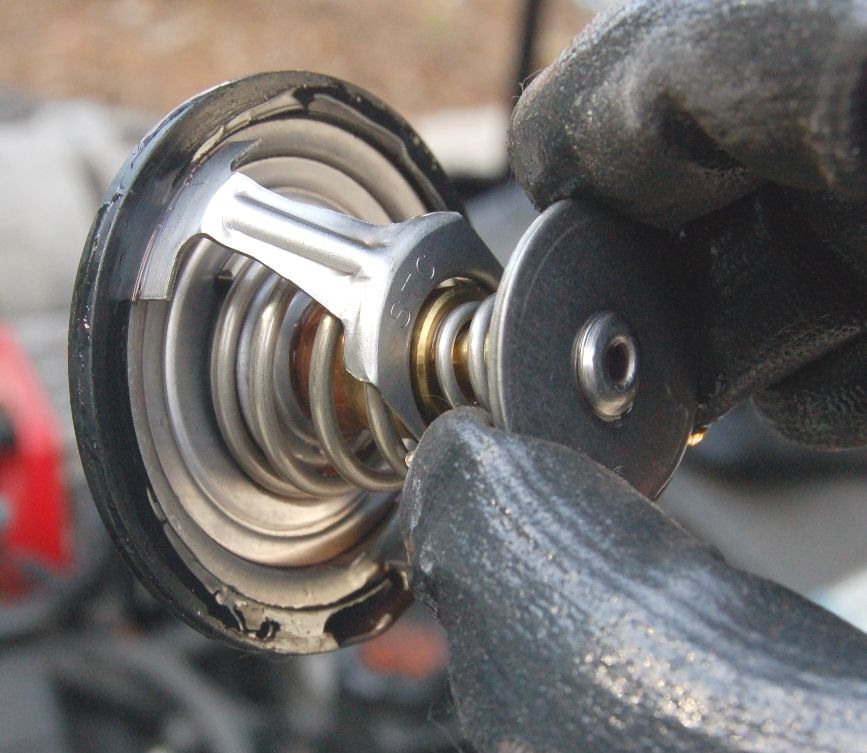 With the t-stat removed you can see coolant: 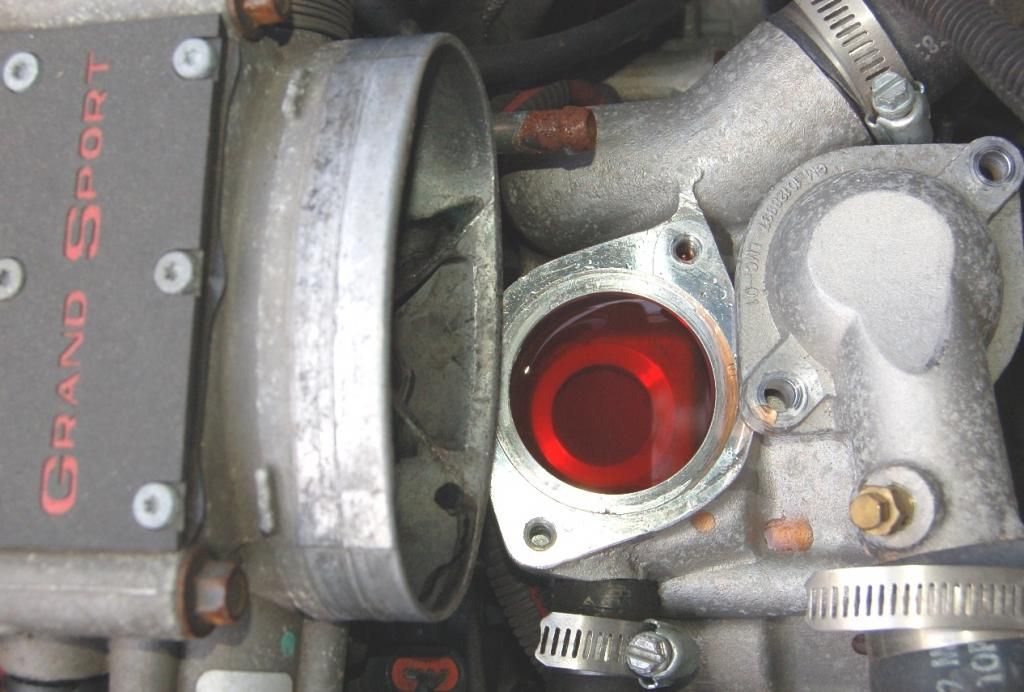 With the t-stat out, replace and tighten the housing: 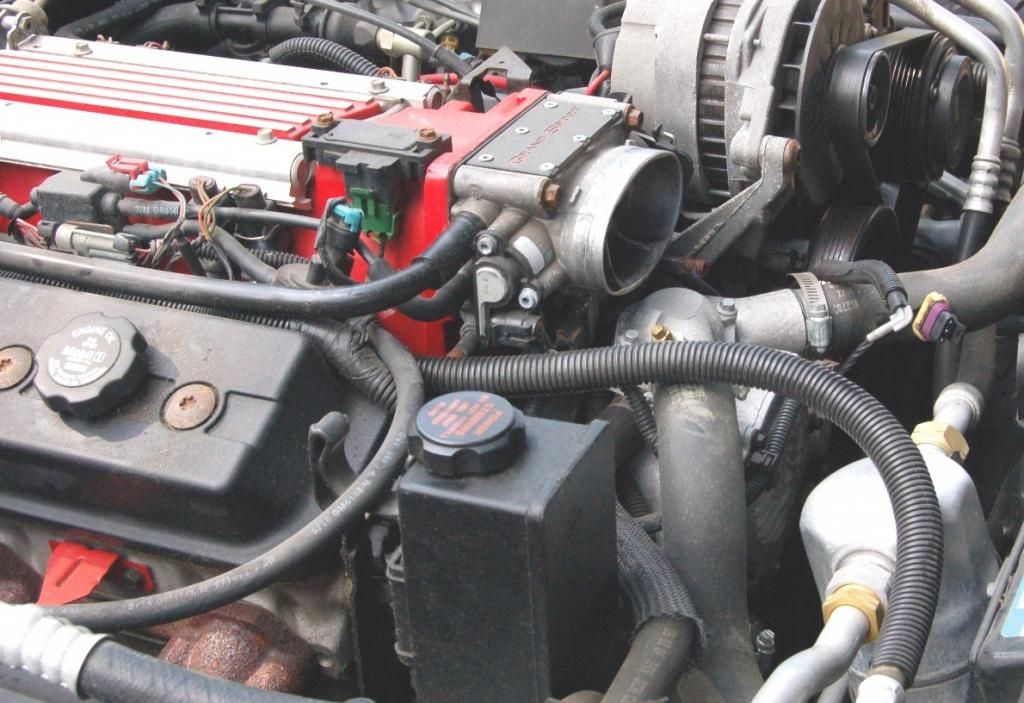 Now your pedcock should be closed and your t-stat housing tight with no t-stat loaded. Fill the reservoir with water. I in my naive state of mind thought 1 gallon of distilled water would do the trick. 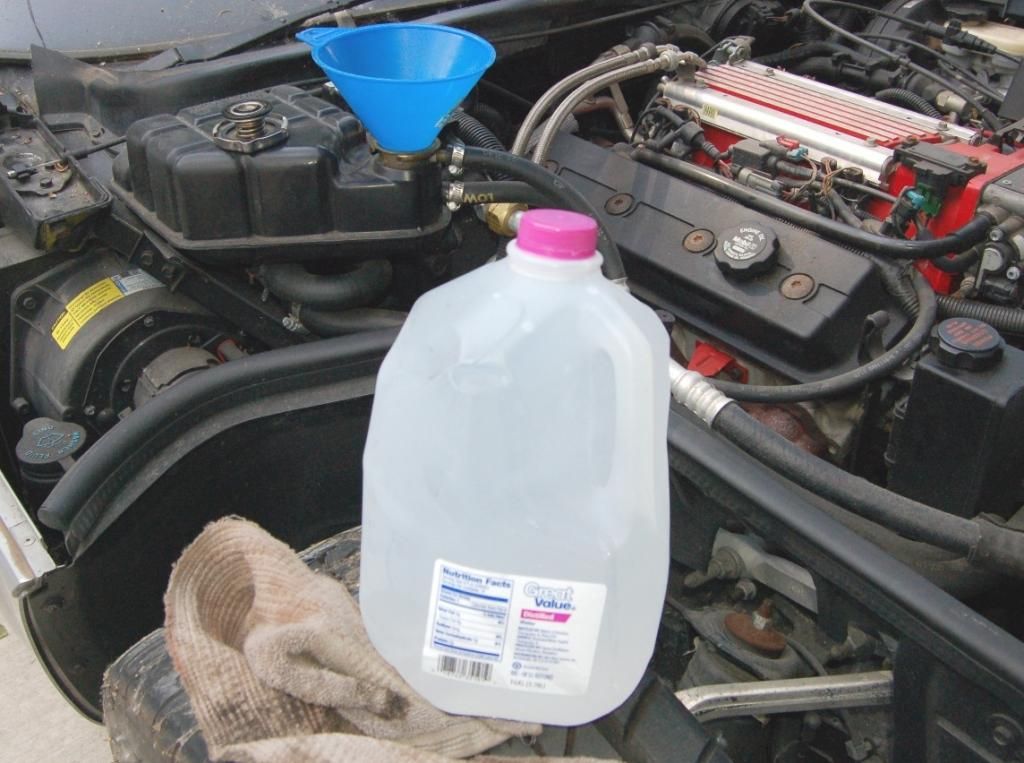 After filling the reservoir with the gallon. I started the car and let it run for 5 min. The idea is with no t-stat loaded you will get water circulating and flushing out everything when you open the pedcock again. Well when I opened the pedcock this came out: 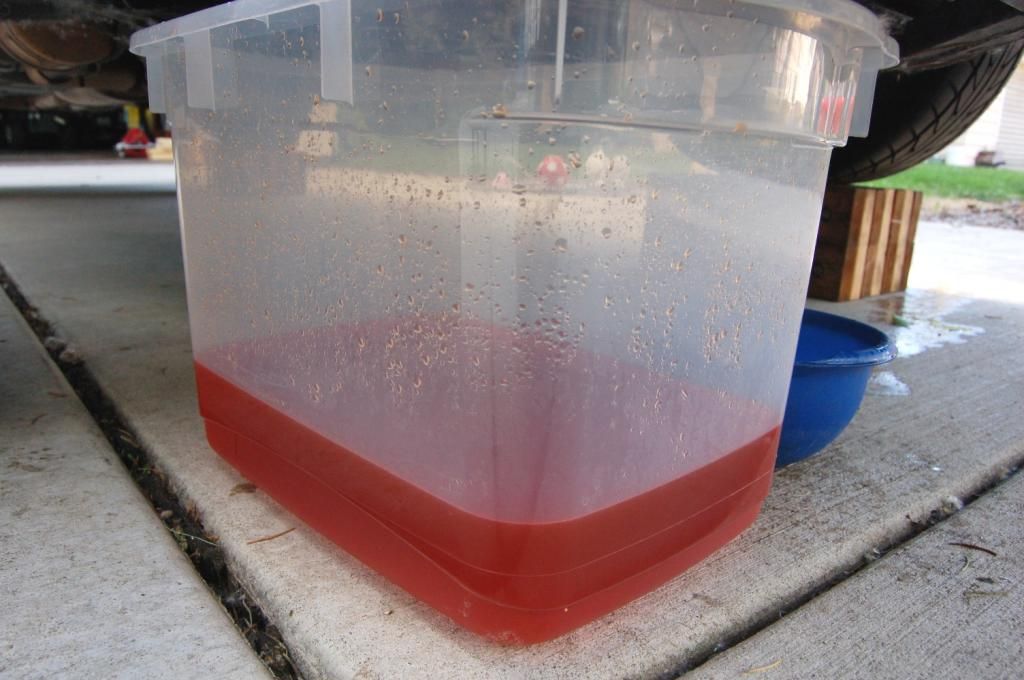 Yup, that's my gallon of distilled water. As orange as it gets. It was at this point i knew I was in for a long day.
Posted on: 2014/7/11 3:01
|
|
|
_________________
My shoulder hurts bad |
||
|
Transfer
|
|
|
How To Part 1: Drain and Flush |
||
|---|---|---|
|
Guru Newb
Joined:
2005/9/16 0:00 From NWI
Posts:
112
|
While searching for radiator thread that was an end all be all and finding none I figured that I would work toward putting one together as I worked on my CE LT4. There are many ways to skin a cat, this was my way. YMMV so take this for what its worth.
after you get your car in a safe position go ahead and drain your radiator by opening the pedcock located on the passenger's side bottom of the radiator. In my case the leak in the radiator took care of most of that. 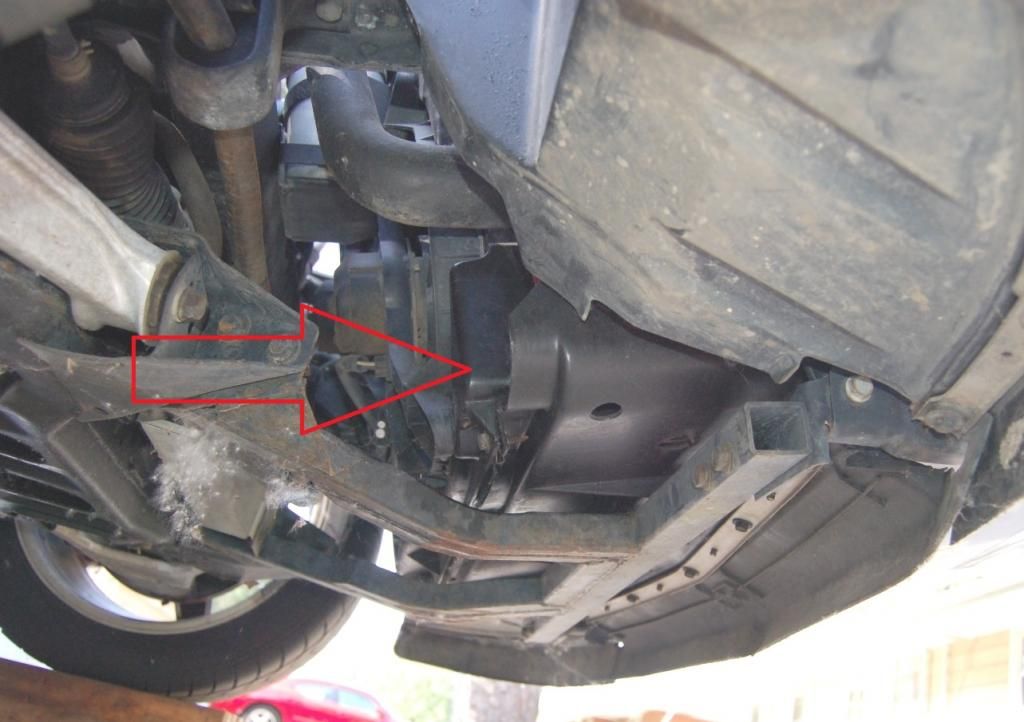 Next I began to take apart the duct work blocking the t-stat. All the arrows are areas that need to be addressed for removal: 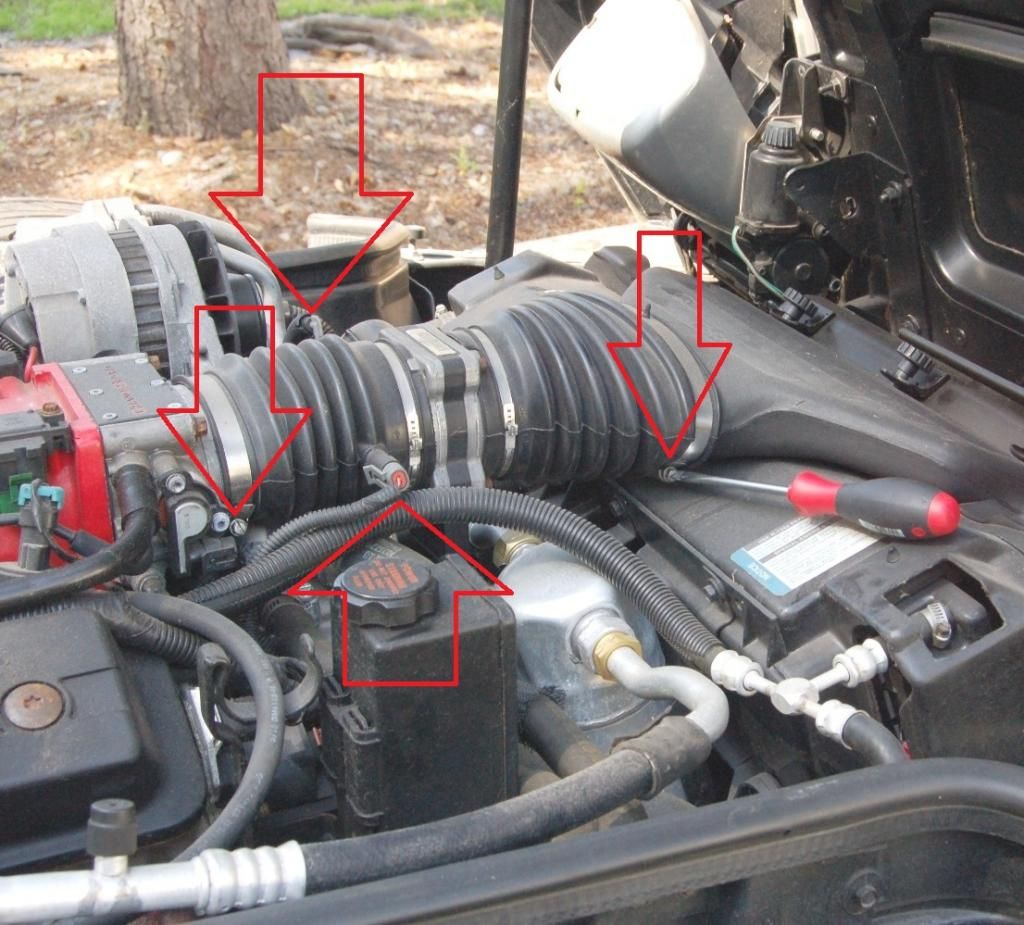 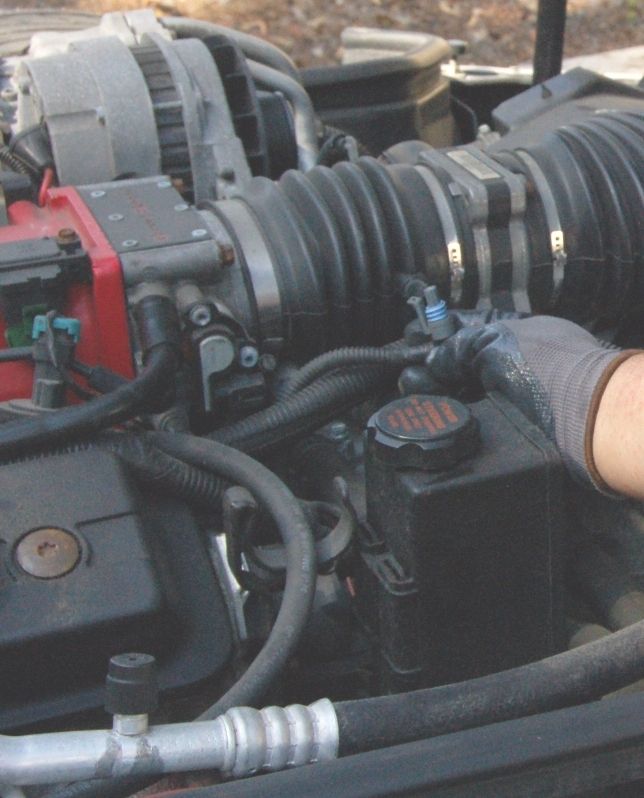 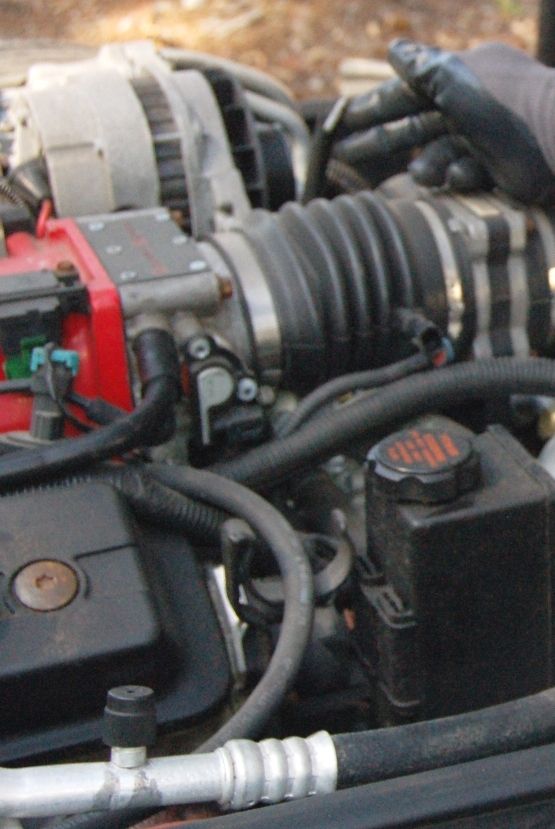 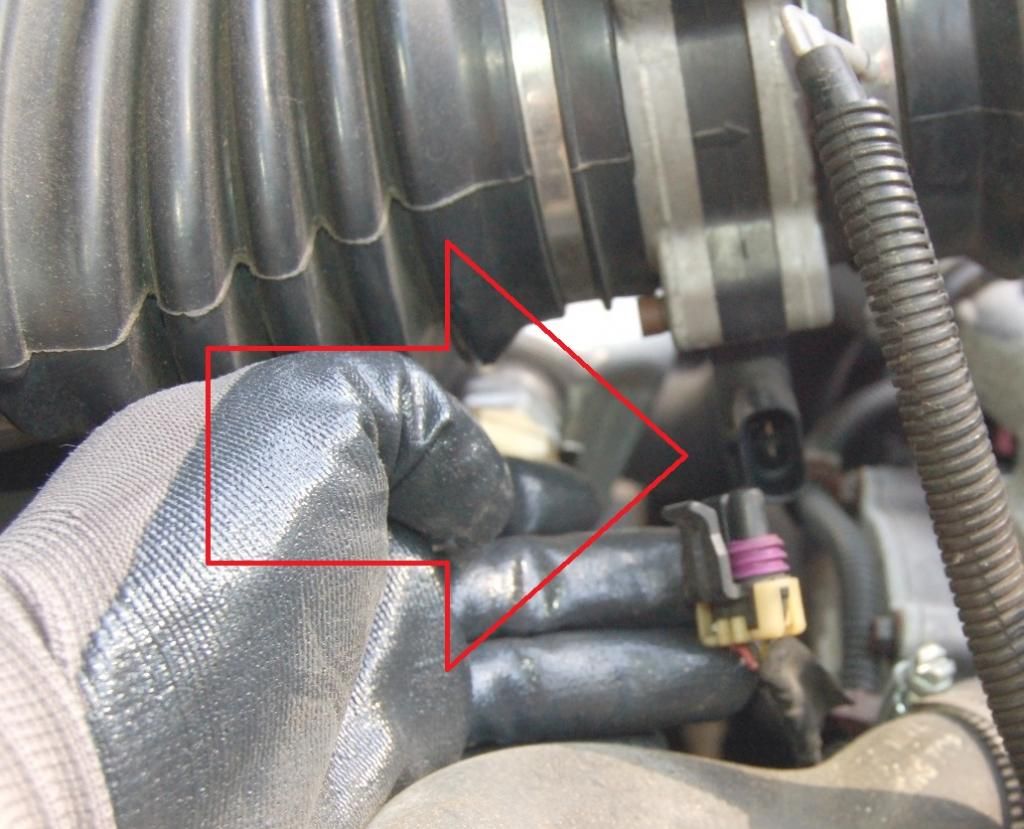 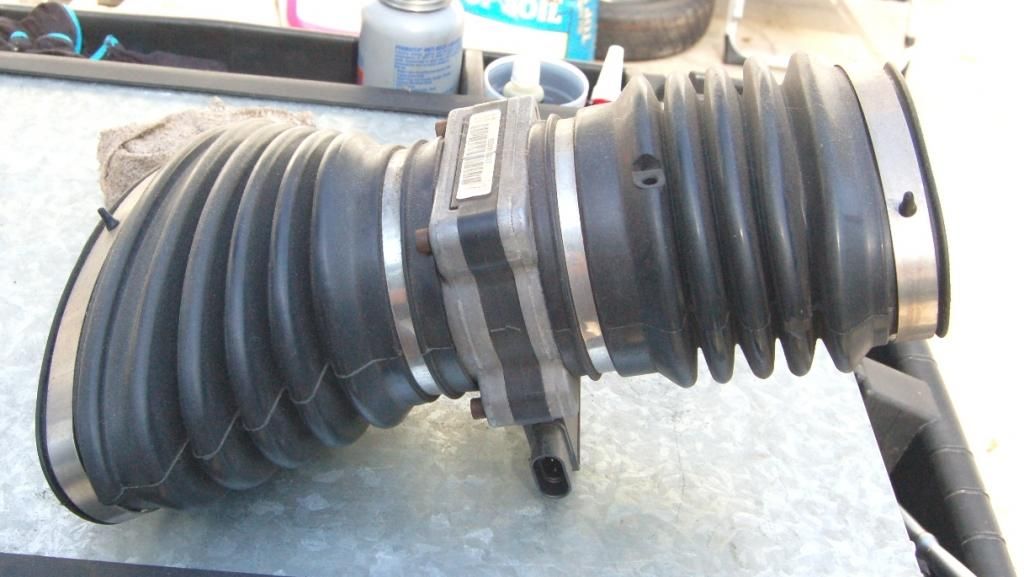 I then pulled the cap on the coolant reservoir: 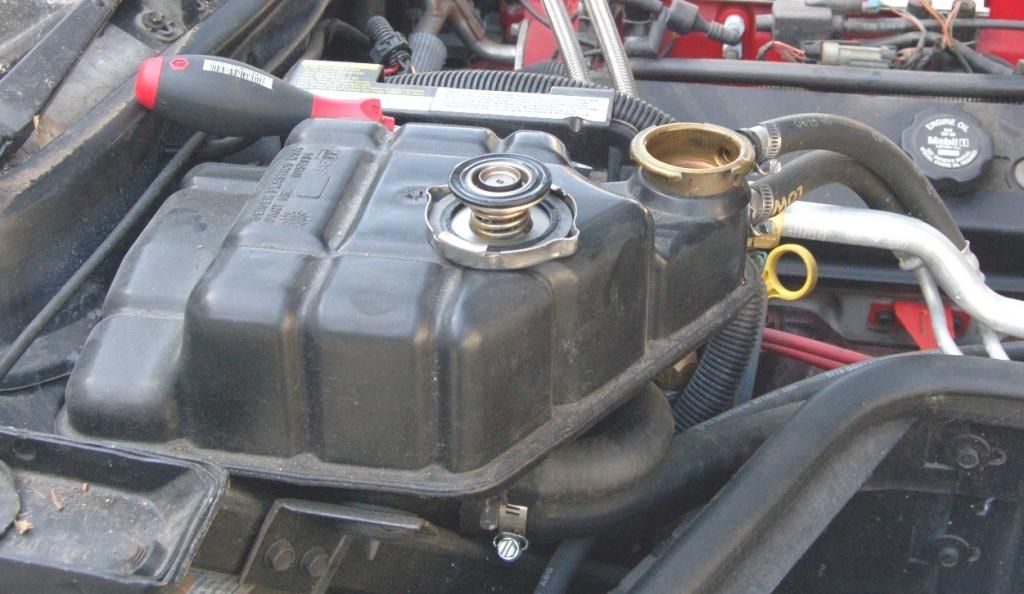 [/URL] [/URL]I then loosened the bolts on the t-stat housing to introduce air into the system. once you loosen them enough you'll get some seepage so be ready to tighten up or use a rag to catch: 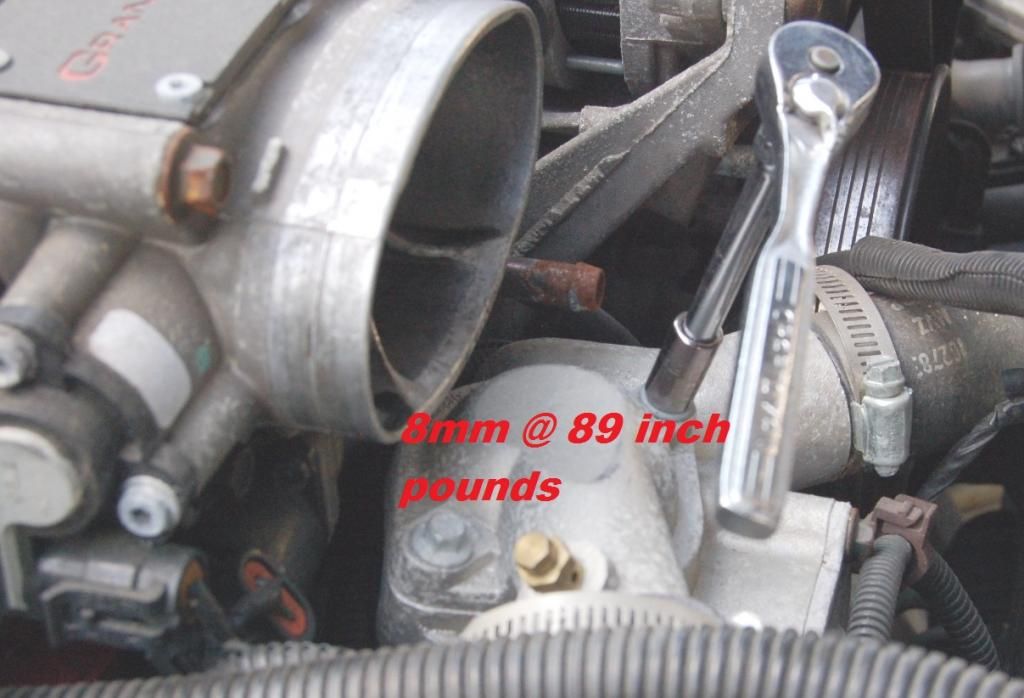 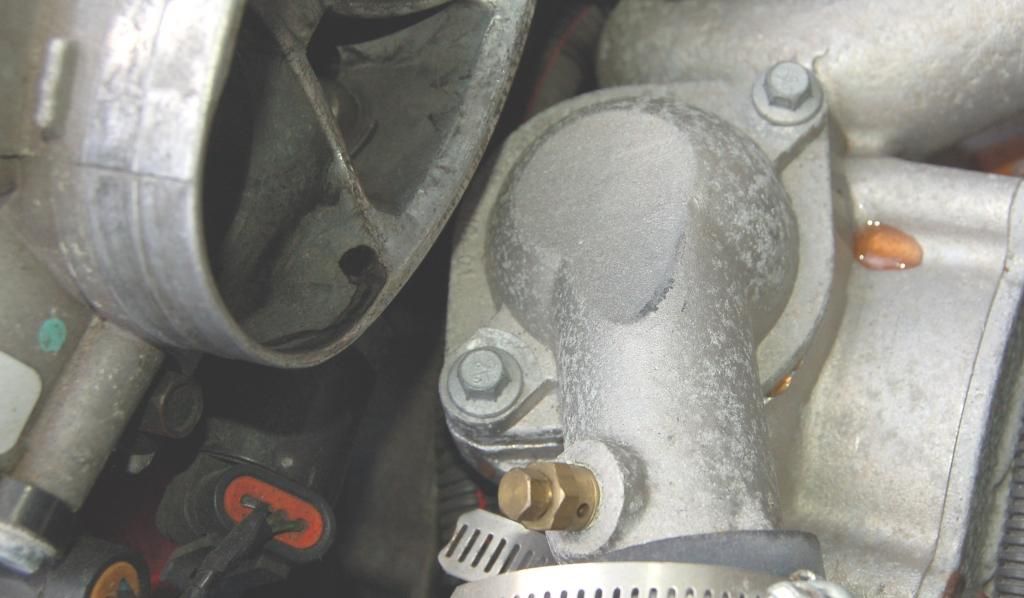 The air you introduced will lead to this so be ready to catch it! Remember, my radiator was already empty, so this is just residual in he system that needed air to be released: 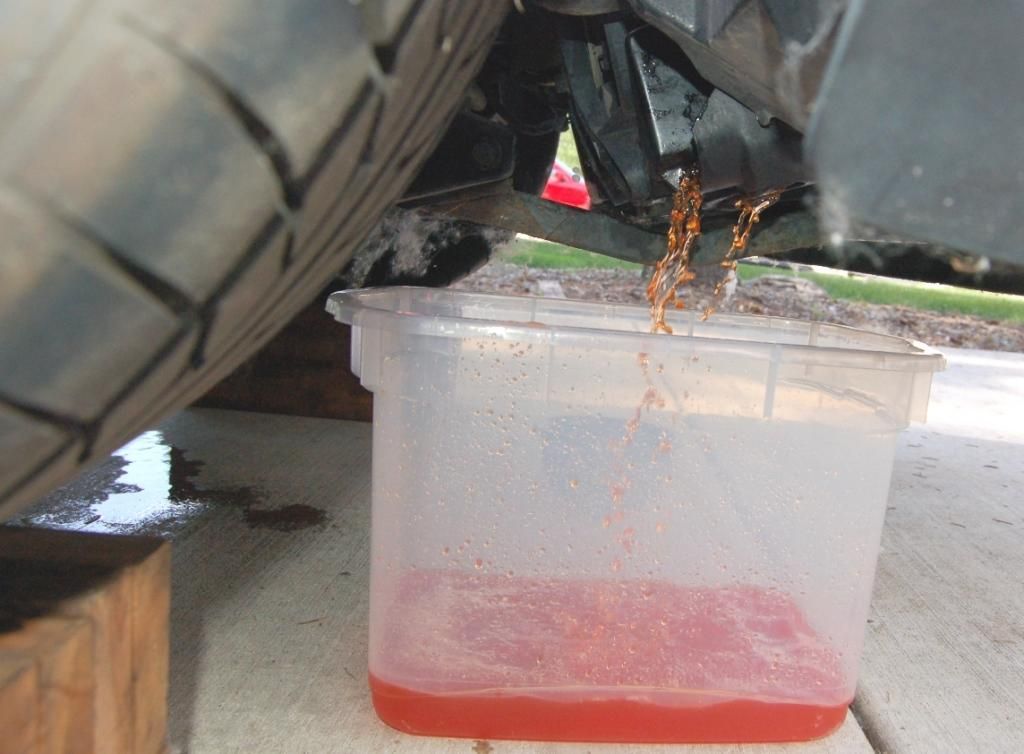
Posted on: 2014/7/11 2:40
|
|
|
_________________
My shoulder hurts bad |
||
|
Transfer
|
|
|
Re: DRIP DRIP |
||
|---|---|---|
|
Guru Newb
Joined:
2005/9/16 0:00 From NWI
Posts:
112
|
Quote:
cant argue that. Tell you what though, after the pain I just went through there is no question if I ever have to replace this one I'm going all aluminum!!
Posted on: 2014/7/8 22:06
|
|
|
_________________
My shoulder hurts bad |
||
|
Transfer
|
|
|
Re: DRIP DRIP |
||
|---|---|---|
|
Guru Newb
Joined:
2005/9/16 0:00 From NWI
Posts:
112
|
I went OEM GM and it was only $175 to my door
Posted on: 2014/7/8 20:58
|
|
|
_________________
My shoulder hurts bad |
||
|
Transfer
|
|
|
Re: AC issue cycle on and off? |
||
|---|---|---|
|
Guru Newb
Joined:
2005/9/16 0:00 From NWI
Posts:
112
|
I will read up on the ac settings. The air conditioner in my opinion hasn't worked "right" in a long time. I have been so frustrated with the radiator issue and now the fact that it was "rejected" at emissions due to two sensors not being active has me pulling my hair out
Posted on: 2014/7/4 16:51
|
|
|
_________________
My shoulder hurts bad |
||
|
Transfer
|
|
|
Re: AC issue cycle on and off? |
||
|---|---|---|
|
Guru Newb
Joined:
2005/9/16 0:00 From NWI
Posts:
112
|
the above is happening with the ac in this position:
[URL=http://smg.photobucket.com/user/benelliman2/media/IMG_3846_zpsd23d9191.jpg.html] 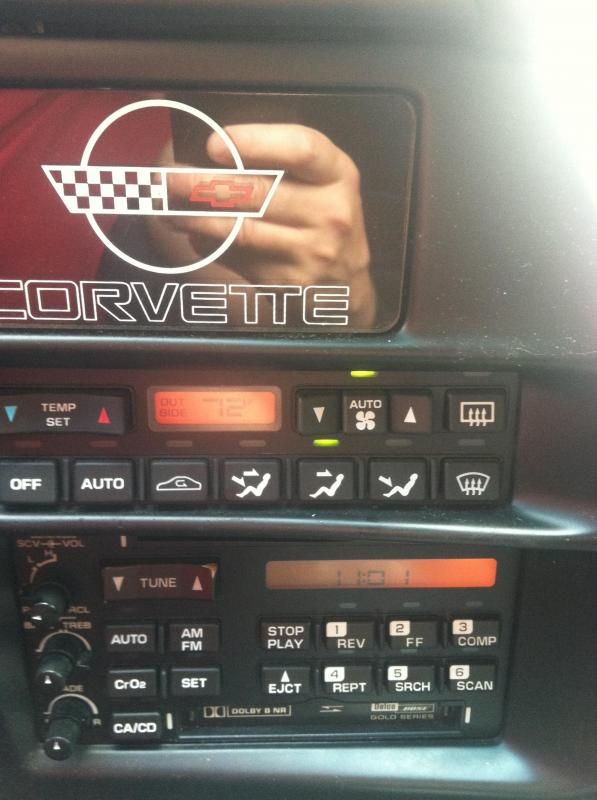 [/URL] [/URL]When the ac is in this position: [URL=http://smg.photobucket.com/user/benelliman2/media/IMG_3847_zpsa114ca66.jpg.html] 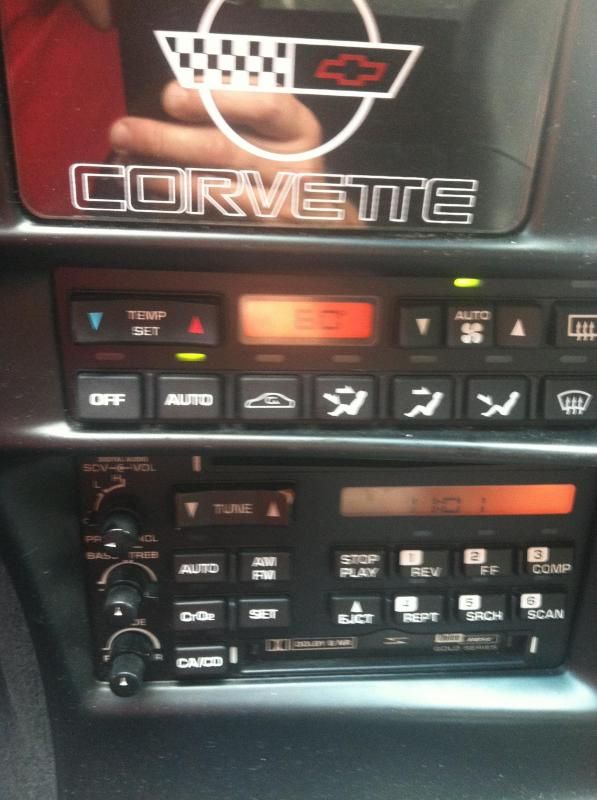 [/URL] [/URL]I get this: [URL=http://smg.photobucket.com/user/benelliman2/media/IMG_3848_zps88d34dc9.jpg.html] 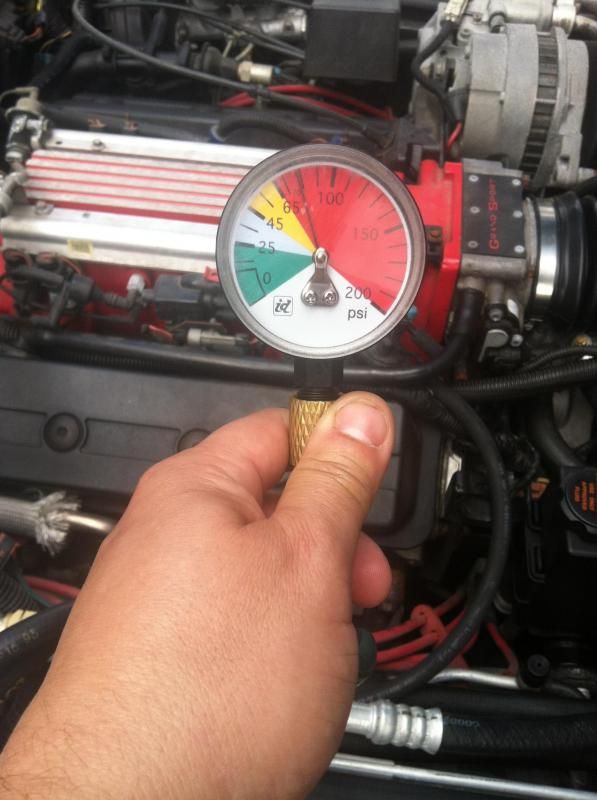 [/URL] [/URL]
Posted on: 2014/7/4 16:28
|
|
|
_________________
My shoulder hurts bad |
||
|
Transfer
|
|
|
AC issue cycle on and off? |
||
|---|---|---|
|
Guru Newb
Joined:
2005/9/16 0:00 From NWI
Posts:
112
|
AC issue now.
here is what I'm dealing with. Any ideas?
Posted on: 2014/7/4 16:21
|
|
|
_________________
My shoulder hurts bad |
||
|
Transfer
|
|
|
Re: Radiator Question |
||
|---|---|---|
|
Guru Newb
Joined:
2005/9/16 0:00 From NWI
Posts:
112
|
This came with my radiator!!
What is it for??? lol [URL=http://s191.photobucket.com/user/benelliman3/media/43DCBACC-7997-4ED6-96EB-7336EE8D1448_zpsb6hpjlua.jpg.html]  [/URL] [/URL]I found some pics that I took and it appeared that the passenger side plastic piece was leaking, or at least it was draining down.
Posted on: 2014/6/30 7:03
|
|
|
_________________
My shoulder hurts bad |
||
|
Transfer
|
|
|
Re: Radiator Question |
||
|---|---|---|
|
Guru Newb
Joined:
2005/9/16 0:00 From NWI
Posts:
112
|
I'm working on a killer how to on this.
I went with OEM on the radiator as the car is very rarely driven and when it is it's not for very long. I'm all about over kill but wasn't up to cutting for this. It also appears that someone was already in there and went cheap on the radiator, but like I said... it looks brand new but leaked over the winter. I checked the hoses at the time and even thought it was the petcock. So I made sure the clamps and petcock were snug, filled her up and ran. Gushing from what appeared to be the middle of the radiator. I think I took some video as well. might have to dig that up
Posted on: 2014/6/28 20:06
|
|
|
_________________
My shoulder hurts bad |
||
|
Transfer
|
|
|
Radiator Question |
||
|---|---|---|
|
Guru Newb
Joined:
2005/9/16 0:00 From NWI
Posts:
112
|
Is it possible to have a leak in the radiator small enough that when cold does not leak at all but when pressurized leaks like a sieve?
Pulled the old rad out and I tell you what, it looks brand new!
Posted on: 2014/6/28 19:30
|
|
|
_________________
My shoulder hurts bad |
||
|
Transfer
|
|
|
Re: Anyone running Aeroforce gauges? Input wanted |
||
|---|---|---|
|
Guru Newb
Joined:
2005/9/16 0:00 From NWI
Posts:
112
|
I like the idea of a glorified scan tool.
As you made mention it plugs into the obd2 plug and lets you see real time what the computer is seeing across all of the parameters. It's a bone stock LT4 so it's not like I am monitoring 700hp. At the end of the day it's just another way to spend money on the car
Posted on: 2014/6/20 2:28
|
|
|
_________________
My shoulder hurts bad |
||
|
Transfer
|
|
|
Re: Pulling KS for block drain on an LT4 |
||
|---|---|---|
|
Guru Newb
Joined:
2005/9/16 0:00 From NWI
Posts:
112
|
Do you think if I had "the book" I'd be asking these questions?
Seriously, your opening line in your post is the reason I don't frequent forums anymore. Up until now everyone here has been more than helpful and accommodating with what some may deem as "dumb" questions on my part. But I do appreciate your help, if I sift through what appears to be your perturbed tone I gather that: The KS is coated in a thread sealer and not any form of thread lock. The sealer is conductive and no one knows exactly what GM uses. Thanks Bill On that note, I'm going to get some Permatex thread SEALER in whatever color they have and put in on the last 1/3 of the KS.
Posted on: 2014/6/20 0:50
|
|
|
_________________
My shoulder hurts bad |
||
|
Transfer
|
|
|
Anyone running Aeroforce gauges? Input wanted |
||
|---|---|---|
|
Guru Newb
Joined:
2005/9/16 0:00 From NWI
Posts:
112
|
If so what application, what gen vette? Are they worth the price tag?
Any and all feedback is wanted. $500 for two 2 1/6" gauges is step, but if they are worth it why not. TIA http://aeroforcetech.com/products_interceptor.html
Posted on: 2014/6/20 0:36
|
|
|
_________________
My shoulder hurts bad |
||
|
Transfer
|
|
|
Re: Pulling KS for block drain on an LT4 |
||
|---|---|---|
|
Guru Newb
Joined:
2005/9/16 0:00 From NWI
Posts:
112
|
As far as I've always been taught that is the difference between red and blue loc tite.
Blue is used when wrench pressure is desired to break the bond. While red's properties are much stronger requiring the need for heat to be applied in order to break it. Basically, if it needs to be serviced use blue If it permanent use red
Posted on: 2014/6/18 18:20
|
|
|
_________________
My shoulder hurts bad |
||
|
Transfer
|
|
|
Re: Pulling KS for block drain on an LT4 |
||
|---|---|---|
|
Guru Newb
Joined:
2005/9/16 0:00 From NWI
Posts:
112
|
red thread lock is the kind that requires heat to break loose I thought. Would blue work as well or should I pick up some Permatex.
Also, I read up that the KS grounds itself to the block, so do you think I should only apply to last 1/2 of the threads only?
Posted on: 2014/6/18 16:01
|
|
|
_________________
My shoulder hurts bad |
||
|
Transfer
|
|
|
Re: Pulling KS for block drain on an LT4 |
||
|---|---|---|
|
Guru Newb
Joined:
2005/9/16 0:00 From NWI
Posts:
112
|
by chance do you know what it was that GM used? looks red.
Torque spec I believe is 15 foot lbs
Posted on: 2014/6/18 14:57
|
|
|
_________________
My shoulder hurts bad |
||
|
Transfer
|
|
|
Re: Pulling KS for block drain on an LT4 |
||
|---|---|---|
|
Guru Newb
Joined:
2005/9/16 0:00 From NWI
Posts:
112
|
yup, cant do it right without both sides out.
Thanks when I go to put them back in anything I should be putting on the threads? Anti-seize or otherwise?
Posted on: 2014/6/18 13:36
|
|
|
_________________
My shoulder hurts bad |
||
|
Transfer
|
|
|
Pulling KS for block drain on an LT4 |
||
|---|---|---|
|
Guru Newb
Joined:
2005/9/16 0:00 From NWI
Posts:
112
|
Will pulling one properly drain the block or do both need to be pulled? the one on the DS seems to be a pain
TIA
Posted on: 2014/6/17 23:03
|
|
|
_________________
My shoulder hurts bad |
||
|
Transfer
|
|
|
Re: General rim/tire question |
||
|---|---|---|
|
Guru Newb
Joined:
2005/9/16 0:00 From NWI
Posts:
112
|
Don't be sorry for speaking the truth!
Your absolutely right. I'll most likely be pussy footing it around town so bad I'll get sick of them and end up selling them. Or I'll like how they look and dig further into a tire that has a higher profile and will be more forgiving. If 26" is the factory OD I'm thinking 27" is the max without throwing to much off. But I'll burn that bridge when I get to it! 
Posted on: 2014/6/13 3:43
|
|
|
_________________
My shoulder hurts bad |
||
|
Transfer
|
|
|
Re: General rim/tire question |
||
|---|---|---|
|
Guru Newb
Joined:
2005/9/16 0:00 From NWI
Posts:
112
|
I went with the crash course in rims and tires and learned a lot in the last few weeks.
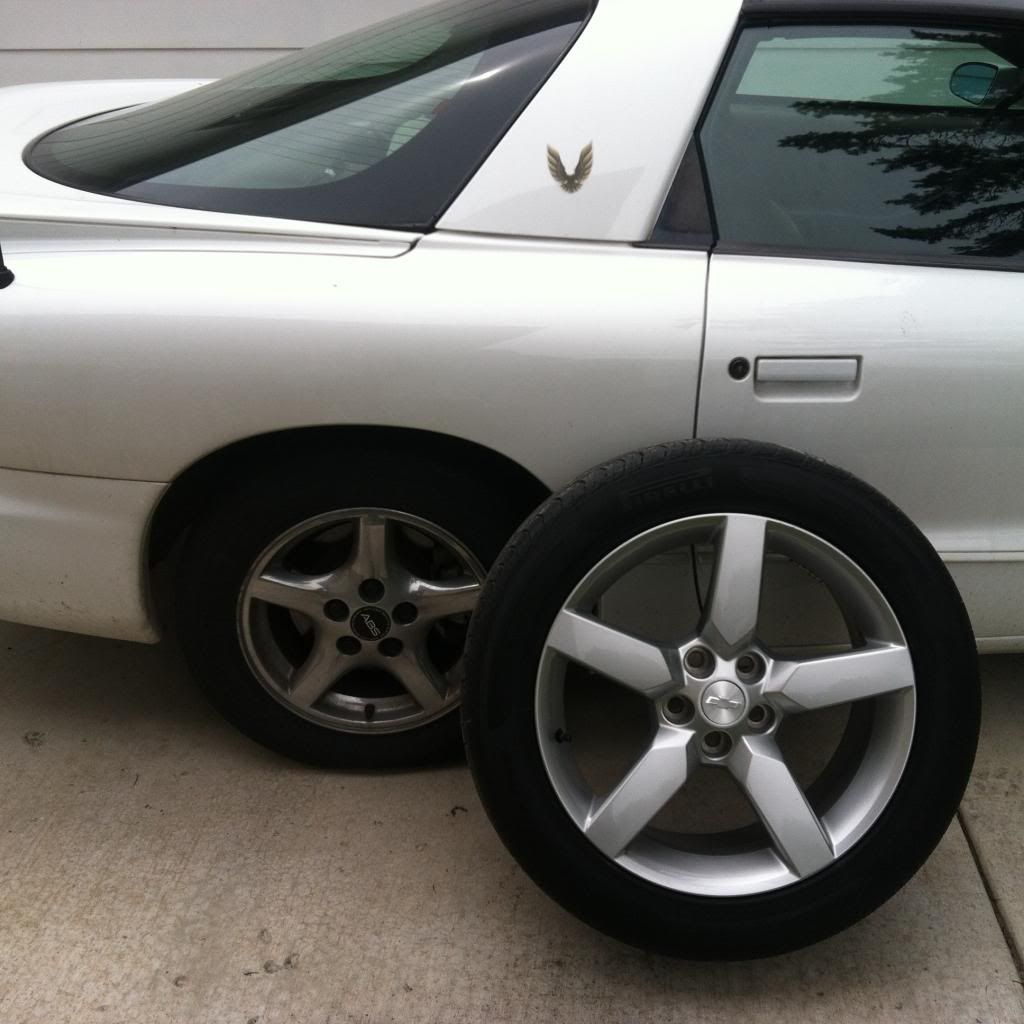
It all boils down to the O.D. of the wheel and tire combo. Keeping the o.d. to as close as the oem is key. The oem set up on my firebird had me at 26 inches. the oem 5th gen camaro is at 29 inches. My firebird wheel well opening is 29", not gonna happen! I ended up finding a set of LOW profile take off tires and bought them ( god bless CL!) for $60. they are 245/35 and 275/30 and will bring my wheel and tire combo to 25". now the question will be how will it ride. On the line of the 275mm width on an 8 inch rim, will it fit... yes. Is it correct, no. At this point I just wanna see the rims on the car! If I like them I will buy the correct tires next summer and go from there.
Posted on: 2014/6/12 2:14
|
|
|
_________________
My shoulder hurts bad |
||
|
Transfer
|
|
|
Re: General rim/tire question |
||
|---|---|---|
|
Guru Newb
Joined:
2005/9/16 0:00 From NWI
Posts:
112
|
[URL=http://s1055.photobucket.com/user/caceres78/media/IMG_3022_zps40afb5af.jpg.html]
 [/URL] [/URL][URL=http://s1055.photobucket.com/user/caceres78/media/IMG_3020_zpsd96a8823.jpg.html] 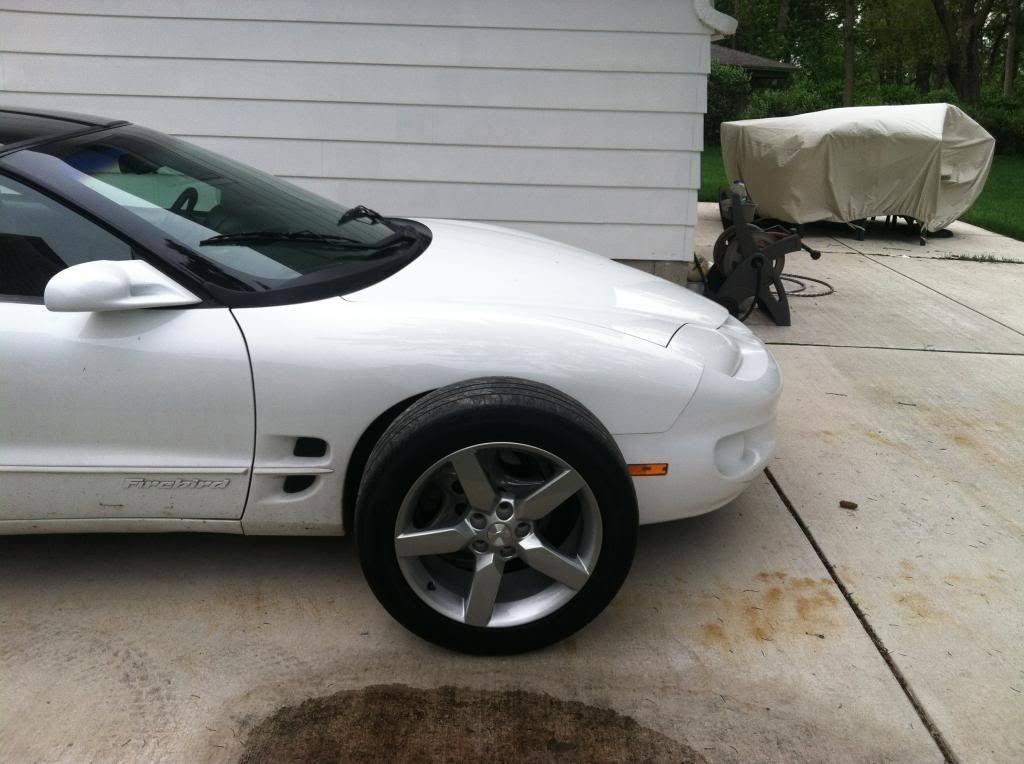 [/URL] [/URL]
Posted on: 2014/6/10 0:36
|
|
|
_________________
My shoulder hurts bad |
||
|
Transfer
|
|
|
Re: General rim/tire question |
||
|---|---|---|
|
Guru Newb
Joined:
2005/9/16 0:00 From NWI
Posts:
112
|
all cosmetic though. I put myself in a jamb with my firebird.
I bought 5th gen Camaro rims with OEM tires. that combo is 29+ inches OD while stock is a hair above 26. They wont fit in the wheel well. I came across a good set of take offs from a Porsche, they are 245/35r19 fronts and 275/30r19 rear the fronts are a perfect match, the rears well..... theres so much wrong with this wheel tire debacle I got myself in I just want to get them on the car already. Luckily I'm into everything at a point where if and when I sell I should still break even.
Posted on: 2014/6/10 0:31
|
|
|
_________________
My shoulder hurts bad |
||
|
Transfer
|
|
|
General rim/tire question |
||
|---|---|---|
|
Guru Newb
Joined:
2005/9/16 0:00 From NWI
Posts:
112
|
Will a 19x8 rim support a 275mm wide tire?
Current tires are 245/50R19 and I wanna step up to a 275/30R19 TIA
Posted on: 2014/6/9 22:04
|
|
|
_________________
My shoulder hurts bad |
||
|
Transfer
|
|
|
Any 4th Gen Firebird owners out there? |
||
|---|---|---|
|
Guru Newb
Joined:
2005/9/16 0:00 From NWI
Posts:
112
|
Looking for some tech advice if you own one.
Got a 98' 3.8 daily driver. Looking to replace rear shocks. Any suggestions? This is a daily driver that sees occasional 80mph expressway drives, that's all. In addition may be putting some 19" rims on it, do you think I need to replace the springs as well or just use the originals? Do springs even go bad? TIA
Posted on: 2014/6/7 0:44
|
|
|
_________________
My shoulder hurts bad |
||
|
Transfer
|
|
|
Re: Cubic feet a C4 Coupe |
||
|---|---|---|
|
Guru Newb
Joined:
2005/9/16 0:00 From NWI
Posts:
112
|
here ya go, my vanity plate should sum it up for ya! lol
[URL=http://s1055.photobucket.com/user/caceres78/media/562A1DE3-E949-438E-82C3-38E408128810-2420-00000380C3606309.jpg.html]  [/URL] [/URL]
Posted on: 2014/6/5 18:27
|
|
|
_________________
My shoulder hurts bad |
||
|
Transfer
|
|
|
Re: Thursday chat. 5 June 2014 |
||
|---|---|---|
|
Guru Newb
Joined:
2005/9/16 0:00 From NWI
Posts:
112
|
Getting ready for work. Another long 12 hour shift.
I need a vacation!
Posted on: 2014/6/5 18:12
|
|
|
_________________
My shoulder hurts bad |
||
|
Transfer
|
|
|
Re: Cubic feet a C4 Coupe |
||
|---|---|---|
|
Guru Newb
Joined:
2005/9/16 0:00 From NWI
Posts:
112
|
Are you running the GM-D or PRS series amp?
I'm not sure I agree 100% with you on the better subs working in smaller spaces comment being the modern reality. Small space big sound has been around since at least the mid 1990's when Kicker introduced the Solo Baric line. I installed car audio in a couple shops in Chicago from 1993 - 1998 and saw my fair share of installs. Even the W7 line from JL hasn't undergone any significant change since its inception, and that's been 10 years. With that said the biggest downfall to any subwoofer it's the installation. I've seen many a "great" sub sound like crap because it was loaded into a pre fab box or one built all wrong. With that said, even with the excursion of a W7 ( not sure if you meant 13W7 above as I'm not familiar with an 8W13) an 8" doesn't have enough cone area to do what I want it to do, and that's move air! I LOVE sealed box enclosures. they deliver some of the best extension down low where I like it and can get loud but don't deliver the physical, not musical, effects I'm looking for. If you know what a hair trick is that should sum it up for you, if you don't take 5 min to you tube it, it's safe for work, and have a good grin! I love sound quality, but the inner kid in me what's loud. There's a fine line between the two and I want to straddle it. I don't think the days of big ported boxes are gone, hell.... the people I hang out with are proof of that, but I do believe that there is a distinct separation from those that are reasonable in their interpretation of what loud enough is and those like me who want 150db+ In the corvette amp wise I have a lot of choices as I have a lot of amps. I can go DC audio 5K, RF T2500bdcp or I can even go with old school PPI A1200.2 or even DSM series RF just for kicks two summers ago I even rolled around town like this! [URL=http://smg.photobucket.com/user/benelliman2/media/2_zps185d9d71.jpg.html] 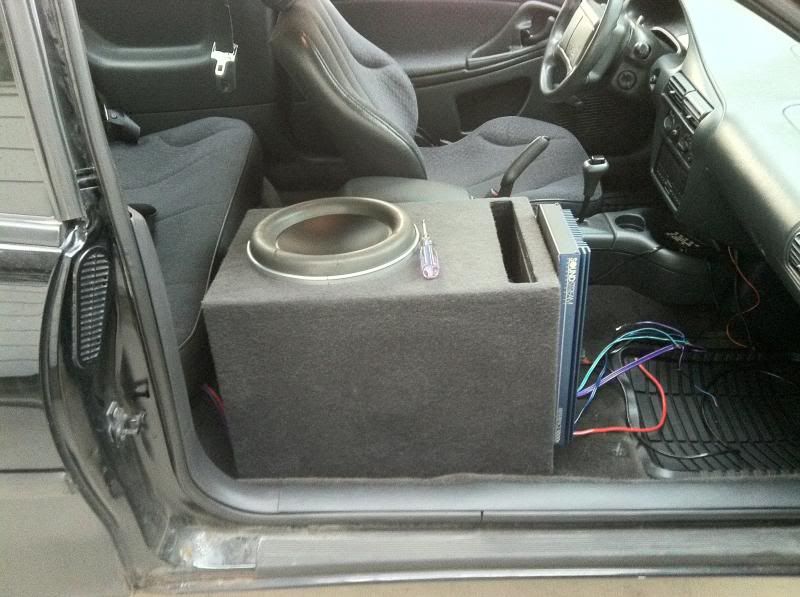 [/URL] [/URL]
Posted on: 2014/6/5 18:09
|
|
|
_________________
My shoulder hurts bad |
||
|
Transfer
|
|
|
Re: Cubic feet a C4 Coupe |
||
|---|---|---|
|
Guru Newb
Joined:
2005/9/16 0:00 From NWI
Posts:
112
|
If you run in the circle I do running subs that take big airspace is the norm.
I have some older round 15" kicker soli barics that only need 1.5 cubes rack and sound awesome! The just don't play as loud as I like! To put it in perspective I plan on running a minimum of 2.5k to just the sub in my set up
Posted on: 2014/6/5 15:24
|
|
|
_________________
My shoulder hurts bad |
||
|
Transfer
|
|
|
