


|
|
Register To Post |

| DaleD | Where exactly is #1 on the distributor cap? | ||
|
Senior Guru
 
|
This is a tune up gone wrong.
After much trouble, I got all the plugs changed. Changed the cap and rotor. Much to my surprise the coil is in the cap, but I got it all changed out. I put the new rotor on in the same orientation as the old rotor. I'm pretty confident I did it right. Got the cap on, ran the wires the way I thought it should go, hit it... it backfires and wont start. Actually, once it backfired I stopped, but I doubt it will start. My cap sits at an angle with respect to the car. So, on the rectangle, there is a corner that points to the front of the car. I have #1 as being the connection to the driver's side of the corner, and #8 as the connection on the other side, towards the passenger side. I have no clue what to do now. Help. |
||
Posted on: 2008/5/18 20:17
|
|||
|
_________________
Whenever someone says "I'm not book smart, but I'm street smart", all I hear is "I'm not real smart, but I'm imaginary smart". |
|||
 Transfer Transfer
|
 
|
||

| DaleD | Re: Where exactly is #1 on the distributor cap? | ||
|
Senior Guru
|
Any ideas on how to troubleshoot this?
No backfire now, just cranks. I have a little tester that I put inline with #1, I'm getting spark to #1. |
||
Posted on: 2008/5/18 21:02
Edited by DaleD on 2008/5/18 21:39:39 |
|||
|
_________________
Whenever someone says "I'm not book smart, but I'm street smart", all I hear is "I'm not real smart, but I'm imaginary smart". |
|||
|
Transfer
|
|
||
| Woodstock | Re: Where exactly is #1 on the distributor cap? | ||
|
Senior Guru

|
Well, backfire sounds like you mixed up a couple of wires.
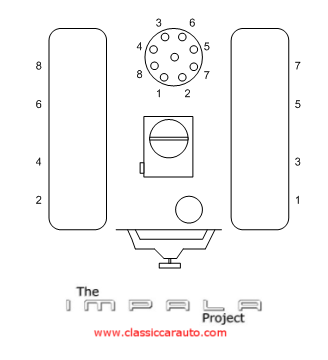
Firing order is 1-8-4-3-6-5-7-2 clockwise. #1 should be next clockwise to the square block |
||
Posted on: 2008/5/18 22:28
|
|||
|
_________________
91 convertible |
|||
|
Transfer
|
|
||
| joeld | Re: Where exactly is #1 on the distributor cap? | ||
|
Guru
 
|
Did you remove all of the old plug wires at the same time, or replace one at a time? It is EXTREMELY easy to cross plug wires. Pull the cap off and check the rotor, be sure the tip is still OK. I understand what you're saying about the orientation of the dist cap and #1 plug wire location. This sounds correct. And you did go 1-8-4-3-6-5-7-2.
Be sure the coil wires inside the cap did "lock" in. I have seen these push up when the harness was plugged in. Joel |
||
Posted on: 2008/5/18 22:31
|
|||
|
_________________
1989 Coupe,L98 automatic |
|||
|
Transfer
|
|
||
| toptechx6 | Re: Where exactly is #1 on the distributor cap? | ||
|
Senior Guru

|
I have no idea why you would remove all wires from the cap without marking the old one if you don't even have a book for your car, but at this point I would do this. Keeping in mind the distributor rotation is clockwise, first verify the wires are on the cap in the correct firing order 18436572 and routed to the correct spark plugs
8 7 6 5 4 3 2 1 Ft. If it wont start, move all wires at the cap one spot in either direction and try again, if it still does not start move each one two spots in the opposite direction and try again, good luck. |
||
Posted on: 2008/5/18 22:32
|
|||
|
Transfer
|
|
||
| DaleD | Re: Where exactly is #1 on the distributor cap? | ||
|
Senior Guru
|
Quote:
Are you sure it's next to the block? By the block, I assume you're talking about the connector block where the 3 plugs go in, one is the tach? The Haynes shows #1 being in the front of the engine, I got an Autozone print out that shows the same. The way the alignment of the distributor is in my car, the square block is pointing to the battery, and I have #1 as the 3rd connector past the block. |
||
Posted on: 2008/5/18 22:37
|
|||
|
_________________
Whenever someone says "I'm not book smart, but I'm street smart", all I hear is "I'm not real smart, but I'm imaginary smart". |
|||
|
Transfer
|
|
||
| DaleD | Re: Where exactly is #1 on the distributor cap? | ||
|
Senior Guru
|
Quote:
I thought I was smarter than I really am. I had the manual with the firing order, so I removed them all at once. I have triple checked the connectors snapping into place. I have the wires routed properly in terms of firing order, and I was just wondering if it was that I didn't have #1 right. I put a little tester on #1 and cranked it, I'm getting spark. I guess I could pull the cap again, but it's a pretty positive lock with those four screws. |
||
Posted on: 2008/5/18 22:41
|
|||
|
_________________
Whenever someone says "I'm not book smart, but I'm street smart", all I hear is "I'm not real smart, but I'm imaginary smart". |
|||
|
Transfer
|
|
||
| DaleD | Re: Where exactly is #1 on the distributor cap? | ||
|
Senior Guru
|
Quote:
Thanks. I have an FSM, but I can never find squat in that thing. I couldn't even find the distributor in the damn FSM. I have a Haynes, and I have the firing order, and a simple diagram of where #1 is. I thought I had it right. Obviously I was wrong. |
||
Posted on: 2008/5/18 22:43
|
|||
|
_________________
Whenever someone says "I'm not book smart, but I'm street smart", all I hear is "I'm not real smart, but I'm imaginary smart". |
|||
|
Transfer
|
|
||
| Woodstock | Re: Where exactly is #1 on the distributor cap? | ||
|
Senior Guru
|
Sorry about that, my bad. The #1 would be the 2nd clockwise to the that block.
|
||
Posted on: 2008/5/18 22:44
|
|||
|
_________________
91 convertible |
|||
|
Transfer
|
|
||
| DaleD | Re: Where exactly is #1 on the distributor cap? | ||
|
Senior Guru
|
Quote:
Are you sure it's 2nd clockwise from the block for an 87? I moved the wires to that position, it cranks, and doesn't fire. This is going to be one expensive tune up, when I have it towed somewhere to have it fixed. |
||
Posted on: 2008/5/18 23:01
|
|||
|
_________________
Whenever someone says "I'm not book smart, but I'm street smart", all I hear is "I'm not real smart, but I'm imaginary smart". |
|||
|
Transfer
|
|
||
| bogus | Re: Where exactly is #1 on the distributor cap? | ||
|
Grand Imperial Pooh-Bah
 
|
the firing order of the Gen 1 small block never changed, IIRC.
http://www.classiccarauto.com/impala/how_to/images/distributor.png |
||
Posted on: 2008/5/18 23:17
|
|||
|
_________________
The single biggest problem with communication is the illusion that it has taken place. - George Bernard Shaw Education is the best tool to overcome irrational fear. - me |
|||
|
Transfer
|
|
||
| DaleD | Re: Where exactly is #1 on the distributor cap? | ||
|
Senior Guru
|
Quote:
I have the order correct, I'm sure of that. Is Woodstock correct in saying that #1 should be the second connector clockwise from the block, (where the tach plugs in)? I think I'm hosed. |
||
Posted on: 2008/5/18 23:24
|
|||
|
_________________
Whenever someone says "I'm not book smart, but I'm street smart", all I hear is "I'm not real smart, but I'm imaginary smart". |
|||
|
Transfer
|
|
||
| Woodstock | Re: Where exactly is #1 on the distributor cap? | ||
|
Senior Guru
|
91 and 87 is the same. Since it can't get any worse, try changing the rotor by 180°.
|
||
Posted on: 2008/5/18 23:34
|
|||
|
_________________
91 convertible |
|||
|
Transfer
|
|
||
| DaleD | Re: Where exactly is #1 on the distributor cap? | ||
|
Senior Guru
|
Quote:
That's confusing to me. I know I made a mess here, but I'm 100% certain I put the rotor on in the same orientation as the one I took off. |
||
Posted on: 2008/5/18 23:38
|
|||
|
_________________
Whenever someone says "I'm not book smart, but I'm street smart", all I hear is "I'm not real smart, but I'm imaginary smart". |
|||
|
Transfer
|
|
||
| joeld | Re: Where exactly is #1 on the distributor cap? | ||
|
Guru
|
Rotor goes on one way, It's indexed to prevent 180 degrees off. Assuming your dist is set in the traditional location, the normal location for #1 plug is the first hole to the left of the "harness" block. #1 is on the left, #2 is on the right.
Joel |
||
Posted on: 2008/5/18 23:39
|
|||
|
_________________
1989 Coupe,L98 automatic |
|||
|
Transfer
|
|
||
| DaleD | Re: Where exactly is #1 on the distributor cap? | ||
|
Senior Guru
|
Quote:
Are you sure? I am not trying to be insulting. Chances are more than good you know more than I do. It's just that I know the #1 I took off was near the front of this distributor. I don't suppose it would hurt to move it over one more if I have the firing order correct, would it? Tried it, no luck. |
||
Posted on: 2008/5/18 23:45
|
|||
|
_________________
Whenever someone says "I'm not book smart, but I'm street smart", all I hear is "I'm not real smart, but I'm imaginary smart". |
|||
|
Transfer
|
|
||
| Woodstock | Re: Where exactly is #1 on the distributor cap? | ||
|
Senior Guru
|
Looking at my spare rotor, it's absolutely no problem to switch it by 180°. But if you are 100% certain it's on correct, than someone might have pulled the distributor and it could be far away from the stock setting.
Mine is 100% stock, #7 is counterclockwise and #2 is clockwise next to the block and should be followed by #1. |
||
Posted on: 2008/5/18 23:55
|
|||
|
_________________
91 convertible |
|||
|
Transfer
|
|
||
| DaleD | Re: Where exactly is #1 on the distributor cap? | ||
|
Senior Guru
|
Quote:
I've had the car a year and a half. What's been done before, I can't say. I know my distributor is angled, and it sounds like most expect it to be square, that is, a side of the distrib. running parallel to the firewall. I thought the angle is just setting the timing? I do know this car had something done to it, because the wires weren't factory. The plugs were ACDelco FR3LS, so they could have been original, who knows? The replacement plugs are ACDelco 41-629, the replace ment for FR3LS. |
||
Posted on: 2008/5/19 0:05
|
|||
|
_________________
Whenever someone says "I'm not book smart, but I'm street smart", all I hear is "I'm not real smart, but I'm imaginary smart". |
|||
|
Transfer
|
|
||
| Calm | Re: Where exactly is #1 on the distributor cap? | ||
|
Senior Guru
 
|
First off.....don't panic. This is not rocket science.
IF the dist. is in the original position, you're only 'off' by one or two positions. Try going ahead with the wires one ahead (as you did) or TWO back. If either of those two things don't work..... I'd go back to the basics: 1) Dial in your distributor (set crankshaft to #1 firing position....be carefull to confirm both #1 valves are closed, confirming compression stroke) 2) Re-Install dist. setting rotor to correct position. 3) Re-install wires as per rotor position being #1 (18436572 clockwise) 4) Reset timing. Best of luck. But DON'T get it towed! Whatever you do! We can help you! |
||
Posted on: 2008/5/19 0:14
|
|||
|
_________________
1995 Forged 385 ZF6 227/234 1.6 FIC30# MSD BBK SS SLP Bullets X-Pipe DynoMax |
|||
|
Transfer
|
|
||
| Woodstock | Re: Where exactly is #1 on the distributor cap? | ||
|
Senior Guru
|
than I like toptechx6 approach:
Quote: If it wont start, move all wires at the cap one spot in either direction and try again, if it still does not start move each one two spots in the opposite direction and try again, good luck. |
||
Posted on: 2008/5/19 0:15
|
|||
|
_________________
91 convertible |
|||
|
Transfer
|
|
||
| DaleD | Re: Where exactly is #1 on the distributor cap? | ||
|
Senior Guru
|
Quote:
Too late, panic set in a while ago. I didn't move the distributor. I just pulled the old cap off, and put the new cap and rotor on. Rotor is in original position, I couldn't be more sure of that. The cap is in the same orientation as the previous cap, to move it would have required moving the wires that plug into that plug block. I'm not anything even close to a mechanic. I have no idea how to set the crankshaft to the #1 firing position. |
||
Posted on: 2008/5/19 0:19
|
|||
|
_________________
Whenever someone says "I'm not book smart, but I'm street smart", all I hear is "I'm not real smart, but I'm imaginary smart". |
|||
|
Transfer
|
|
||
| DaleD | Re: Where exactly is #1 on the distributor cap? | ||
|
Senior Guru
|
Quote:
I've had #1 in 4 positions so far. Currently, it's on the left side of the connector block. I need a mechanic that makes house calls. |
||
Posted on: 2008/5/19 0:24
|
|||
|
_________________
Whenever someone says "I'm not book smart, but I'm street smart", all I hear is "I'm not real smart, but I'm imaginary smart". |
|||
|
Transfer
|
|
||
| Calm | Re: Where exactly is #1 on the distributor cap? | ||
|
Senior Guru
|
Don't worry.....we'll help you through this.
First off...did you try the "one forward - two back" thing? |
||
Posted on: 2008/5/19 0:27
|
|||
|
_________________
1995 Forged 385 ZF6 227/234 1.6 FIC30# MSD BBK SS SLP Bullets X-Pipe DynoMax |
|||
|
Transfer
|
|
||
| Calm | Re: Where exactly is #1 on the distributor cap? | ||
|
Senior Guru
|
To clarify......did you do exactly as topteck described? Or did you simply re-locate #1?
|
||
Posted on: 2008/5/19 0:29
|
|||
|
_________________
1995 Forged 385 ZF6 227/234 1.6 FIC30# MSD BBK SS SLP Bullets X-Pipe DynoMax |
|||
|
Transfer
|
|
||
| DaleD | Re: Where exactly is #1 on the distributor cap? | ||
|
Senior Guru
|
Quote:
Yep. I put it in the position I thought was #1. That would be 3 connectors to the left of the plug block. I went to 4 to the left. No luck. Then back to 2 to the left. Nothing. Now it's at the first connector to the left of the plug block. Still nothing. |
||
Posted on: 2008/5/19 0:30
|
|||
|
_________________
Whenever someone says "I'm not book smart, but I'm street smart", all I hear is "I'm not real smart, but I'm imaginary smart". |
|||
|
Transfer
|
|
||
| Calm | Re: Where exactly is #1 on the distributor cap? | ||
|
Senior Guru
|
In order for you to understand correctly......
The distributor ALWAYS 'distributes' the spark in a very mechanical way. For us mortals to understand, the Chevy fire gods teach us that #1 is the basic reference......then #8 fires...then #4 fires....and so on (18436572) You're ONLY problem right now is locating #1! All the rest will take care of itself. |
||
Posted on: 2008/5/19 0:34
|
|||
|
_________________
1995 Forged 385 ZF6 227/234 1.6 FIC30# MSD BBK SS SLP Bullets X-Pipe DynoMax |
|||
|
Transfer
|
|
||
| joeld | Re: Where exactly is #1 on the distributor cap? | ||
|
Guru
|
OK, if all else fails. Yes you can just keep moving #1 around the cap followed by the rest. It can only be 8 different locations. The only thing that will happen be be a "spit" back or possible back-fire. I agree, the other way will be to start at square one and set dist to #1 comp and then set timing. Myself I would just keep trying to move plug wires first. One question, did you replace the coil? And are you sure all wires are hooked uo to dist cap and locked in? And I am sure about the rotor. Look at your old one and you'll see what I mean. Look at the bottom.
Joel |
||
Posted on: 2008/5/19 0:36
|
|||
|
_________________
1989 Coupe,L98 automatic |
|||
|
Transfer
|
|
||
| DaleD | Re: Where exactly is #1 on the distributor cap? | ||
|
Senior Guru
|
Quote:
When I relocated, I moved the entire ring. That is, pull 1, then pull 2, put 1 where 2 was. Move 8 to where 1 was... etc. I have a little tester, I put it inline with #1. I know it gets spark, the little light flashed. It's pretty confusing to me at this point. I'm at that point where I don't even trust what I know. |
||
Posted on: 2008/5/19 0:40
|
|||
|
_________________
Whenever someone says "I'm not book smart, but I'm street smart", all I hear is "I'm not real smart, but I'm imaginary smart". |
|||
|
Transfer
|
|
||
| Calm | Re: Where exactly is #1 on the distributor cap? | ||
|
Senior Guru
|
Ok
Forget everything then and try this: Spin the engine over till your timing mark (on the crank pully) lines up (close is good enough) with the timing tab. Open the dist. cap......see where the rotor is pointing. Transition that to the cap. As of this point, you're either in the range (one ahead, two back - wire position-wise) or you're 180 degrees opposite. (not bad odds) Try all of that. No start....then simply go to the oposite (180 deg.) side of your dist. for wiring. ((Please remember.....it's 18436572 CLOCKWISE) |
||
Posted on: 2008/5/19 0:43
|
|||
|
_________________
1995 Forged 385 ZF6 227/234 1.6 FIC30# MSD BBK SS SLP Bullets X-Pipe DynoMax |
|||
|
Transfer
|
|
||
| CentralCoaster | Re: Where exactly is #1 on the distributor cap? | ||
|
Senior Guru

|
Do you have a timing light?
It's possible the previous guy put the dist in a tooth off and then put the plug wires on where they shouldn't be in order to get it to run. The rotor can only go on one way, it's keyed. With about 6* timing, the boxy thing where the wires hook up the coil, points directly to the drivers side. The #1 plug is the 2nd plug clockwise from that.  If you turn the motor over until it's exactly at the 0 on the timing mark, the rotor should be pointing almost directly at the #1 or #6 (which is 180 across from #1) |
||
Posted on: 2008/5/19 0:44
|
|||
|
_________________
1985 Z51, ZF6 |
|||
|
Transfer
|
|
||
| DaleD | Re: Where exactly is #1 on the distributor cap? | ||
|
Senior Guru
|
Quote:
I see what you mean on the rotor. There's a notch on one side, so I assume there's a corresponding key on the distributor, so you can't put it on wrong. I've tried 4 positions, I'll try the other 4 before I call the tow truck. |
||
Posted on: 2008/5/19 0:46
|
|||
|
_________________
Whenever someone says "I'm not book smart, but I'm street smart", all I hear is "I'm not real smart, but I'm imaginary smart". |
|||
|
Transfer
|
|
||
| Calm | Re: Where exactly is #1 on the distributor cap? | ||
|
Senior Guru
|
Quote:
I've tried 4 positions, I'll try the other 4 before I call the tow truck. Now it's getting personal! :tongue: (I have a personal dislike of tow trucks) It ran right before your tune up, right? That MEANS the original wiring was correct.....and your replacement wiring is incorrect. So....start OVER. Just locate #1 wire (the rest is simple math.) |
||
Posted on: 2008/5/19 0:56
|
|||
|
_________________
1995 Forged 385 ZF6 227/234 1.6 FIC30# MSD BBK SS SLP Bullets X-Pipe DynoMax |
|||
|
Transfer
|
|
||
| DaleD | Re: Where exactly is #1 on the distributor cap? | ||
|
Senior Guru
|
Quote:
I have that just about memorized by now, 18436572! (That's not a bad thing). I'm done for the night. I can try this stuff tomorrow after work. I don't have a timing light, but I'll be darned if I can find the mark on the crank pully. I should be able to see it looking from the driver's side, and I don't see squat. So, on my list tomorrow, is move to the 4 other positions, and if that doesn't work, find the timing marks on the crank pully. Thanks much for the input. With all the work I put in changing the darn plugs, would be a shame to have to have it towed now. Those plugs on the passenger side were absolutely brutal. |
||
Posted on: 2008/5/19 1:04
|
|||
|
_________________
Whenever someone says "I'm not book smart, but I'm street smart", all I hear is "I'm not real smart, but I'm imaginary smart". |
|||
|
Transfer
|
|
||
| DaleD | Re: Where exactly is #1 on the distributor cap? | ||
|
Senior Guru
|
Quote:
It ran pretty well before I f'ed it up. An occasional hesitation when cold, but other than that, it was running great. The plugs and wires were decent, the rotor and cap were lousy. I replaced the cap, but kept the same coil. 18436572 (If it's any consolation, I'd insist on a flatbed.) |
||
Posted on: 2008/5/19 1:08
|
|||
|
_________________
Whenever someone says "I'm not book smart, but I'm street smart", all I hear is "I'm not real smart, but I'm imaginary smart". |
|||
|
Transfer
|
|
||
| DaleD | Re: Where exactly is #1 on the distributor cap? | ||
|
Senior Guru
|
Quote:
Great looking motor. There is something up with my car. The distributor cap is angled from what you show, as much as 30* CCW from your config. |
||
Posted on: 2008/5/19 1:11
|
|||
|
_________________
Whenever someone says "I'm not book smart, but I'm street smart", all I hear is "I'm not real smart, but I'm imaginary smart". |
|||
|
Transfer
|
|
||
| CentralCoaster | Re: Where exactly is #1 on the distributor cap? | ||
|
Senior Guru
|
Sounds like it may have been put in a tooth retarded and them advanced 30* to make up for it. This is a really easy fix, I hate to see you fork up all that cash for a tow and mechanic. Buy a timing light instead with that cash. And then you'll learn how to set timing and maybe pull a distributor. All useful stuff because that knowledge applies to nearly every car on the road.
You really need to find TDC on the pulley and then check the rotor position, until then you're guessing. It's a groove cut into the balancer. Hard to miss unless it's completely caked in grime. You can turn the motor over by hand with a 1/2" ratchet, clockwise and in neutral. |
||
Posted on: 2008/5/19 6:54
|
|||
|
_________________
1985 Z51, ZF6 |
|||
|
Transfer
|
|
||
| toptechx6 | Re: Where exactly is #1 on the distributor cap? | ||
|
Senior Guru
|
I agree with CC that the it sounds like the distributor was not indexed correctly by the person who removed it previously, that is likely the reason installing the wires on the cap "correctly" now results in it actually being out of time.
Ideally the distributor should be removed and reinstalled correctly, however the car did run so it can be made to do so again by simply "dead timing" the engine without distributor removal, for now lets just try to make that happen. Indexing it correctly might be a better lesson for next semester. You indicate you have a Haynes manual, assuming mine is the same, check page 2A-10 for the procedure to locate TDC for number 1 cylinder (for now ignore steps 4 & 5) if the rotor ends up pointing toward the firewall assume that is TDC on the exhaust stroke as in step 8, make sure you have found TCD on the compression stroke. You will need to clean off the vibration damper and timing plate so you can see and align the mark. Once you have located TDC for #1 simply install the wires on the cap in the correct firing order starting with #1 at the location closest to where the rotor is pointing.(don't forget to reconnect the BATT wire to the distributor) If it does NOT start once you do the above, next try holding the pedal to the floor while cranking. This is "clear flood" mode and prevents the injectors from firing, it is possible the many short cranking attempts so far have wet the plugs with fuel, once it does start of course release the pedal to prevent over revving, again good luck.  |
||
Posted on: 2008/5/19 11:08
|
|||
|
Transfer
|
|
||
| CentralCoaster | Re: Where exactly is #1 on the distributor cap? | ||
|
Senior Guru
|
Good advice above. So if the rotor is pointing towards 11 oclock, turn that engine over one more time, then it should be pointing towards 5 oclock.
You should do this with the cap removed. Once that is done, have confidence that you've got the wires hooked up right AND LEAVE THEM THERE. And try starting it a few times. A few small backfires isn't really going to hurt anything. If it still doesn't work right, check elsewhere, check the routing to the spark plugs, make sure you know the cylinder numbering on the engine, or start looking at other issues. Did you install the cap/rotor/coil correctly? Is the coil button still in place? Is the cap seated properly on the distributor base? Are your coil connections hooked up securely? Is the rotor sitting flush on the distributor shaft, not backwards and cockeyed because the keyed part is interfering with it? This is really easy work, so just forget about everything you've done so far and take a deep breath and start over fresh. |
||
Posted on: 2008/5/19 15:52
|
|||
|
_________________
1985 Z51, ZF6 |
|||
|
Transfer
|
|
||
| DaleD | Re: Where exactly is #1 on the distributor cap? | ||
|
Senior Guru
|
Quote:
I have a Haynes manual. Mine has different page numbers, but I found it. Page 64 in mine, go figure. There was something I didn't quite understand about finding TDC. It said line up the timing mark, take off the cap, and if the rotor isn't pointing to #1, (I guess they assume you know where #1 is located!), then rotate the motor 360. At least that's how I read it. So, I lined up the mark with the scale. My scale is rusted, so I just got the mark somewhere within the boundry of the scale. Took off the cap, and the rotor was pointing at the connector to the right of the plug block. I took pics of my cap, rotor position and timing mark position in case I got into big trouble. I also noticed, my distributor cap is aligned almost identical to the picture in my Haynes book, so maybe that isn't a problem? I put the cap back on and put #1 where the rotor was pointed. BINGO! It started. It was enough to make a grown man cry, (not really, but it was very nice). It's running rich. But it's running. I need to re-route the wiring, and put the looms on, but it was too late to screw with that tonight. I knew only bad would come of that! I have 3 questions: First: I'm pretty sure #1 moved during this tune up. Not positive, because I'm a dumbass, but I'm pretty sure it moved. How can that be? Second: I know the rotor and cap were pretty old, but the plugs and wires I took off were decent. Does it make sense that changing these items would cause the timing shift and have the car running rich? Third: I bought wire looms that connect to the valve covers with new center bolts. How critical is the torque on those? And finally, thanks to all. It's a lonely feeling when your car is broken. It's really nice to have a place where folks help you out. I'm not mechanic, but maybe one day I can return a favor. |
||
Posted on: 2008/5/20 1:38
|
|||
|
_________________
Whenever someone says "I'm not book smart, but I'm street smart", all I hear is "I'm not real smart, but I'm imaginary smart". |
|||
|
Transfer
|
|
||
| TommyT-Bone | Re: Where exactly is #1 on the distributor cap? | ||
|
Chair-man of the bored
 
|
I'd like to give kudos to all the gurus who helped you through. You guys are the best..... for real.....
|
||
Posted on: 2008/5/20 1:58
|
|||
|
Transfer
|
|
||
| toptechx6 | Re: Where exactly is #1 on the distributor cap? | ||
|
Senior Guru
|
Quote:
Yeah Baby, I knew you could do it, congratulations on sticking with it way to go! Regarding your question concerning the process of finding TDC (not knowing where #1 is located)? I told you to ignore that part and only be concerned if the rotor was pointed toward the firewall, with the timing mark on the damper aligned with the indicator you have a 50/50 chance of being on the compression stroke, if the rotor had been pointed at the firewall instead of forward you would have been on the exhaust stroke, understand? I'm confused by what you mean when you say #1 "moved"? If you are saying it is not in the same spot on the cap, that is possible, if you had marked the old cap you would know! It is possible that it is still out of time, the only proper way to know is to check it with a timing light, on your car you will need to disable computer advance (ESC)when checking the timing, don't forget to enable it when finished. As for running rich, make sure you didn't accidentally disconnect a vacuum line during the tune up. I would snug the center bolts down by hand using a 1/4 drive ratchet, the torque spec is only around 100 inch lbs as I recall, the only critical part is not snapping them off, they are not very strong, a valve cover leak is better than a broken bolt! Again congratulations, nice job. |
||
Posted on: 2008/5/20 9:29
|
|||
|
Transfer
|
|
||
| joeld | Re: Where exactly is #1 on the distributor cap? | ||
|
Guru
|
Good job! Didn't doubt you couldn't do it. It just gets a little confusing until you do it a couple of times. That's good advice on checking all the lines just be sure all is connected.
Joel |
||
Posted on: 2008/5/20 15:15
|
|||
|
_________________
1989 Coupe,L98 automatic |
|||
|
Transfer
|
|
||
| DaleD | Re: Where exactly is #1 on the distributor cap? | ||
|
Senior Guru
|
Quote:
Thanks! I understand about the TDC now. Obviously I found it, but I know what you mean about exhaust versus compression and where the rotor was pointed. Lesson learned. As for #1 moving. Yes, I mean on the cap, but I was careless, not 100% sure it really did move, I am not going to worry about it. I'm going to assume it didn't, and I was just a dumbass about how I did it. Another lesson learned the hard way. I said it was running rich... thinking about that, I may have made a mistake. I used anti-sieze on the plugs. I was careful to avoid the electrode, but I did get it pretty far down on the threads. It may have been burning anti-sieze, I didn't run it long enough to let it smooth out, (not that it was running that rough), because the wires aren't dressed. I didn't want to burn them up. Checking the timing is going to be rough. My scale is all rust brown. I can't see any lines. Not sure what to do there. Thanks again. This kind of advice is great to have access to. |
||
Posted on: 2008/5/20 15:45
|
|||
|
_________________
Whenever someone says "I'm not book smart, but I'm street smart", all I hear is "I'm not real smart, but I'm imaginary smart". |
|||
|
Transfer
|
|
||
| DaleD | Re: Where exactly is #1 on the distributor cap? | ||
|
Senior Guru
|
Quote:
Thanks. Sometimes you just have to walk away from a problem for a while. That, and get some great advice here!  |
||
Posted on: 2008/5/20 15:45
|
|||
|
_________________
Whenever someone says "I'm not book smart, but I'm street smart", all I hear is "I'm not real smart, but I'm imaginary smart". |
|||
|
Transfer
|
|
||
| toptechx6 | Re: Where exactly is #1 on the distributor cap? | ||
|
Senior Guru
|
Thanks!
I understand about the TDC now. Obviously I found it, but I know what you mean about exhaust versus compression and where the rotor was pointed. Lesson learned. As for #1 moving. Yes, I mean on the cap, but I was careless, not 100% sure it really did move, I am not going to worry about it. I'm going to assume it didn't, and I was just a dumbass about how I did it. Another lesson learned the hard way. I said it was running rich... thinking about that, I may have made a mistake. I used anti-sieze on the plugs. I was careful to avoid the electrode, but I did get it pretty far down on the threads. It may have been burning anti-sieze, I didn't run it long enough to let it smooth out, (not that it was running that rough), because the wires aren't dressed. I didn't want to burn them up. Checking the timing is going to be rough. My scale is all rust brown. I can't see any lines. Not sure what to do there. Thanks again. This kind of advice is great to have access to.[/quote] You may have smelled the anti-seize cooking off but if it was not up to operating temperature is WAS running rich, normal operation, they all do until they go into closed loop. If you can get the timing indicator clean enough to see any well defined mark (0, 5, 10) you can time it with an advance style timing light, see how it runs first once you get your wires routed, it may be fine. |
||
Posted on: 2008/5/20 16:44
|
|||
|
Transfer
|
|
||
| CentralCoaster | Re: Where exactly is #1 on the distributor cap? | ||
|
Senior Guru
|
To fill in the blanks here... plugs/wires will NOT affect your timing.
The only thing that affects timing is the distributor position, which is adjusted by loosening the clamp on the intake and rotating the distributor... ...or relocating the plug connections will affect timing. Timing tab looks like this:  The deep notch is 0 degrees The peak to the left is 4 degrees BTDC (advanced) The next 2 peaks after that are 8 and 12 degrees. To the right is 4 and 8 ATDC (retarded). BTDC = before top dead center ATDC = after top dead center There are usually less marks on the ATDC side, because nobody in their right mind sets base timing over there. |
||
Posted on: 2008/5/20 17:03
|
|||
|
_________________
1985 Z51, ZF6 |
|||
|
Transfer
|
|
||
| DaleD | Re: Where exactly is #1 on the distributor cap? | ||
|
Senior Guru
|
Quote:
That helps a lot, thanks. I would guess changing that thing out is more trouble than it's worth? I can barely reach it, let alone get it out of there. |
||
Posted on: 2008/5/20 17:52
|
|||
|
_________________
Whenever someone says "I'm not book smart, but I'm street smart", all I hear is "I'm not real smart, but I'm imaginary smart". |
|||
|
Transfer
|
|
||
| CentralCoaster | Re: Where exactly is #1 on the distributor cap? | ||
|
Senior Guru
|
It's welded to the timing cover. You'd have to replace the timing cover to replace it. You don't need to read the letters anyways now that you know what the peaks mean, but you could just rub it down with sandpaper if you want to see the stamped letters.
|
||
Posted on: 2008/5/20 20:57
|
|||
|
_________________
1985 Z51, ZF6 |
|||
|
Transfer
|
|
||
| pianoguy | Re: Where exactly is #1 on the distributor cap? | ||
|
Guru Emeritus
 
|
Glad to hear you got it going!
|
||
Posted on: 2008/5/21 2:55
|
|||
|
_________________
1996 LT4 �Before you criticize someone, you should walk a mile in their shoes. That way when you criticize them, you are a mile away from them and you have their shoes.�- Jack Handey |
|||
|
Transfer
|
|
||
| rayquayle | Re: Where exactly is #1 on the distributor cap? | ||
|
Senior Guru

|
A bit more clear maybe?
  Handy to keep around the garage, but a dial back timing light is best as you then only need to remember that the deep valley is 0. |
||
Posted on: 2008/5/21 5:46
|
|||
|
_________________
Ray Quayle in England '86 Indy PaceCar, 4+3 NCM Founder #2896 NCM Lifetime #672 Graduate of Gordon's School |
|||
|
Transfer
|
|
||
You can view topic.
You cannot start a new topic.
You cannot reply to posts.
You cannot edit your posts.
You cannot delete your posts.
You cannot add new polls.
You cannot vote in polls.
You cannot attach files to posts.
You cannot post without approval.
|
|