


|
|
Register To Post |

| PeteK | 700R4-4L60 Build Up Part 3 | ||
|
Moderator
 
|
Today I had a chance to build up the reverse drum, and the input drum. The input drum is very complicated, and is a bit time consuming.
In the photo below, I have the new Lip Seal's installed on the reverse drum piston. Lip seals always go on so the lip faces the oil feed. 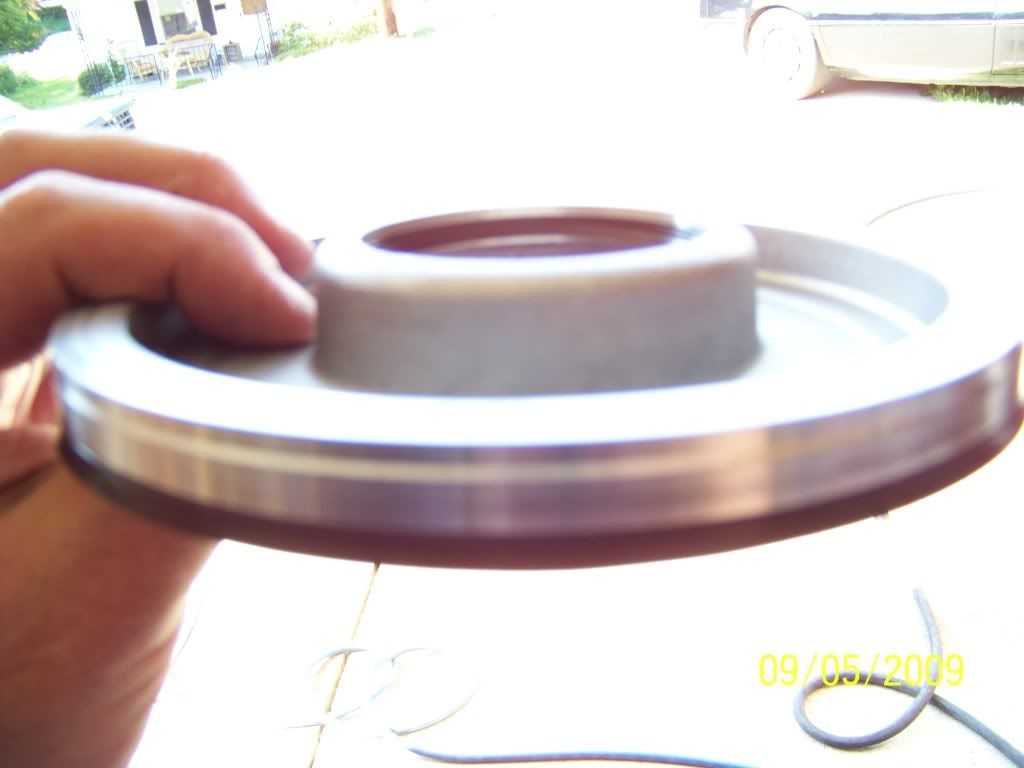 Next photo shows the new vs old drum. Although the old drum is still flat and serviceable, I am installing a wide band, and need to use a new one, or the edges would burn off on the slightly worn old drum. 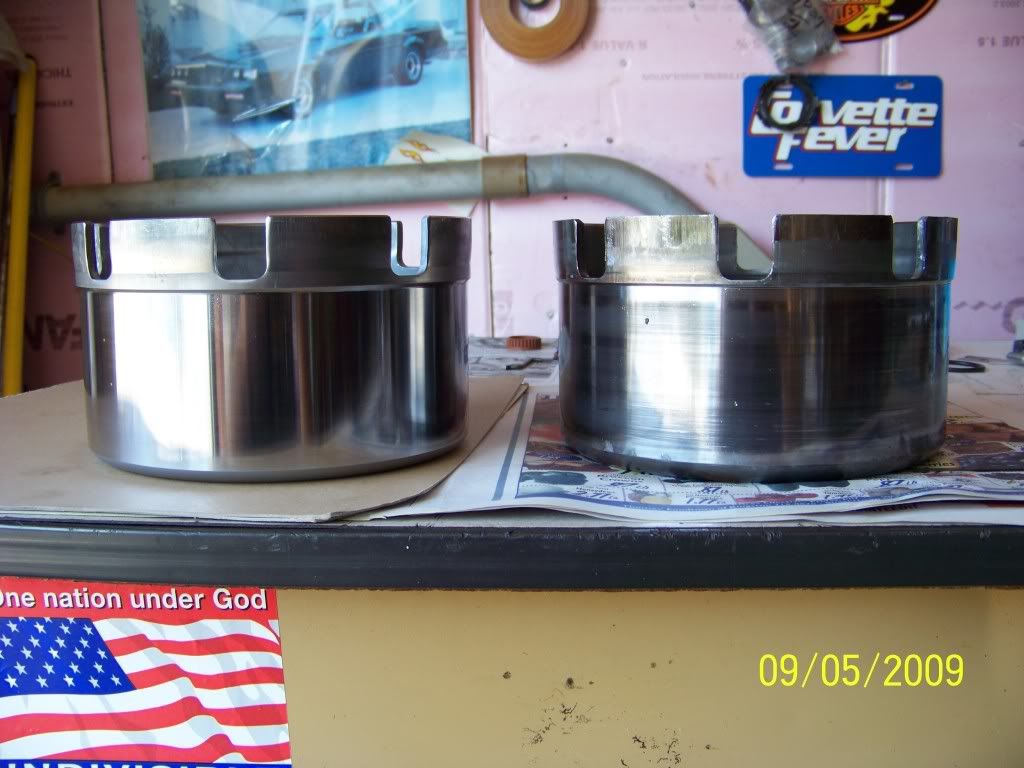 After the piston is carefully installed into the drum, the return springpack, and retaining clip are installed. Next come the apply ring, frictions and steels, capped off by the pressure plate and snap ring. Photo below shows assembled drum. 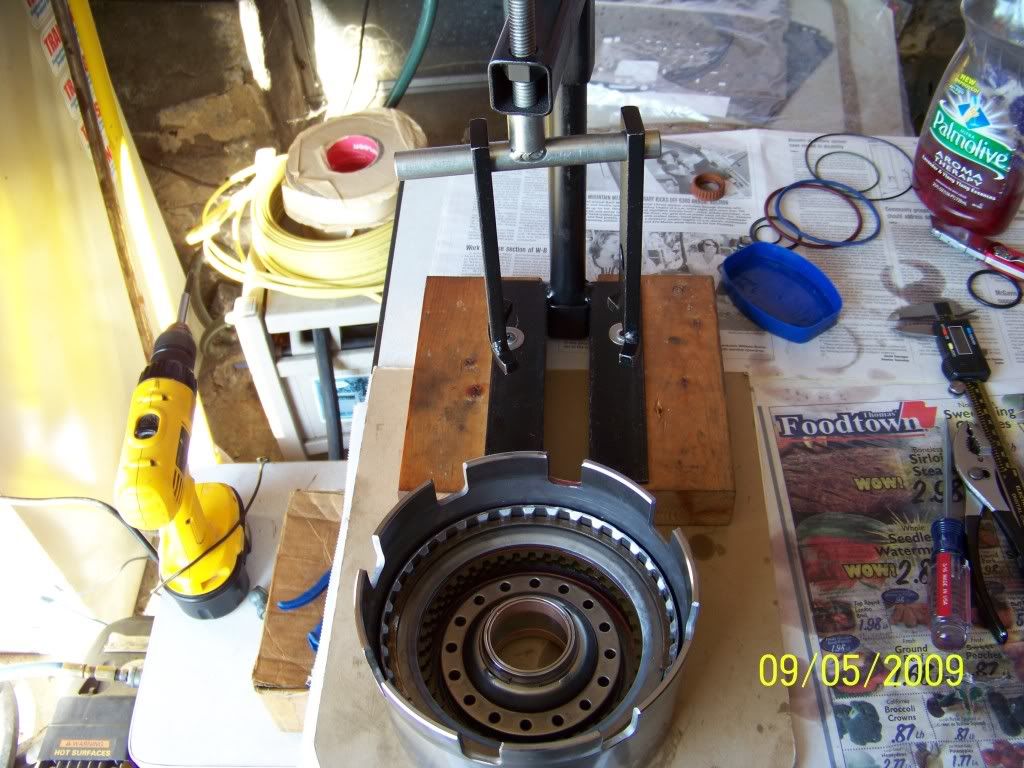 Next up is the input drum. It is in the photo below, on the left side. All of the other parts on the table install into the drum. Not shown in the photo are the overrun, and forward friction plates. They are soaking in fresh atf. 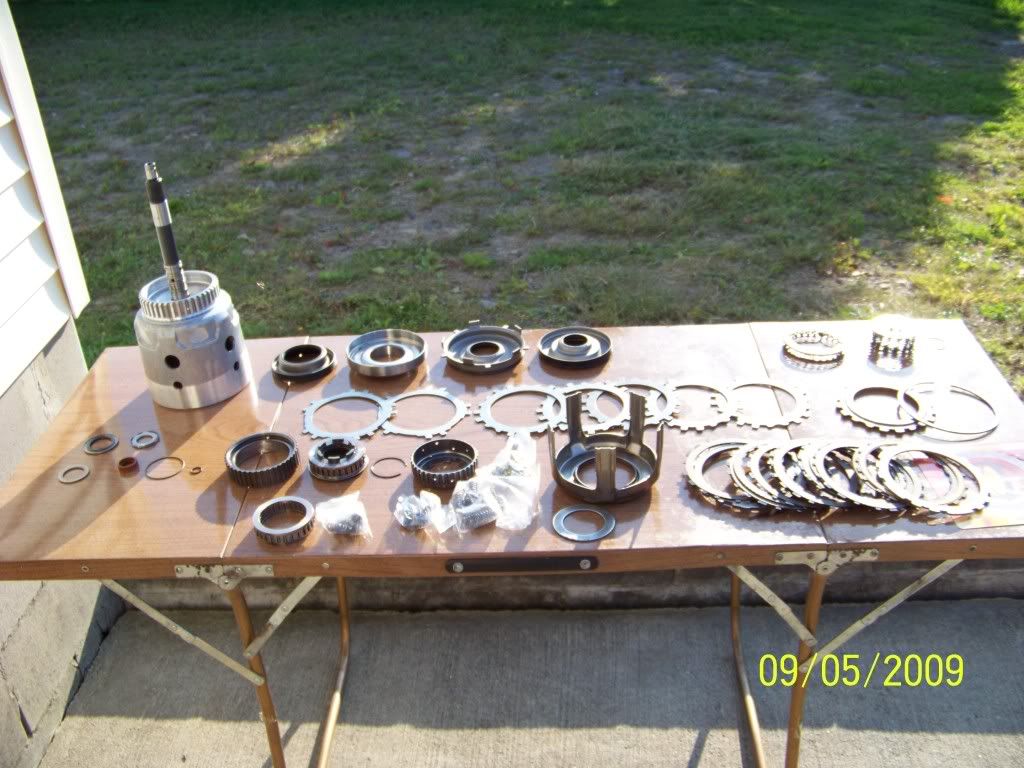 After the drum is emptied, and properly cleaned, the steel pistons are installed. I replace the aluminum factory pistons with stronger steel pistons, and a return spring from a 1999 and newer unit. 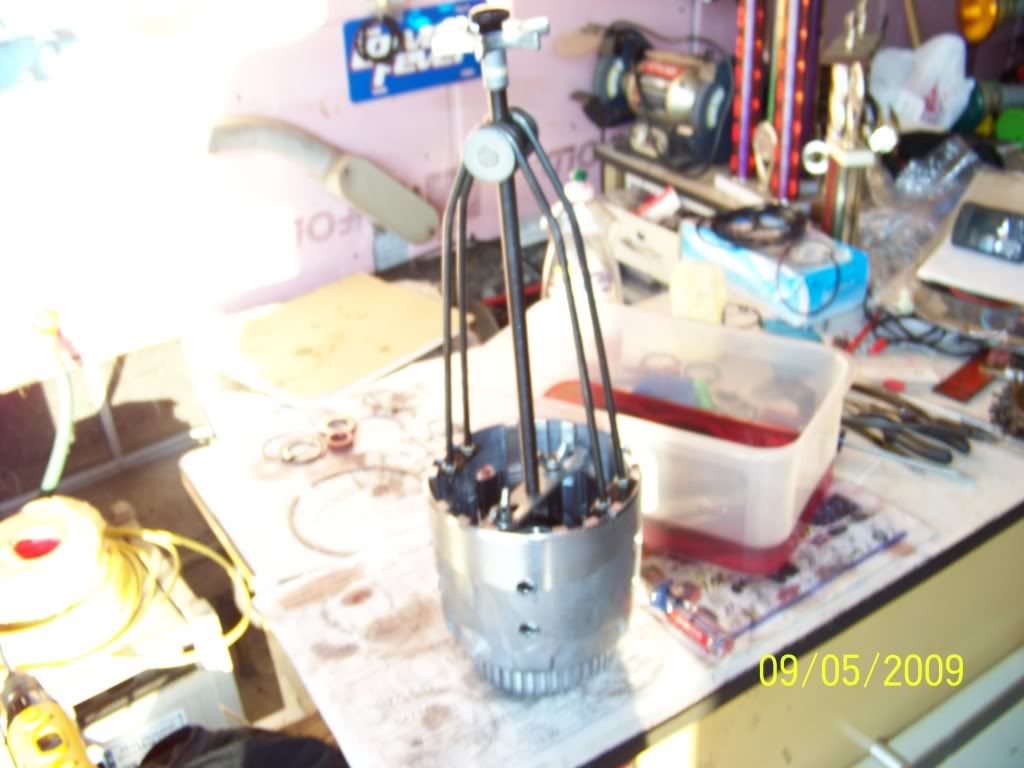 After the steel pistons, and upgraded return spring pack is installed on both return springs to stop clutch apply at high rpm's. Overrun and forward clutches are installed with their matching steels. Then the sprag is rebuilt with a stronger aftermarket unit. Pic below shows the weaks single cage sprag, next to the the aftermarket dual cage sprag. GM should be shot for switching to a single cage sprag in the late 80's. Big HP and torque turns them inside out. 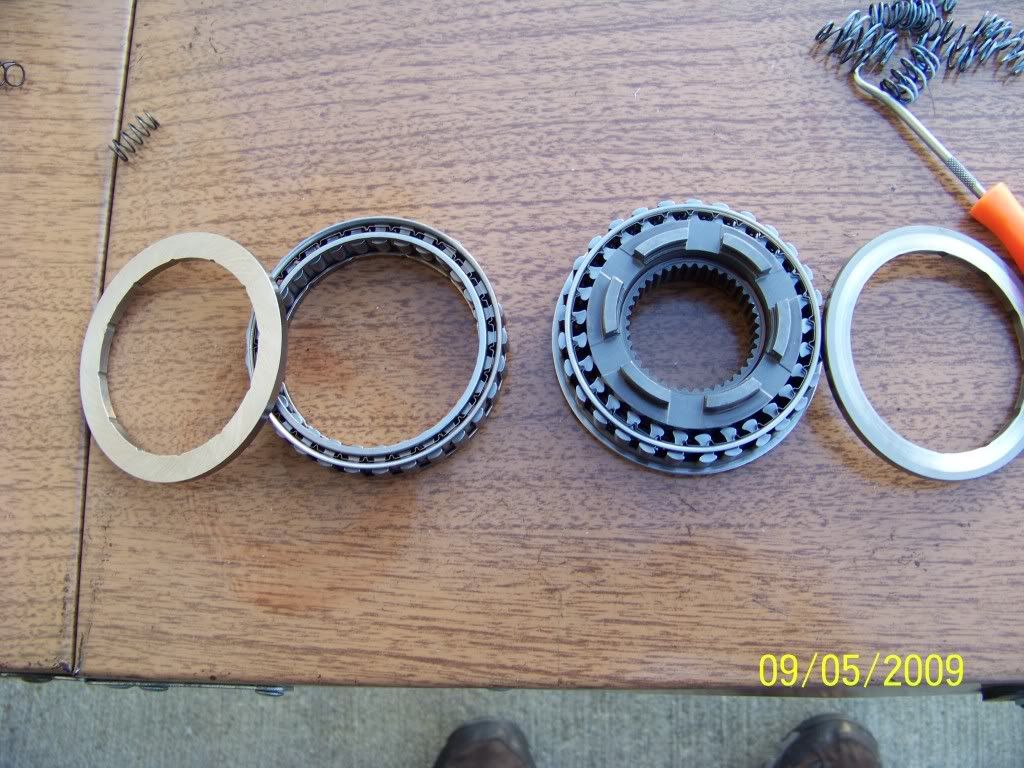 After sprag is installed, all that remains is the 3-4 clutchpack. On this build, I am using the expensive Raybestos Z-Pack, and matching GM piston. They Z-Pack and piston cost about $100, but well worth it. In the early days, the Z-Pack was absolute crap, but they have become the 3-4 pack of choice, in my opinion. After the input drum is filled, it is flipped over for the teflon sealing ring install. The 4 sealing rings are shown below. 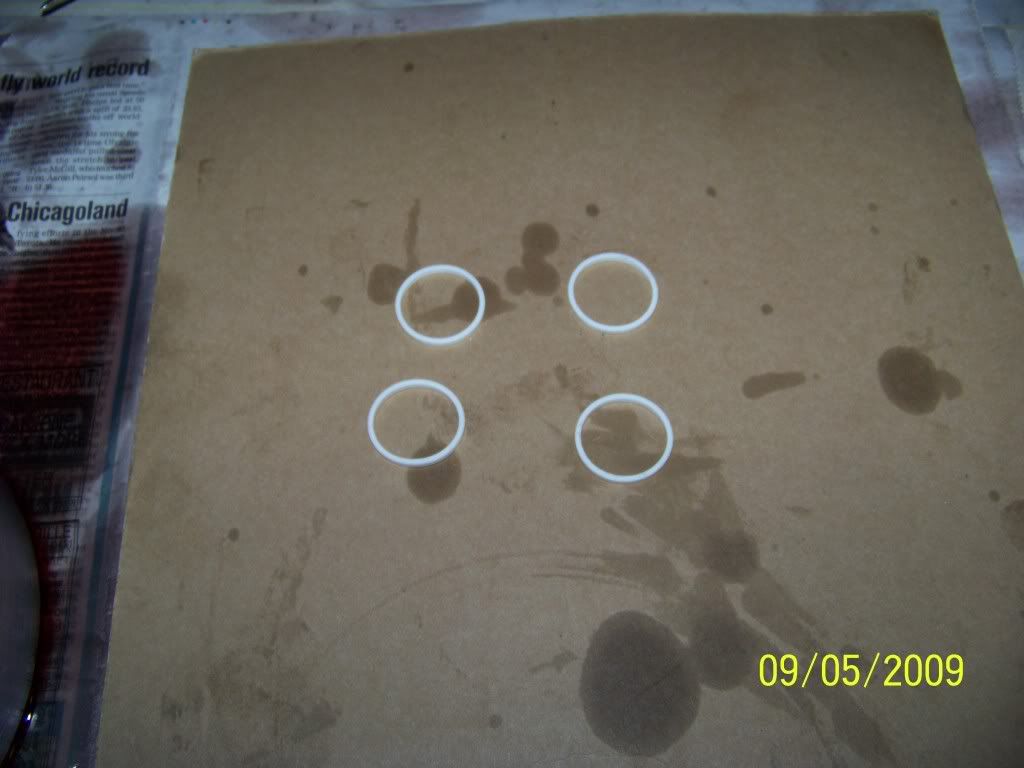 They are slid down a carefully adjusted expanding tool, and located in their correct slot, starting from the bottom, and going up until all 4 are installed. 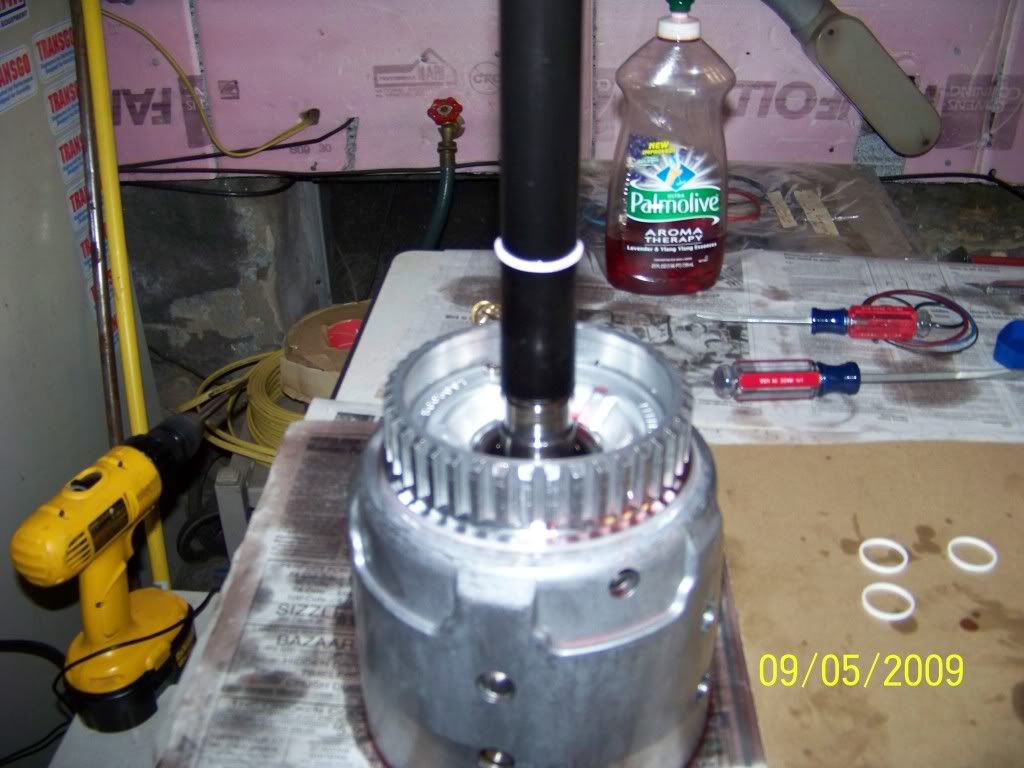 Once they are installed, they are carefully massaged by hand, in an attempt to shrink them down in size. After this occurs, a special resizing sleeve is installed to properly size them. I leave this plastic sleeve on for 12 hours or more. 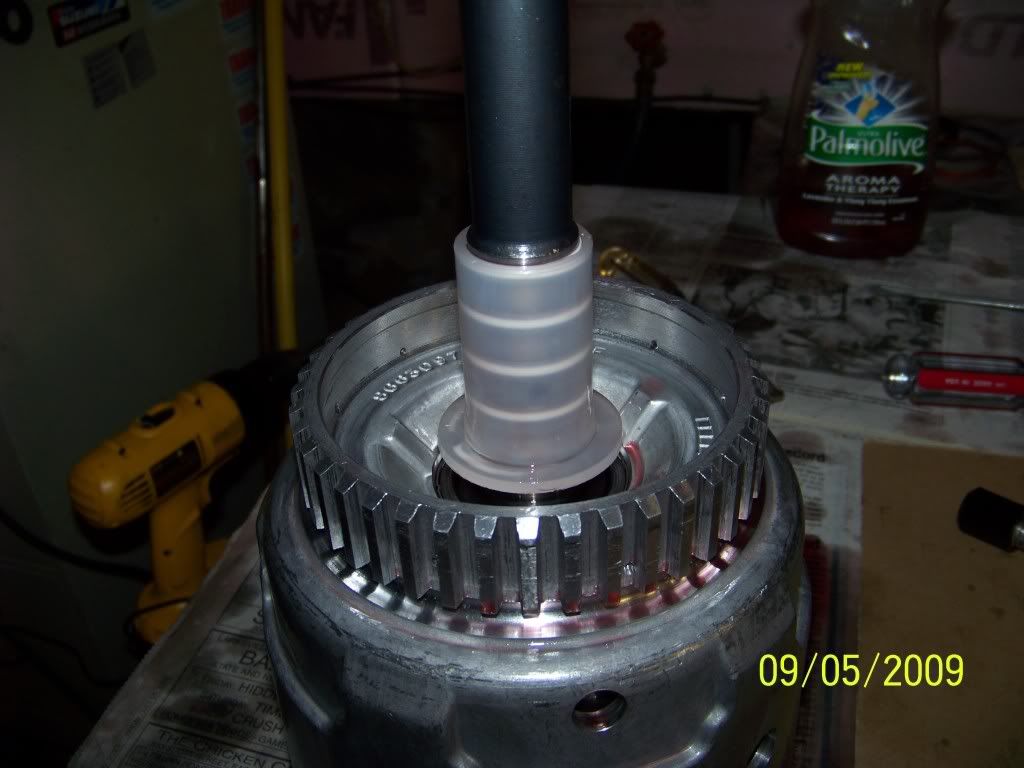 Tomorrow, I hope to install the 2 drums assembled today, and begin to work on the pump. |
||
Posted on: 2009/9/6 3:01
Edited by PeteK on 2012/2/16 17:10:32 |
|||
|
_________________
"It was really on a pass until it came apart." "Yeah. They always are." |
|||
 Transfer Transfer
|
 
|
||

| Aboatguy | Re: 700R4-4L60 Build Up Part 3 | ||
|
Senior Guru
 |
Pete thanks for another great thread!
|
||
Posted on: 2009/9/6 14:11
|
|||
|
Transfer
|
|
||
| bogus | Re: 700R4-4L60 Build Up Part 3 | ||
|
Grand Imperial Pooh-Bah
 
|
Wow... and I still don't know how the damned thing works.
Impressive work!! |
||
Posted on: 2009/9/6 15:50
|
|||
|
_________________
The single biggest problem with communication is the illusion that it has taken place. - George Bernard Shaw Education is the best tool to overcome irrational fear. - me |
|||
|
Transfer
|
|
||
| PeteK | Re: 700R4-4L60 Build Up Part 3 | ||
|
Moderator
|
I planned to get the pump rebuilt today, but is was not meant to be. Turns out the stator shaft is also scarred up from the last asshole's inability to install the worm track filters. I have to order a new stator tuesday (probably $50 or so), so that pulls the plug on the pump for a while.
*At this stage of the game, I should not find any additional suprises, so it is not a biggie. Depending on how hard I party tonight, I may have more completed tomorrow. I need to rebuild the servo, replace and modify the seperator plate, and go through the aux valvebody, and finally the main valvebody. If that happens tomorrow, this piece of junk should be assembled by weeks end. Stay tuned for more pics. |
||
Posted on: 2009/9/6 18:27
|
|||
|
_________________
"It was really on a pass until it came apart." "Yeah. They always are." |
|||
|
Transfer
|
|
||
| bogus | Re: 700R4-4L60 Build Up Part 3 | ||
|
Grand Imperial Pooh-Bah
|
I was just waxing philosophic...
I have come to the conclusion that when I do a major project, it isn't my workmanship that I worry about anymore. I fret about that as I do the project and that keeps me honest... what I worry about is the QC of the product I am installing. Glad you found the bad part now and not after a couple of passes! |
||
Posted on: 2009/9/6 18:30
|
|||
|
_________________
The single biggest problem with communication is the illusion that it has taken place. - George Bernard Shaw Education is the best tool to overcome irrational fear. - me |
|||
|
Transfer
|
|
||
| JDSWHITE93 | Re: 700R4-4L60 Build Up Part 3 | ||
|
Senior Guru

|
what I worry about is the QC of the product I am installing.
Ain't that the truth. |
||
Posted on: 2009/9/6 23:27
|
|||
|
_________________
The few, the proud, the crazy, the LT1 owners association :thumbright: |
|||
|
Transfer
|
|
||
| PeteK | Re: 700R4-4L60 Build Up Part 3 | ||
|
Moderator
|
I accomplished the mission for monday. Ordered the new pump stator, rebuilt the Valve Body, aux Valvebody, servo, and went through as much of the pump as I could. I will load up the pics, and give another run down soon.
I also tallied up the costs. Yikes. This one was expensive! |
||
Posted on: 2009/9/8 19:11
|
|||
|
_________________
"It was really on a pass until it came apart." "Yeah. They always are." |
|||
|
Transfer
|
|
||
| rklessdriver | Re: 700R4-4L60 Build Up Part 3 | ||
|
Senior Guru

|
Quote:
I also tallied up the costs. Pete Adding up cost is never a good thing to do. On a second note: I'd like to thank you for the tuitoral. I've never seen some of the aftermarket hard parts (like the Beast reactor shell) that are availiable for the 700/4L60 before. I can now see why every one of the 700's I had built by local tranny shops in the past wouldn't stand up to mild street engines (mild IMO anyway) for very long.... Sprag failure in every one of them. thanks Will |
||
Posted on: 2009/9/8 20:56
|
|||
|
_________________
1984 Corvette. 434 SBC with a Powerglide. Best pass - 8.48@160MPH 1.23 60ft on MT 275/60R15 Radials. 1972 Corvette. LS5 454 BBC with M20 4 speed. Best Pass - Doing good to just pass a gas station. |
|||
|
Transfer
|
|
||
| PeteK | Re: 700R4-4L60 Build Up Part 3 | ||
|
Moderator
|
Gonna talk about the servo in this post.
First some backround on what it does. Located on the passenger side of the trans is a cover approx 3 inches in diameter. Behind this cover sits the servo assembly. Servo assembly does 3 things: 1) Applies the band for 2nd gear 2) Applies the band for 4th gear 3) Works as an accumulator for 3rd gear. *Remember, accumulator means shock absorber. ** To apply the band, servo moves pin that pushes the end of the band over, thus clamps the machined reverse drum tightly. Pic below shows all of the parts and pieces that make up the servo assembly. It is one of the simpler things in this transmission, and you can also access it while the trans is in the car, in the event you wish to upgrade it with aftermarket parts. 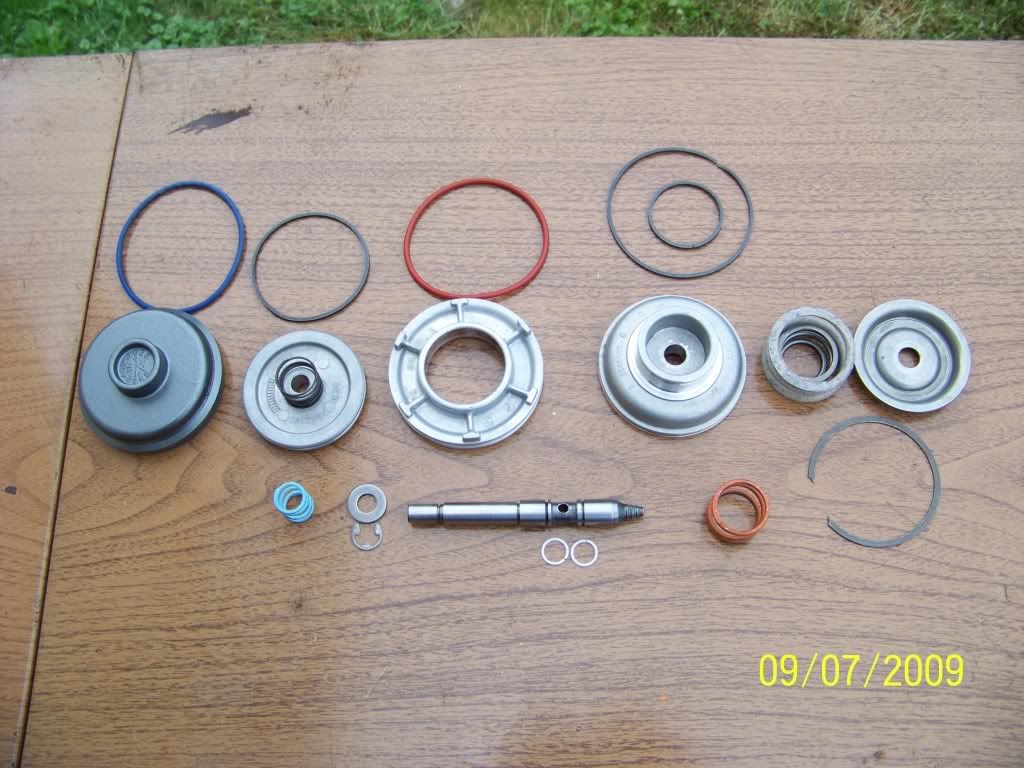 The pic below shows the 3rd accumulator springs being assembled into the center piston. 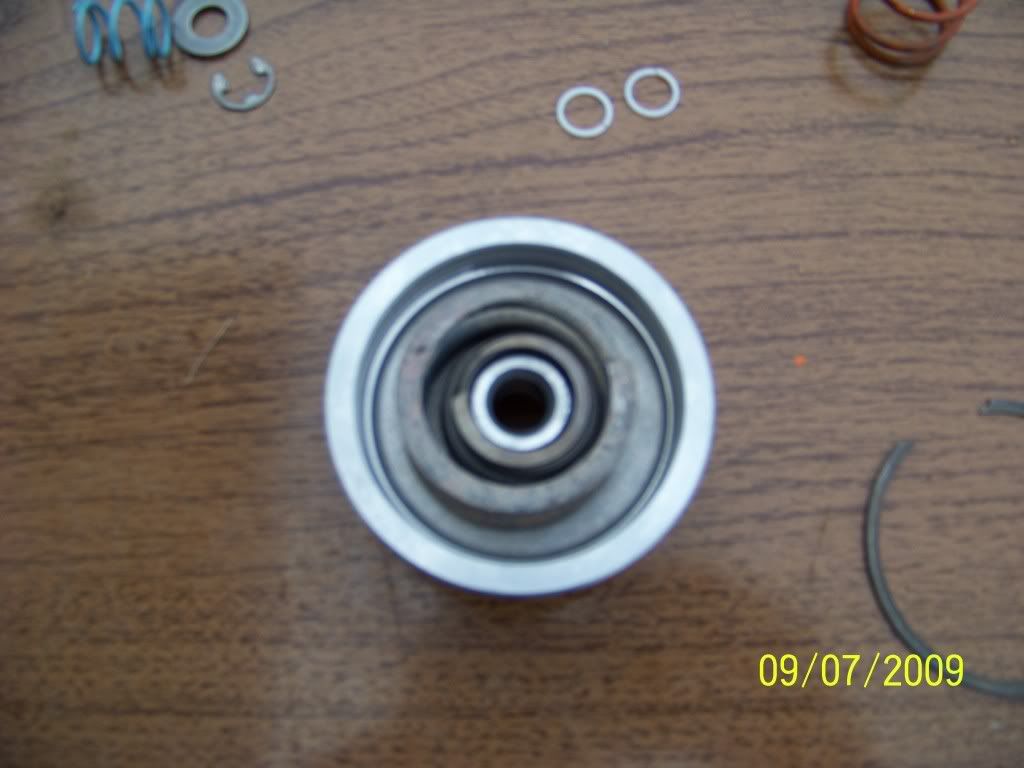 GM says a special tool is needed to compress this spring assembly, but a craftsman, spring loaded plastic clamp works very well for me. After it is compressed, a snap ring is installed. 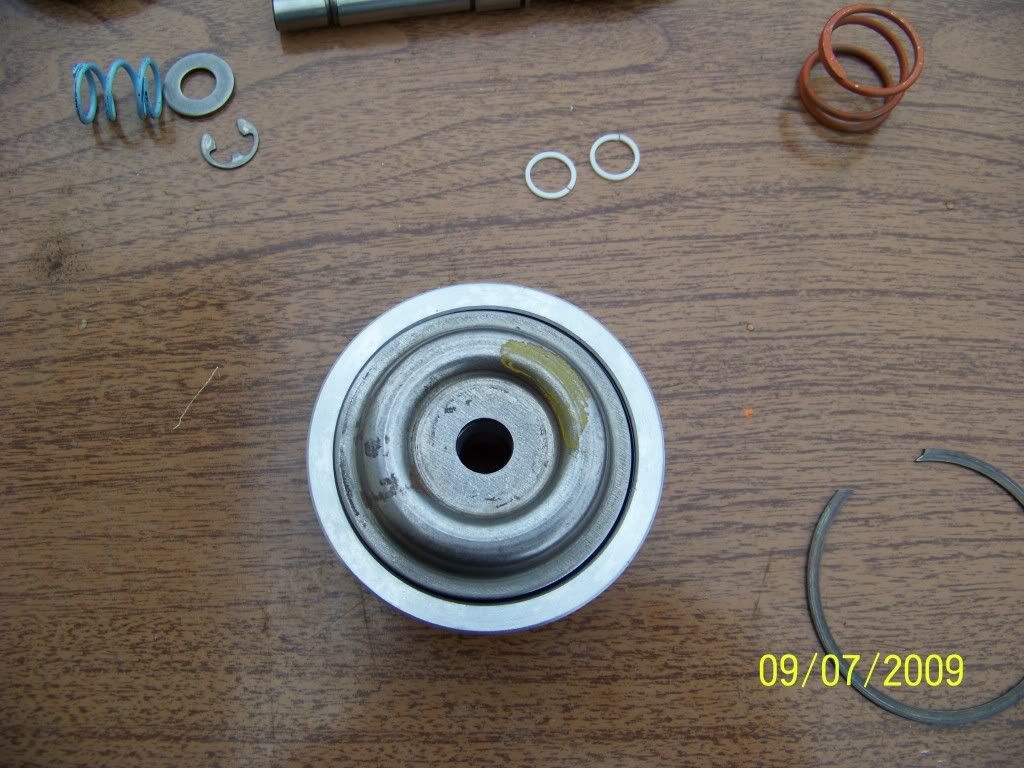 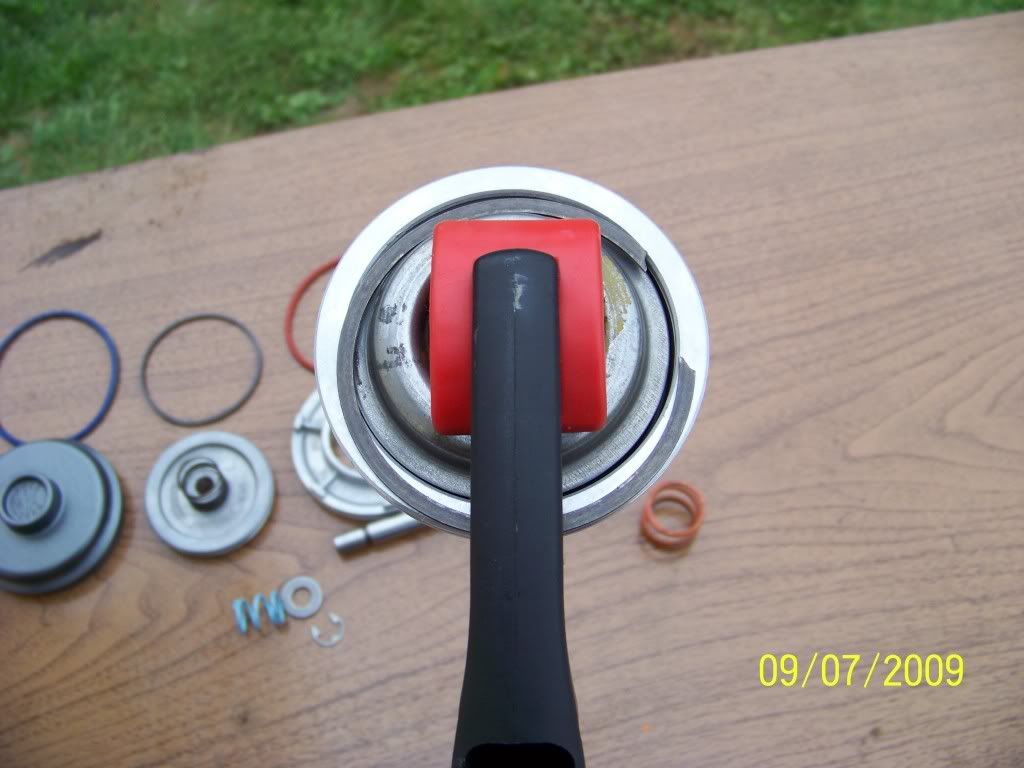 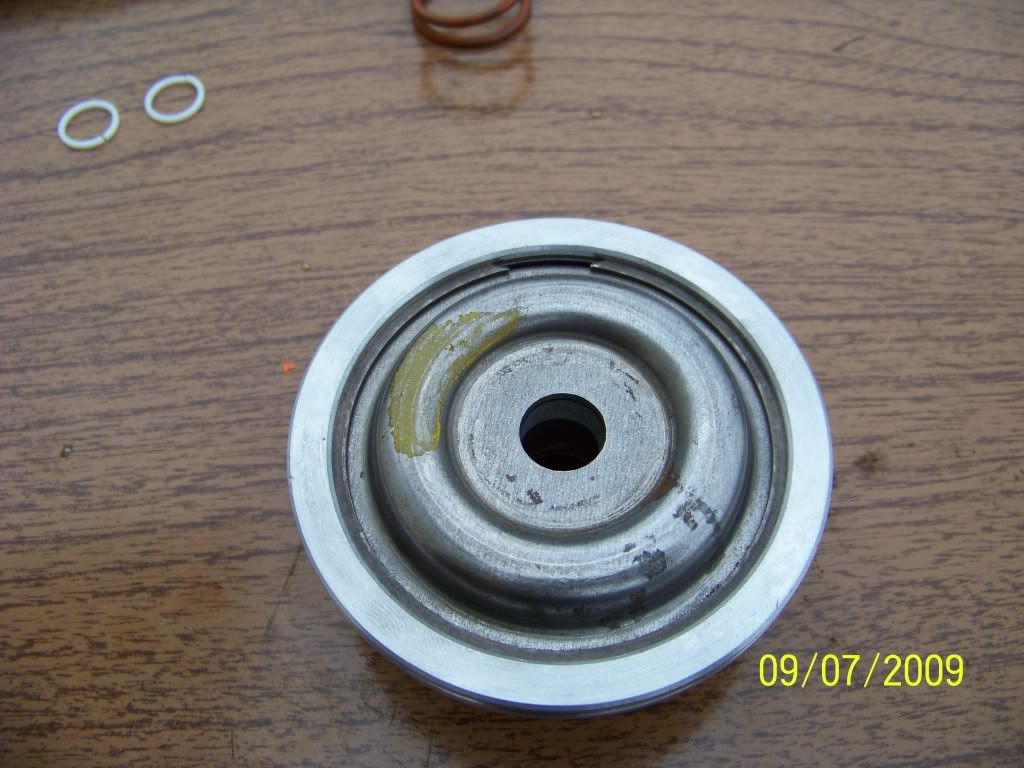 Now, the selective length servo pin is slid through the piston assembly and retained with a spring, washer and "E"-clip. 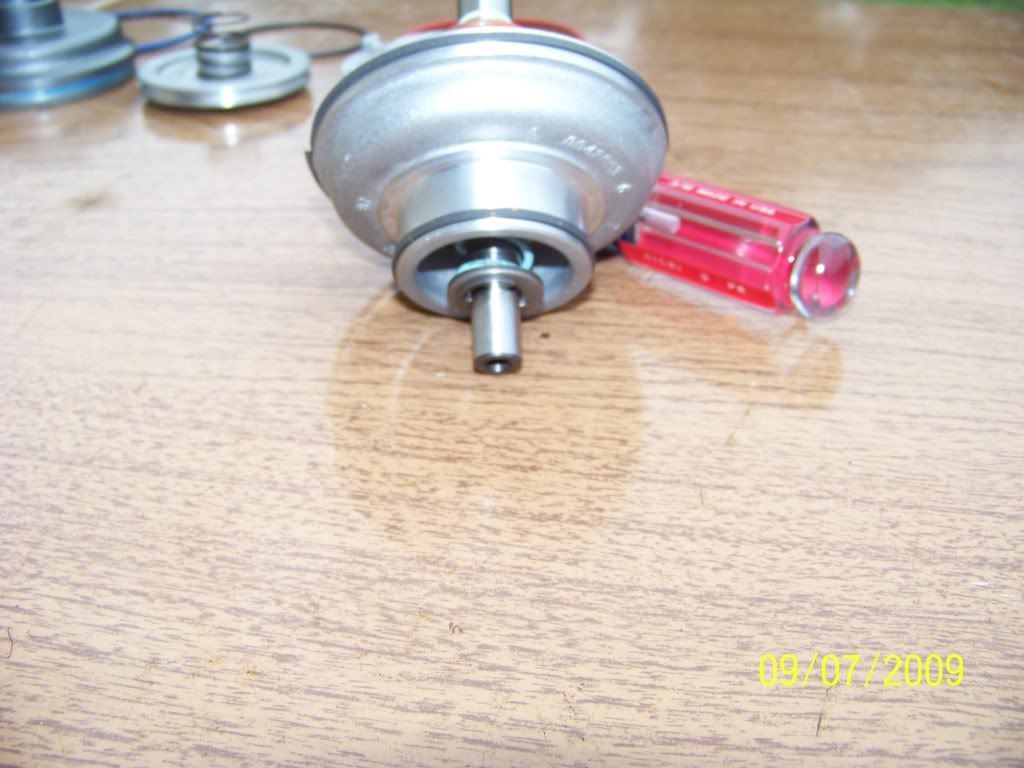 Notice in the photo below, 2 small white teflon sealing washers on the pin. These were used on the early 700's and later discontinued by GM. GM felt that they were 2 seals that could be damaged during install, so the eliminated them. I view them as 2 seals that contribute to sealing the pin's hydraulic function, so I use them every chance I get. Leak testing (with air) will always let you know if they are installed properly. 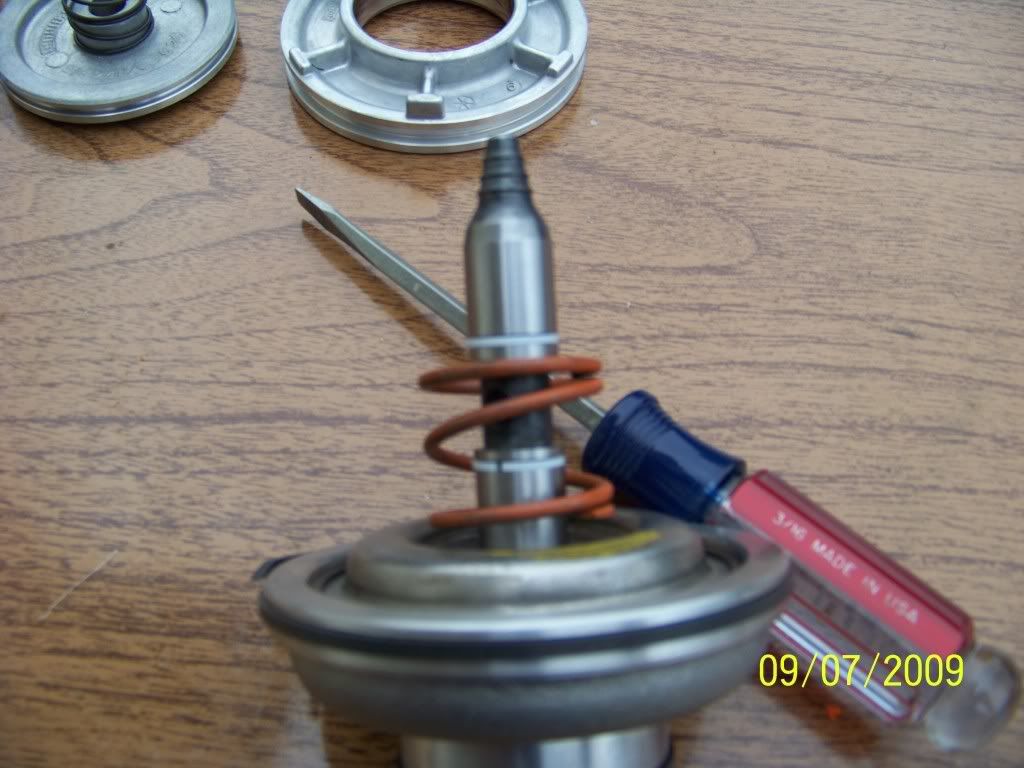 Pic below shows the 2nd gear piston with it's red o-ring installed 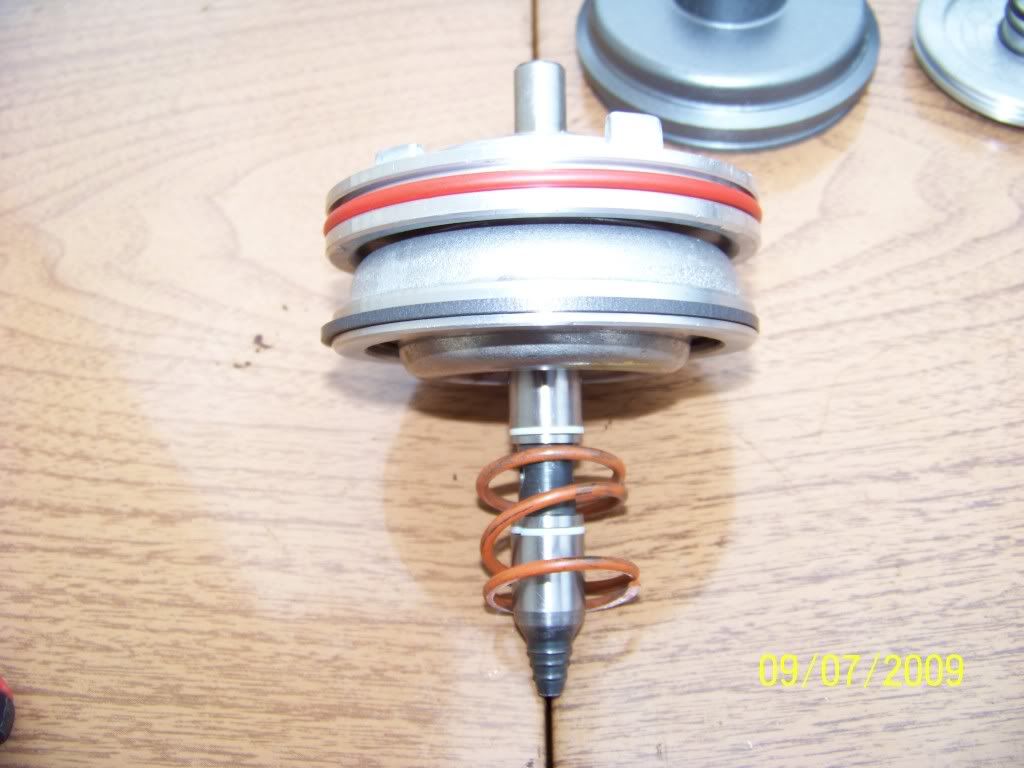 The next pic shows the 4th apply piston installed with an aftermarket booster spring added 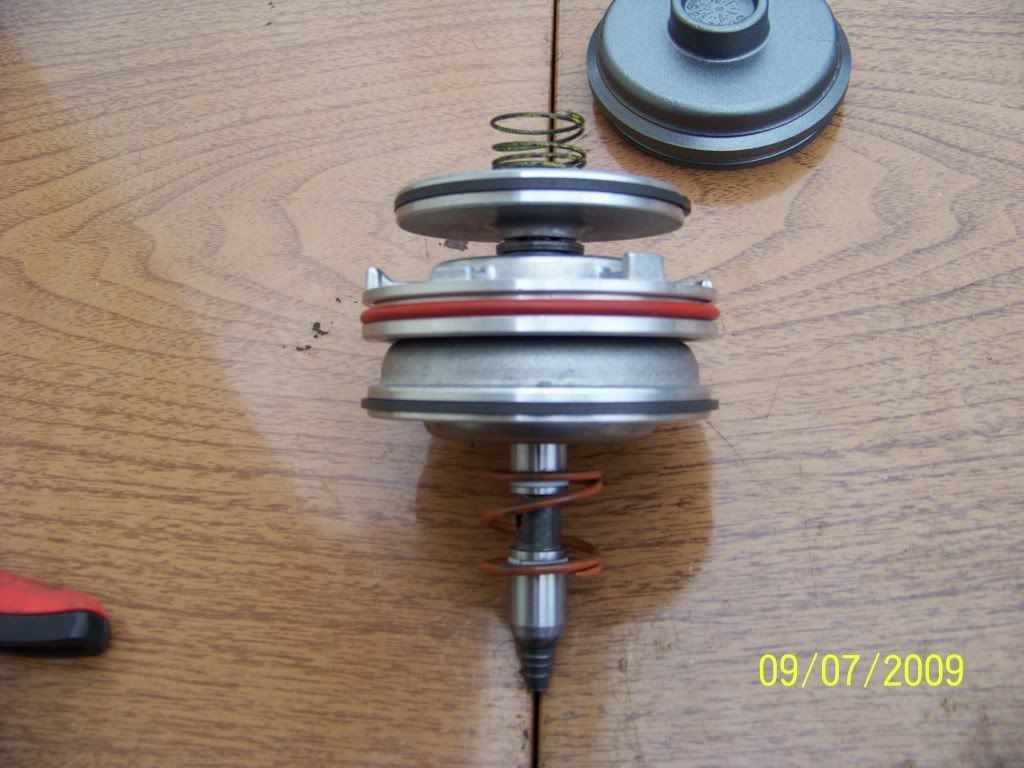 Final pic shows the entire assembly mocked up, and ready (after lubing everything up) to be installed. One of the last things installed in the trans is the servo assembly, so (for now) it is wrapped in plastic, and put aside. 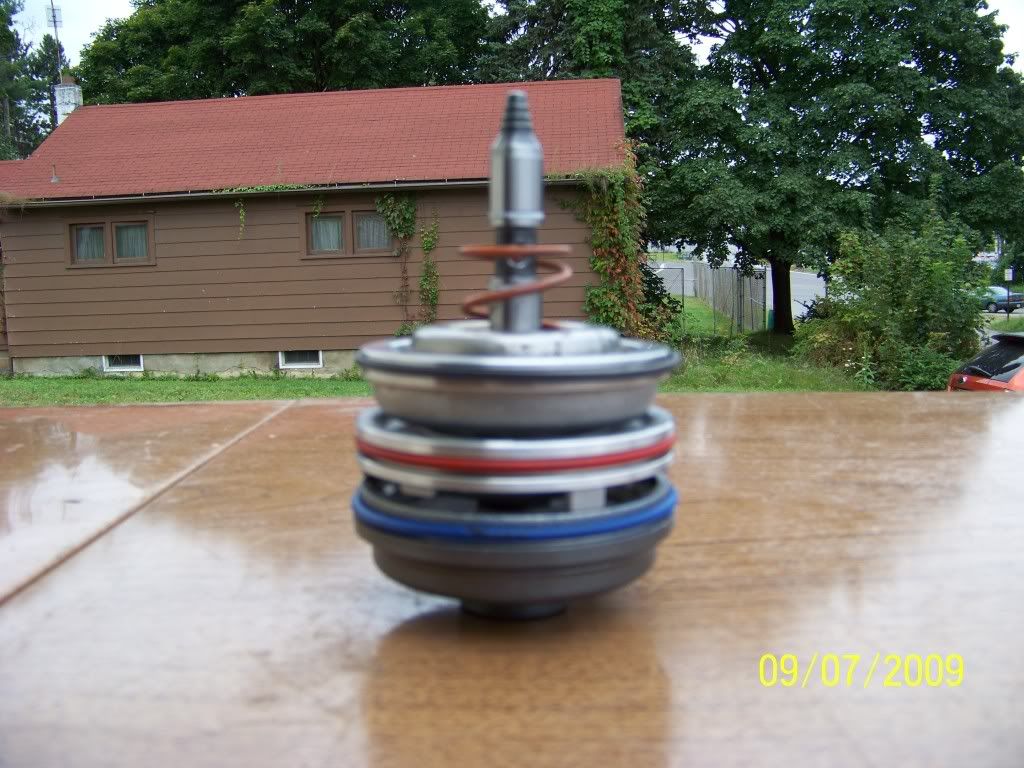 |
||
Posted on: 2009/9/8 21:35
Edited by PeteK on 2012/2/16 17:13:50 |
|||
|
_________________
"It was really on a pass until it came apart." "Yeah. They always are." |
|||
|
Transfer
|
|
||
| PeteK | Re: 700R4-4L60 Build Up Part 3 | ||
|
Moderator
|
Glad to do it Will.
Quote:
 |
||
Posted on: 2009/9/9 2:03
|
|||
|
_________________
"It was really on a pass until it came apart." "Yeah. They always are." |
|||
|
Transfer
|
|
||
| JDSWHITE93 | Re: 700R4-4L60 Build Up Part 3 | ||
|
Senior Guru
|
How much would a build like this cost Just curious how much money I'll need in my piggybank when the time comes. I haven't tracked my car much so it might be a long while however sooner or later.
|
||
Posted on: 2009/9/9 2:54
|
|||
|
_________________
The few, the proud, the crazy, the LT1 owners association :thumbright: |
|||
|
Transfer
|
|
||
| Matatk | Re: 700R4-4L60 Build Up Part 3 | ||
|
Webmaster
 
|
Man, Pete, you're really scaring me for when I tackle my trans rebuild myself. Ugh.
Matthew |
||
Posted on: 2009/9/9 4:11
|
|||
|
_________________
2002 EBM convertible, Magnusson supercharger, cam, headers, etc. 1989 Corvette...RIP |
|||
|
Transfer
|
|
||
| PeteK | Re: 700R4-4L60 Build Up Part 3 | ||
|
Moderator
|
Quote:
Remember that I am counting every nickel spent, including the core, derale pan, and the $1064.00 gearset. Converter is not factored in. Many additioal "hard parts" are not normally needed, but this core was a mess. Currently, I am at $2700 out of pocket, with zero dollars budgeted for labor. I will give a complete breakdown at the end. ***Remember this is a prototype build, and does not represent what would be a typical performance build. |
||
Posted on: 2009/9/9 14:23
|
|||
|
_________________
"It was really on a pass until it came apart." "Yeah. They always are." |
|||
|
Transfer
|
|
||
| iCorvette | Re: 700R4-4L60 Build Up Part 3 | ||
|
Senior Guru
 
|
is this the biggest and baddest tranny to date?
|
||
Posted on: 2009/9/9 15:20
|
|||
|
_________________

|
|||
|
Transfer
|
|
||
| PeteK | Re: 700R4-4L60 Build Up Part 3 | ||
|
Moderator
|
Actually, no. The cost of the aftermarket planetary makes it the most expensive, but it could be beefed up more.
On this build, the intention is to build a duplicate to what is in my car now, with the exception of a better 3-4 clutchpack, and the prototype gears. After I determine which trans is the best for my combination, I will pull it back out, and make a few small changes to beef it up for the next motor. It should be a bit stronger than what I am running currently. |
||
Posted on: 2009/9/9 15:48
|
|||
|
_________________
"It was really on a pass until it came apart." "Yeah. They always are." |
|||
|
Transfer
|
|
||
| PeteK | Re: 700R4-4L60 Build Up Part 3 | ||
|
Moderator
|
Quote:
Thanks Andy. Simply put, an auto trans is a hydraulic unit that activates a clutchpack or a band. When this occurs, it puts certain geartrain parts in a bind (locks them solid). This causes a different drivetrain part to rotate, thus changing gear ratios. Everything else inside relates to the timing of these mechanical (via hydraulic pressure) parts to control the exact time it happens, and releases. |
||
Posted on: 2009/9/10 1:13
|
|||
|
_________________
"It was really on a pass until it came apart." "Yeah. They always are." |
|||
|
Transfer
|
|
||
| BillH | Re: 700R4-4L60 Build Up Part 3 | ||
|
The Stig Moderator
 
|
Pete, It's always great to see craftsman to things right.
There's way too much half ass in this world (see the thread on Shops in Chat). BTW, I have that same silly woodgrain table. Carry it in the race trailer. |
||
Posted on: 2009/9/10 2:08
|
|||
|
_________________
Every man dies but not every man lives. |
|||
|
Transfer
|
|
||
| bogus | Re: 700R4-4L60 Build Up Part 3 | ||
|
Grand Imperial Pooh-Bah
|
Quote:
That almost makes sense...  |
||
Posted on: 2009/9/10 2:26
|
|||
|
_________________
The single biggest problem with communication is the illusion that it has taken place. - George Bernard Shaw Education is the best tool to overcome irrational fear. - me |
|||
|
Transfer
|
|
||
| PeteK | Re: 700R4-4L60 Build Up Part 3 | ||
|
Moderator
|
Quote:
Just think of it a about 5,000 small little things that happen in sequence, instead of 1 complicated transmission :-) |
||
Posted on: 2009/9/10 2:30
|
|||
|
_________________
"It was really on a pass until it came apart." "Yeah. They always are." |
|||
|
Transfer
|
|
||
You can view topic.
You cannot start a new topic.
You cannot reply to posts.
You cannot edit your posts.
You cannot delete your posts.
You cannot add new polls.
You cannot vote in polls.
You cannot attach files to posts.
You cannot post without approval.
|
|